Quilted Cross Stitch Ornaments – Fabric Christmas Baubles
I planned to do some ‘Christmas in July’ type designs this year, but time kind of got away with me. Instead I’m going to learn how to make some quick cross stitch ornaments, starting with this quilted folded star ornaments. How is it July already anyway? I feel like this year has both horribly dragged on *and* flown by. At the same time.
These quilted ornaments are by no means unique to me. While I could not find the origin of this design, I found a number of ‘vintage’ examples of these, and countless tutorials. Regardless, today’s focus will be on adapting it for cross stitch design. I’ll link to the other tutorials I referenced at the bottom in case you prefer video tutorials or want a different perspective.
This post may contain affiliate links. If you buy something using one of these links, I earn a small commission. However, there is no extra cost to you. Thanks for understanding! Learn more in my Disclosures & Privacy Policy.
Table of Contents
Cross Stitch Pattern Design
The first order of business was to design a pattern that would fit inside the opening of the traditional quilted star pattern. I tried searching for sample patterns others had made previously to use as a size reference. But other than this ‘Easy Cross Stitch Folded Star Ornaments‘ book from 1989, I didn’t find much.
People are certainly making them, as I found ton of finished ornaments for sale on Etsy. However, even Pinterest’s propensity for uploading patterns against designer’s wishes could not help me. They probably exist, but I couldn’t find them. So here we are.
Needing to figure out the sizing myself, I did what any good crafter would do. I made a mockup.
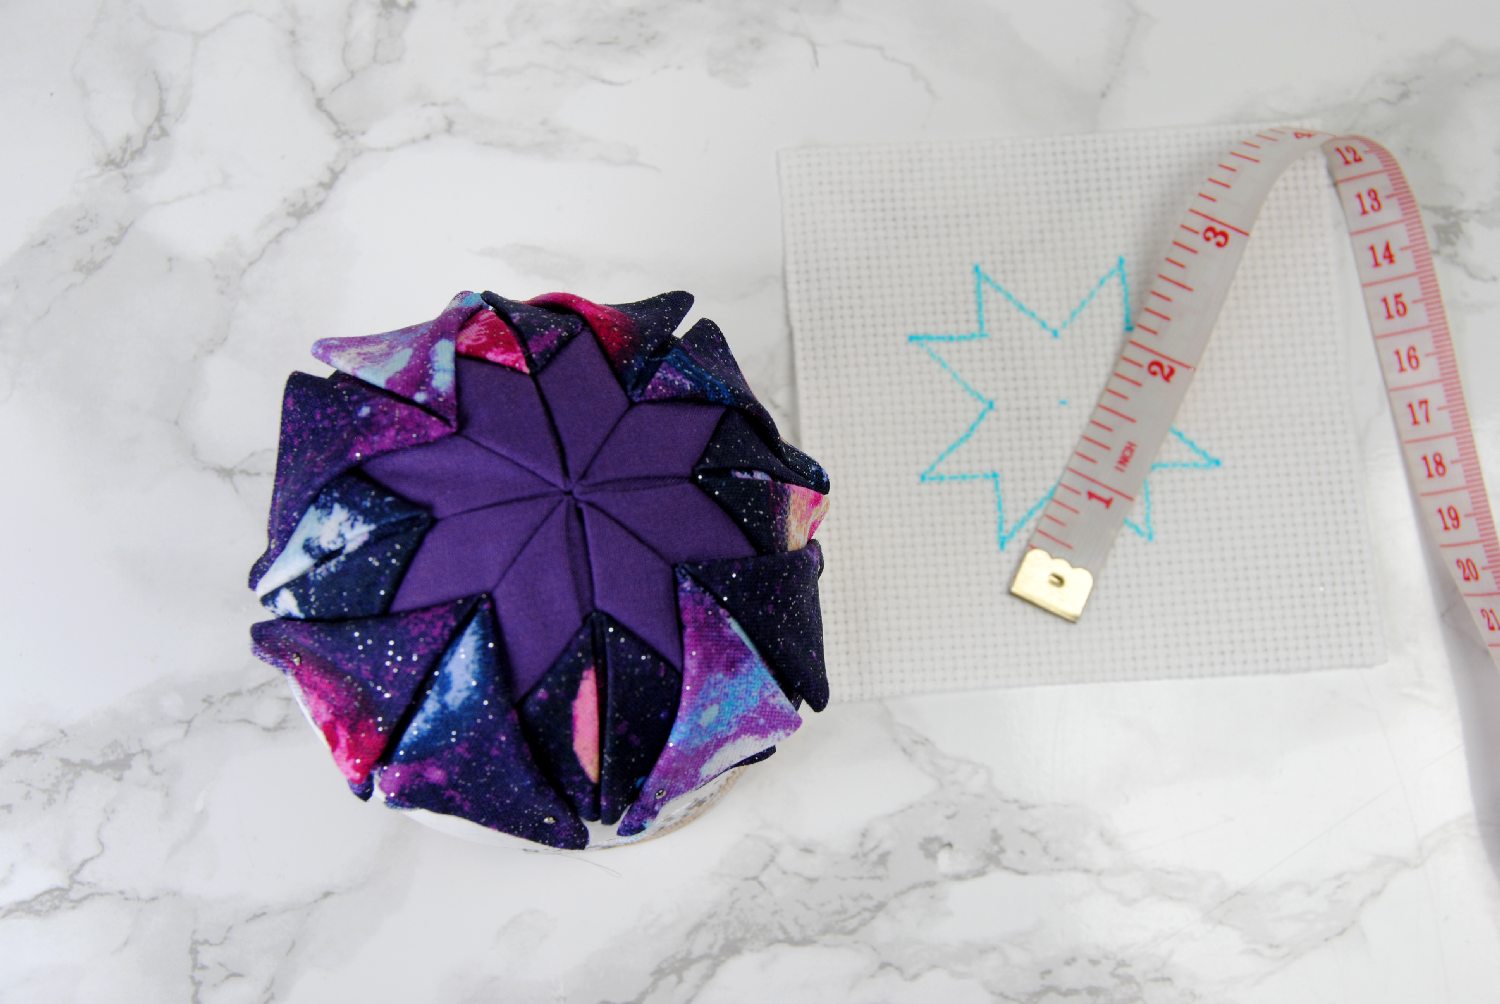
After doing the first two rows of fabric in the standard ‘quilted ornament’ design, I measured out those spaces and outlined it on a scrap of 14 count aida to test the fit. I kept to the whole stitches just inside the border so there’d be a little room around it showing off the background fabric.
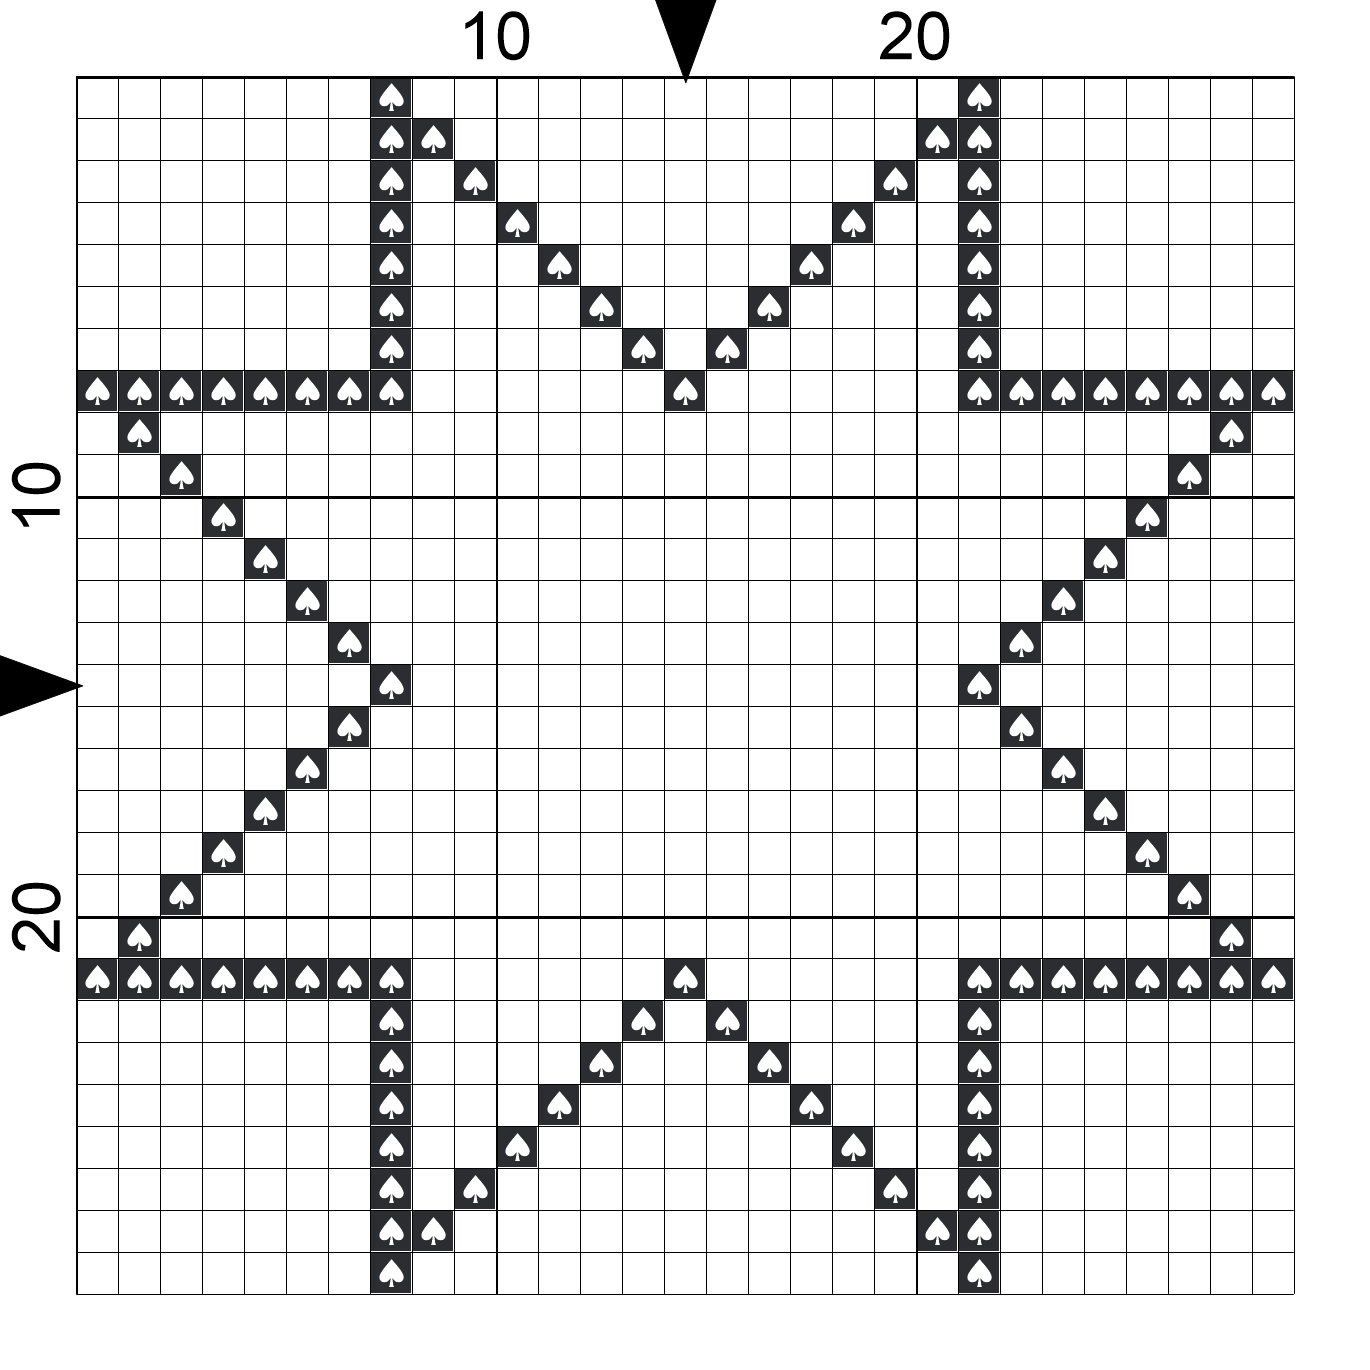
To save you from having to do this, here’s the general outline I came up with. There’s not much space inside, a 13×13 block for you to put a small motif in, such as my 1″ pendant design.
Note that this is based on 14 count fabric. If you use a higher count fabric though, you’ll have even more pixels to work with! I’ll let you figure out how to resize the outline for a new count though. I can’t do all the work for you. 😉
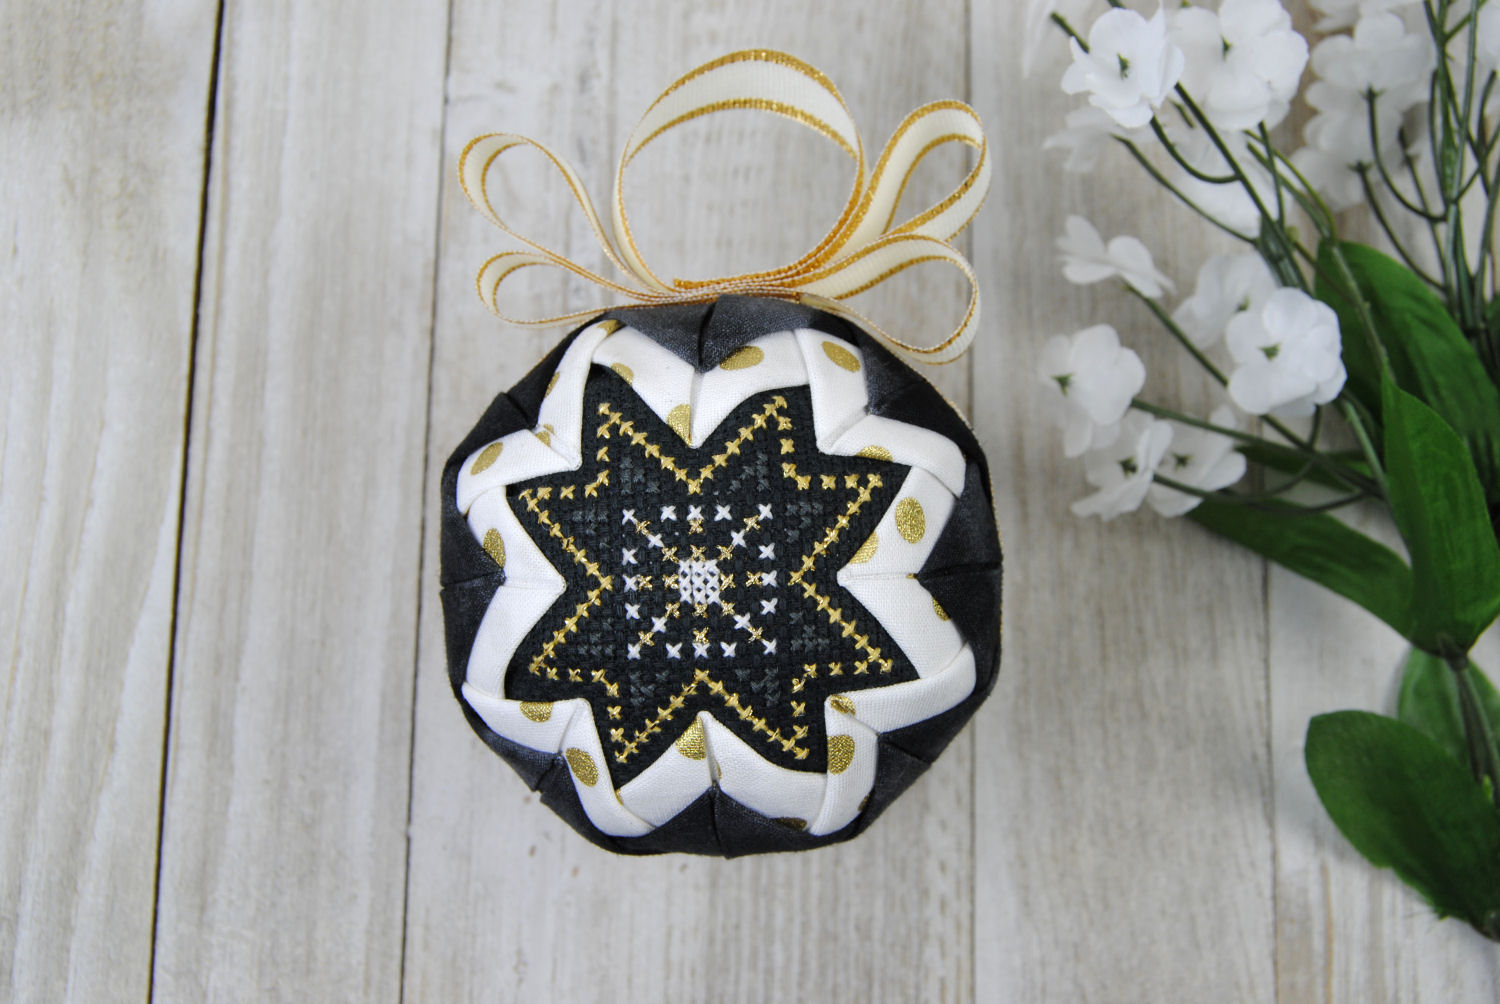
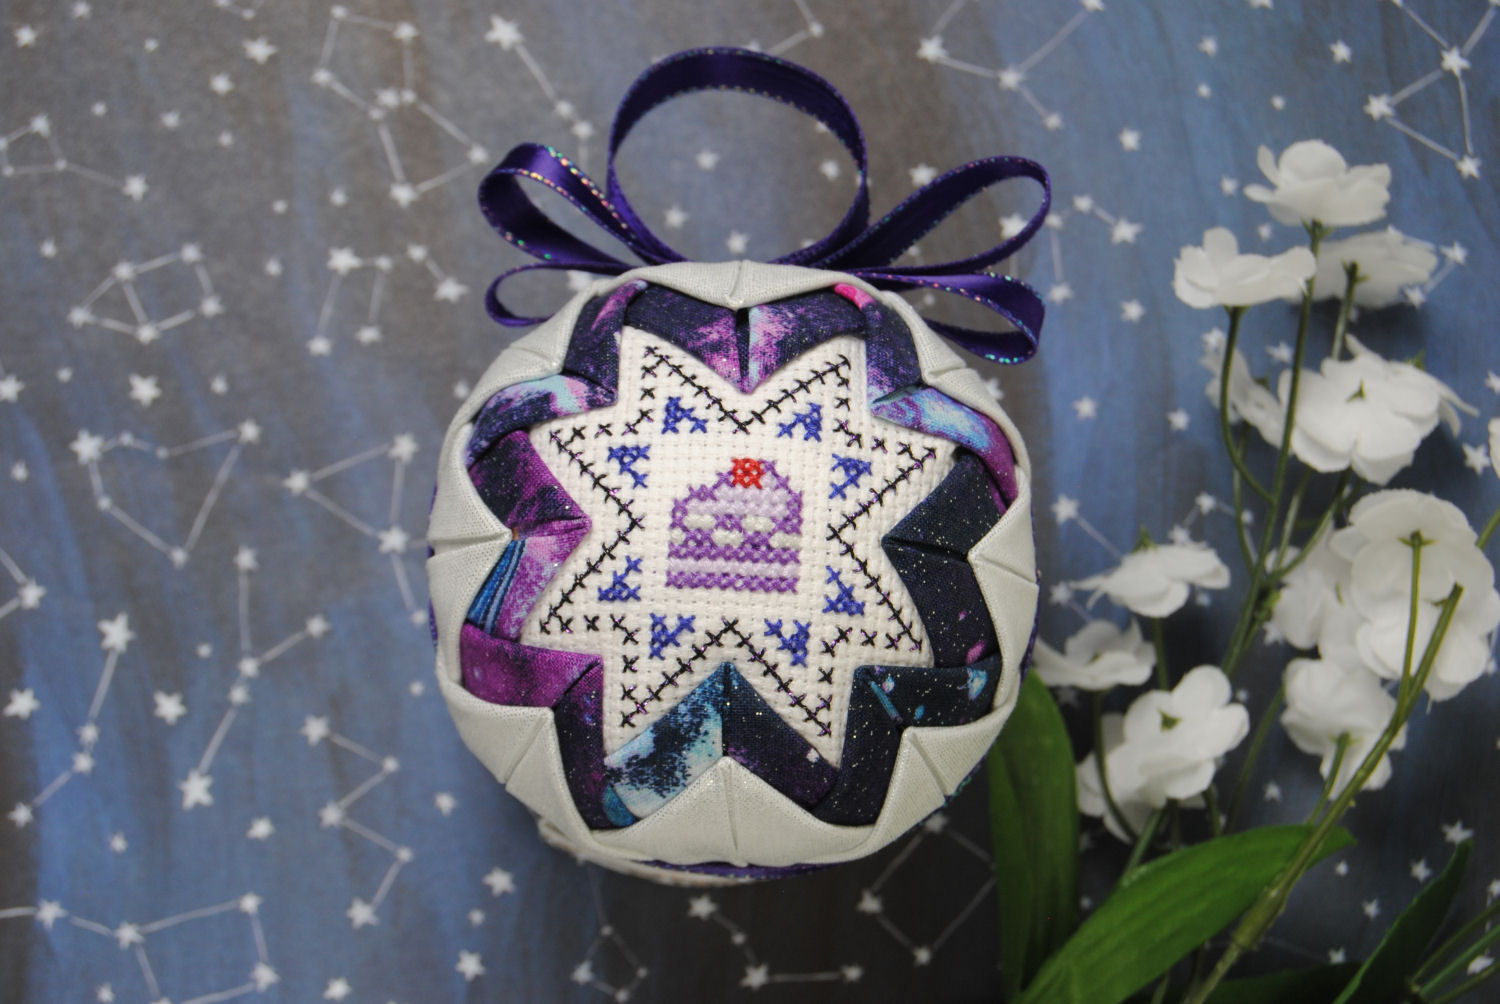
Now, I love this purple space fabric and will likely go back and finish that ball to gift to a friend once I figure out what my outer layer fabric will be. But my Christmas decorations (and even our wrapping paper!) last year were almost entirely Gold/Black/White themed. So I wanted one that would fit in without having to make all new ornaments.
If you’d like the simple geometric pattern I’ll be using for the rest of this tutorial, it’s available Free on Patreon.
Materials
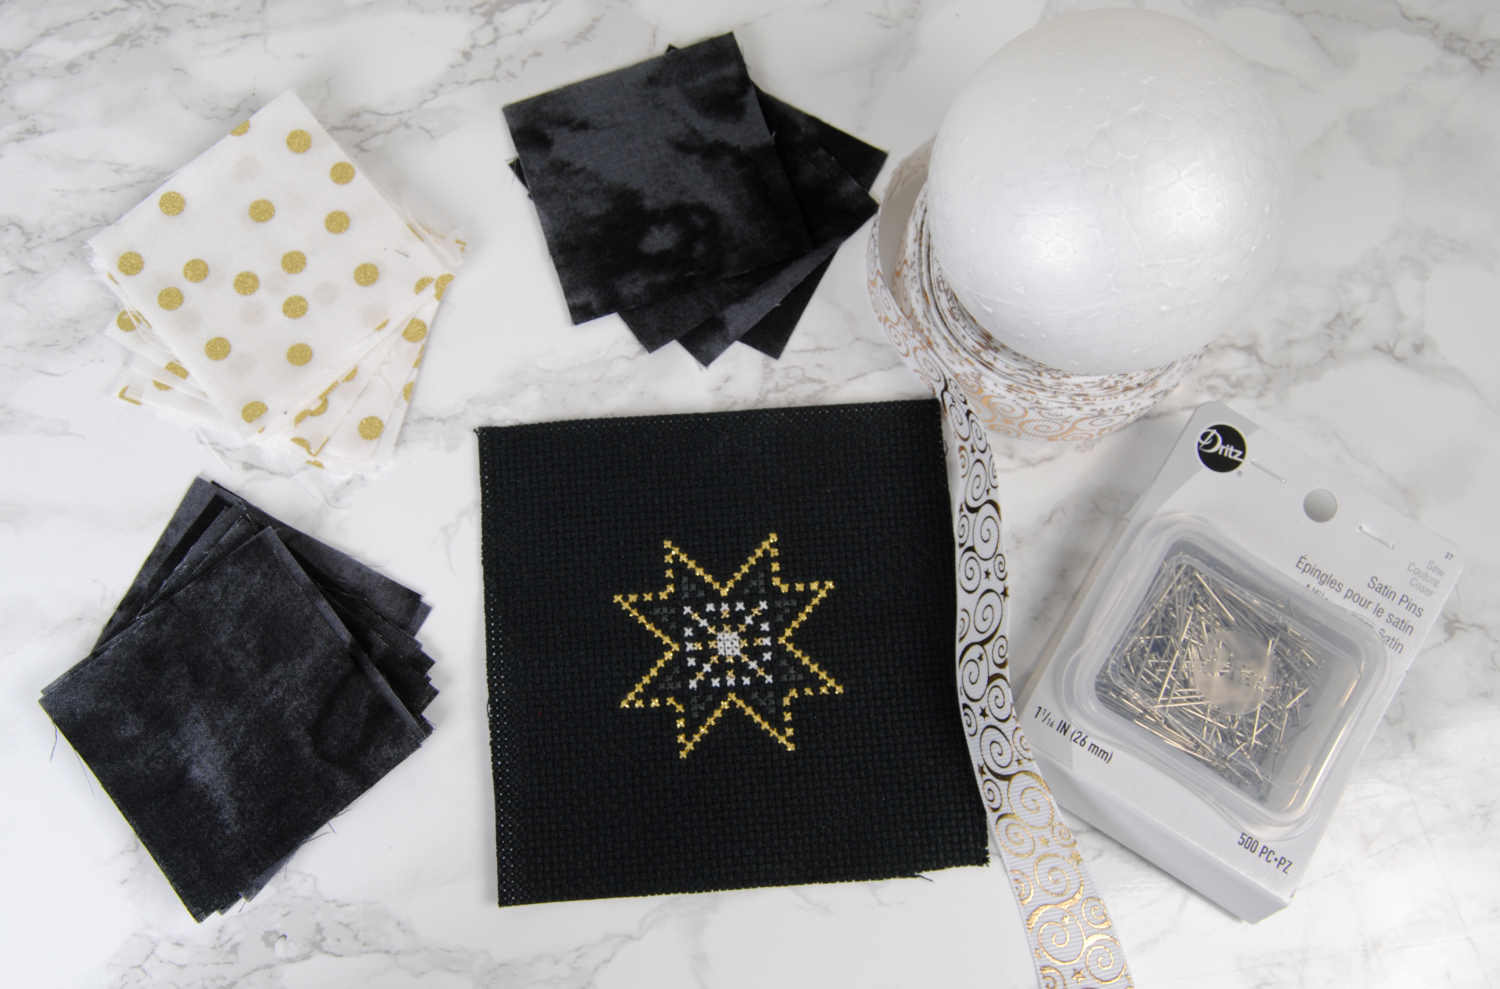
So what actually is needed for this? Not too much, but most of these things come in bulk so you’ll have enough materials to make several!
- Foam balls – I used 3″ (7.62cm) balls, so the pattern and fabric squares are based on that size. If you get bigger ones, you’ll need to do some math to figure out how much bigger your fabric will need to be.
- Straight Pins – Sometimes called Satin pins or Dressmaker pins. You’ll need about 200 pins per ornament, so keep that in mind depending on how many you’re planning to make.
- Fabric squares – You’ll need to cut 16 squares each of your second and third layer colors. These squares should be 2.5″x2.5″ (6.35cmx6.35cm). Jelly rolls are already cut into 2.5″ strips, so that’s an easy way to get half the cutting work done if you’re buying all new fabric. Otherwise, any fabric you have on hand will do. Mine were scraps left over from other projects. Ideally there’s high contrast between the layers, but you could also do a gradient.
- Cross Stitch design – You can just do the one, or have a second one on the opposite side. If you want just one side to be stitched, cut an extra 4 squares of whatever color fabric you want in the middle of your opposite side.
- Ribbon – Pictured in the materials photo is a 7/8″ gold swirl ribbon I bought off Amazon, but I ended swapping it out for a 5/8″ white and gold ribbon by the end of it. Either way, you want a decently thick ribbon to cover up the edges of your fabric squares. But the amazon ribbon made a terrific ball stand to hold it in place while I took photos! Otherwise the ball tends to immediately roll over as one side gets heavier with fabric.
Attaching your cross stitch accent piece
We’re starting with your cross stitch accent piece. It really doesn’t matter where on the ball you start, but the natural seam of the foam may help you line up the opposite side later, so try to align it to that if you can.
I quite simply just pinned the sides down, then the top and bottom, and finally the corners. You’ll note there’s some wavy fabric still- that’s okay! It will get covered up as you go. You can gently push the folds as far towards the corners as it will go, though.
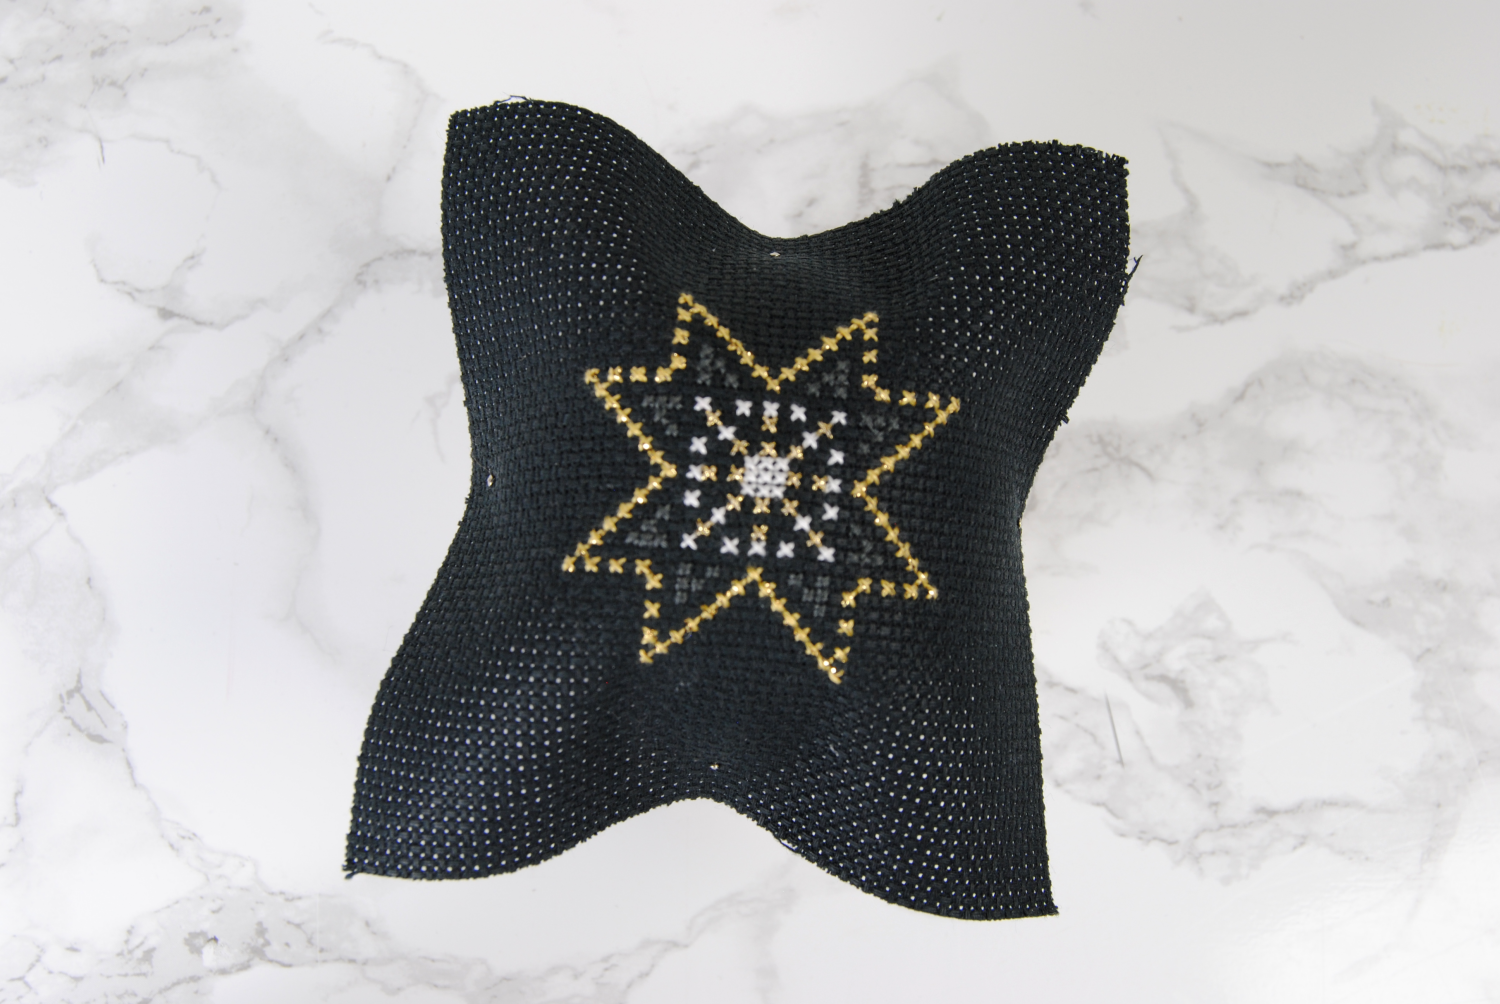
Note that if you’re doing a cross stitch on both sides, you may want to go ahead and pin the opposite side in due to the extra fabric. You can also trim the aida closer to the design than I did and not worry about it, though.
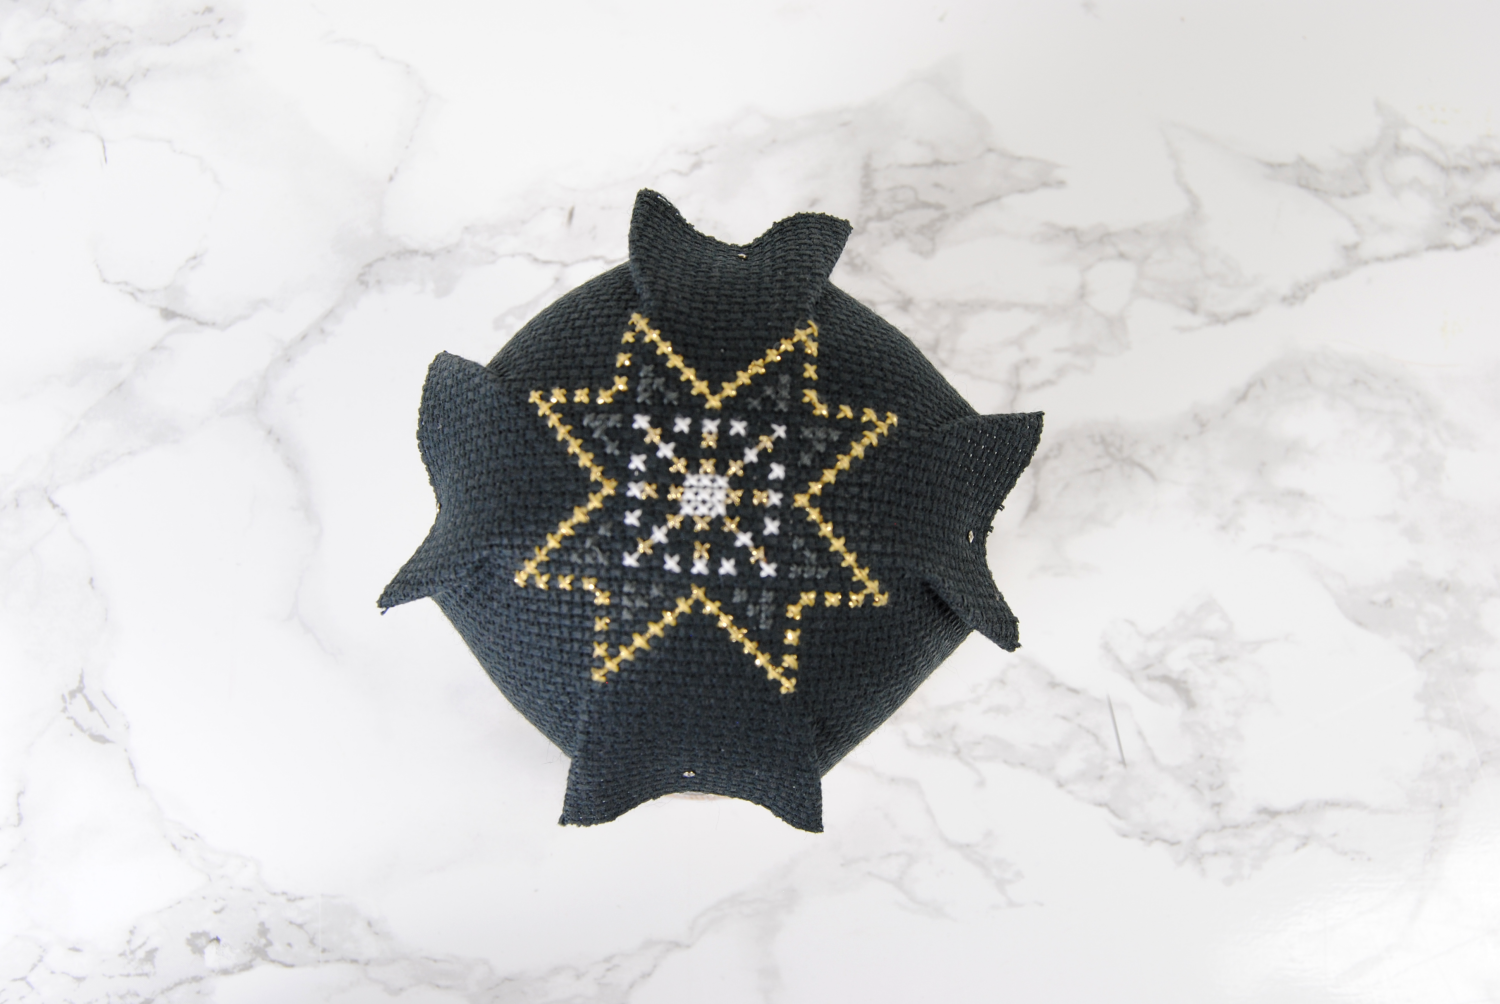
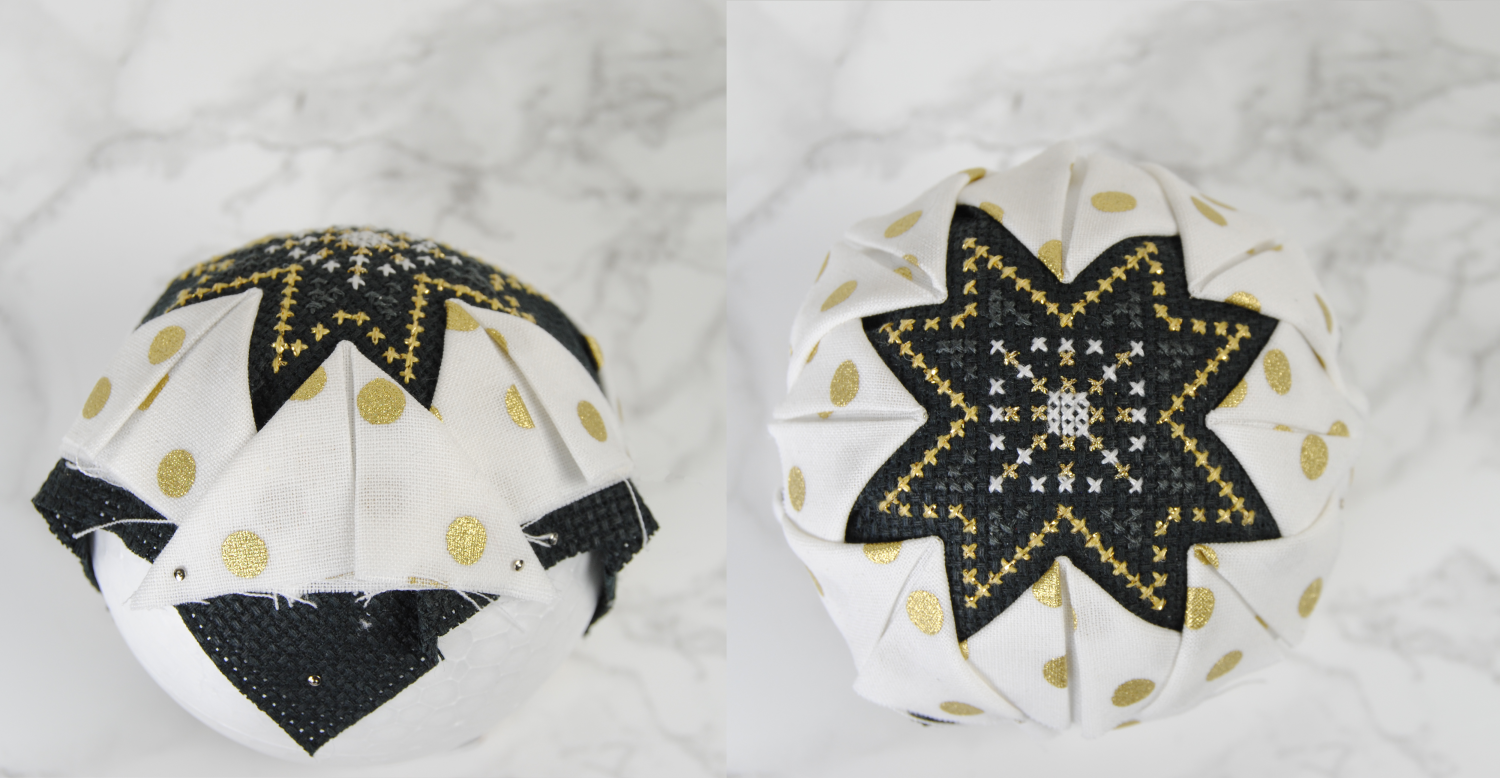
Your first quilted block
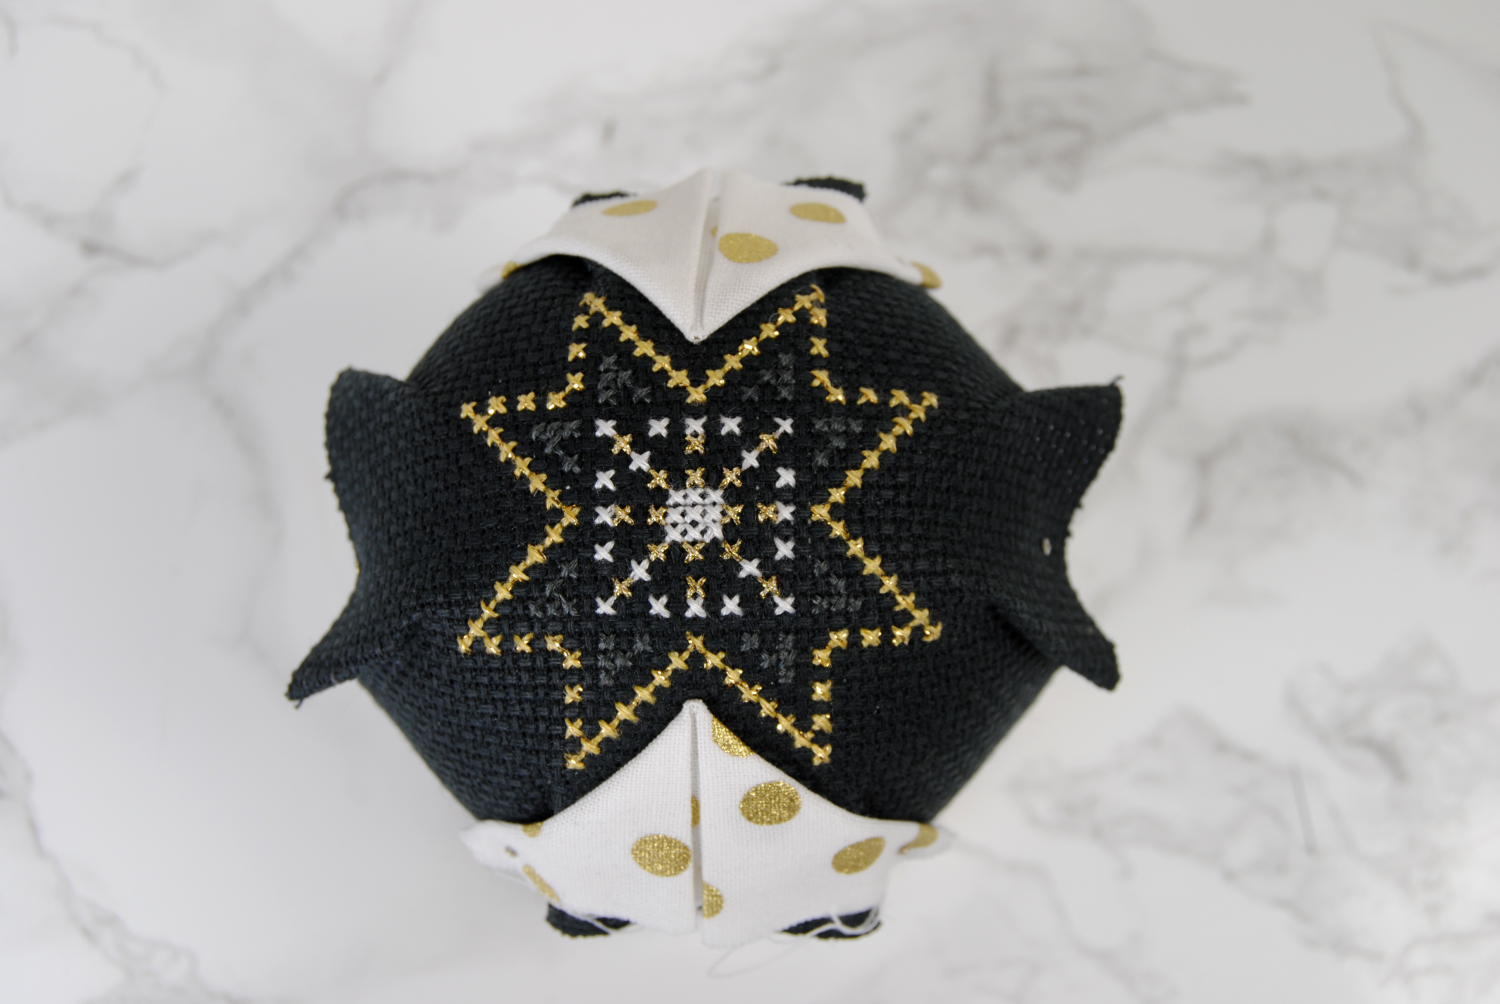
Okay, so this isn’t really quilting. But it’s creating a quilted effect in a way, so it’s often referred to as a quilted ornament. The actual procedure is quite simple.
Take a square of your middle fabric color. In my case I did a white so it would really stand out between the black aida and the dark fabric I chose for my outer layer.
Stick a pin in the center of the ‘wrong’ side of the fabric. You can fold it in squares to determine the center. You’ll be folding it anyway, so don’t worry about creases.
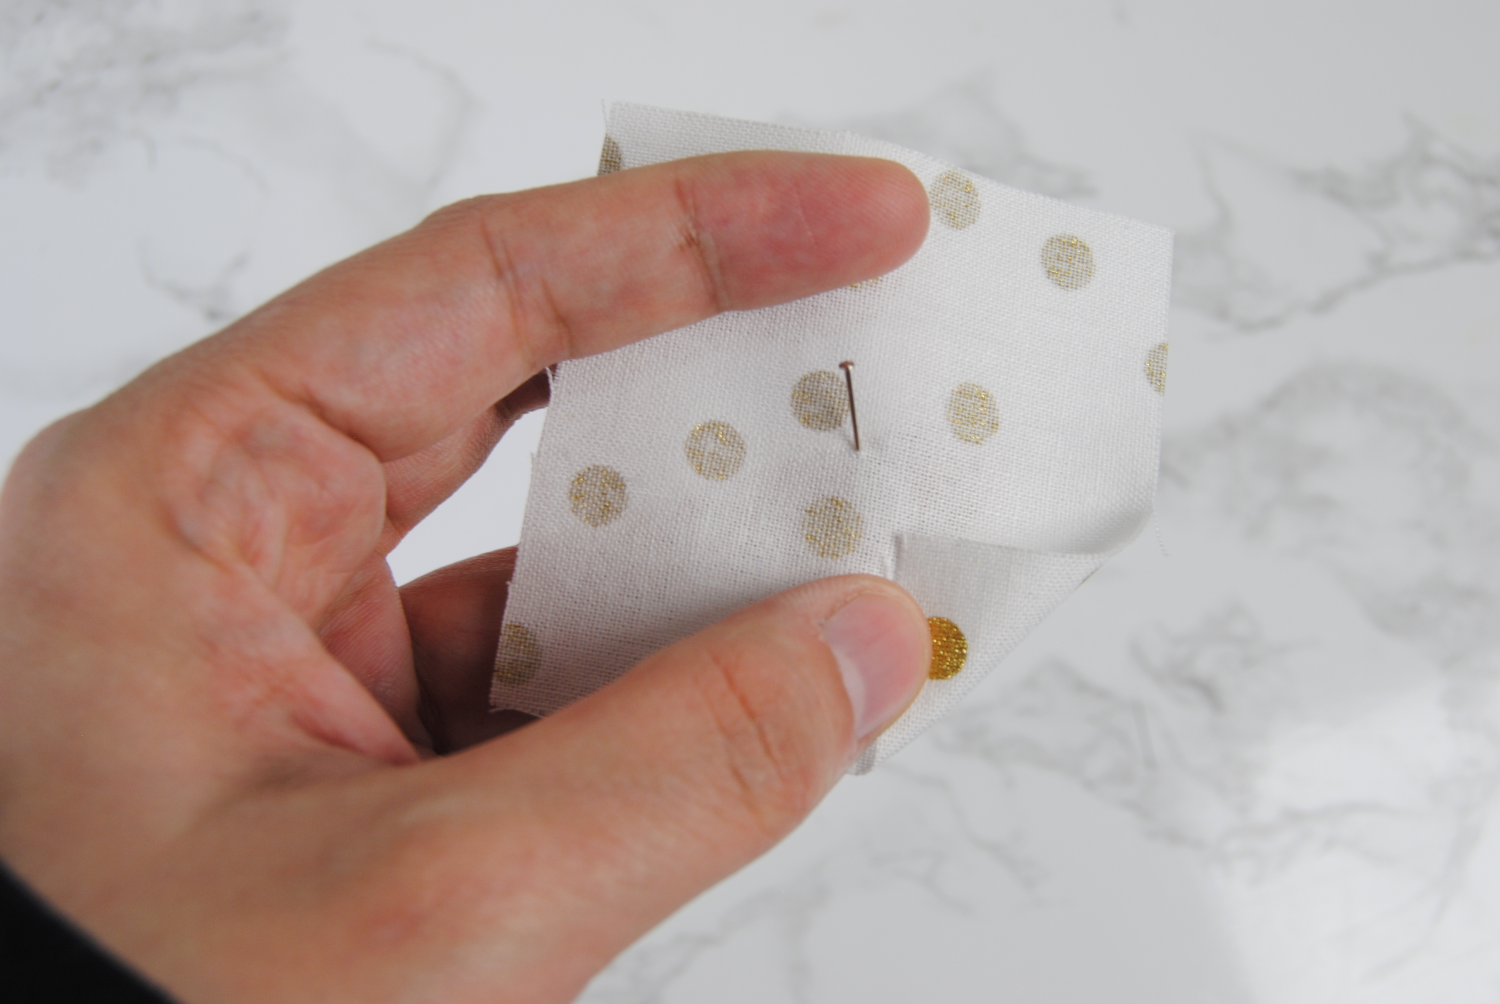
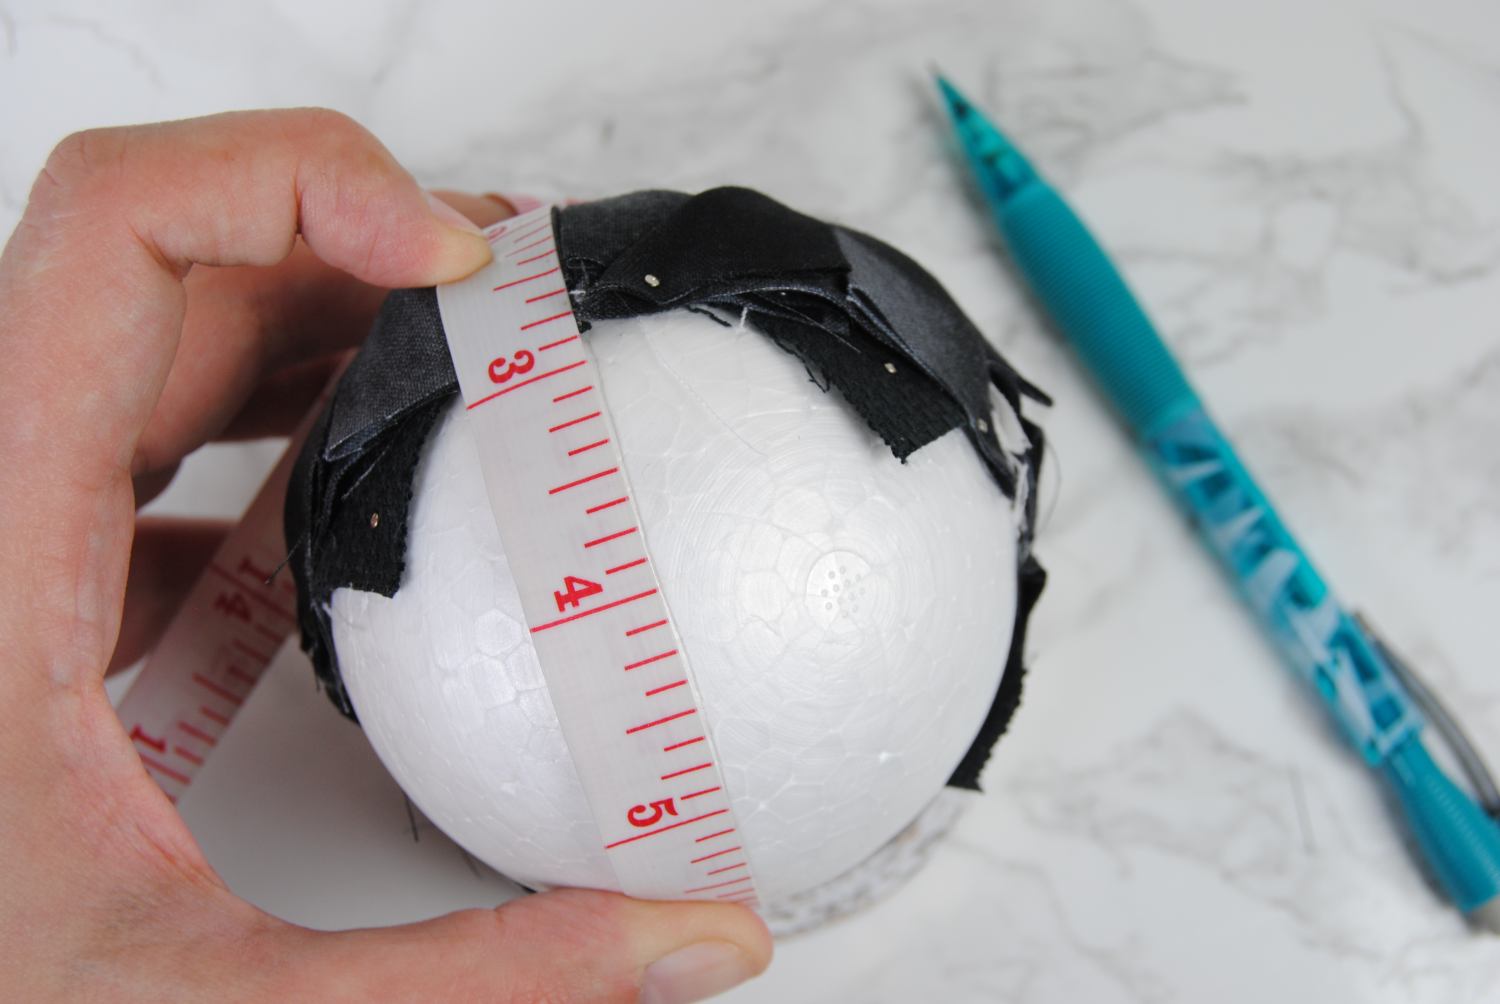
Now stick that pin onto your ball. I placed mine two squares down from one of the valleys of my stitched design. This should be 3/4″ (2cm) from the center of your design. See the photo for reference if needed.
Now fold your square in half away from the center.
Fold the two corners down to create this triangular shape, and pin it in place. If you’re not liking how the pattern is showing up on here, unfold it, rotate it and try again. As many times as you need to.
Remember only 1/2″ (1.27cm) strip of the top of this triangle will be visible in the final project. So in my example below, only that top left polka dot will be visible anyway.
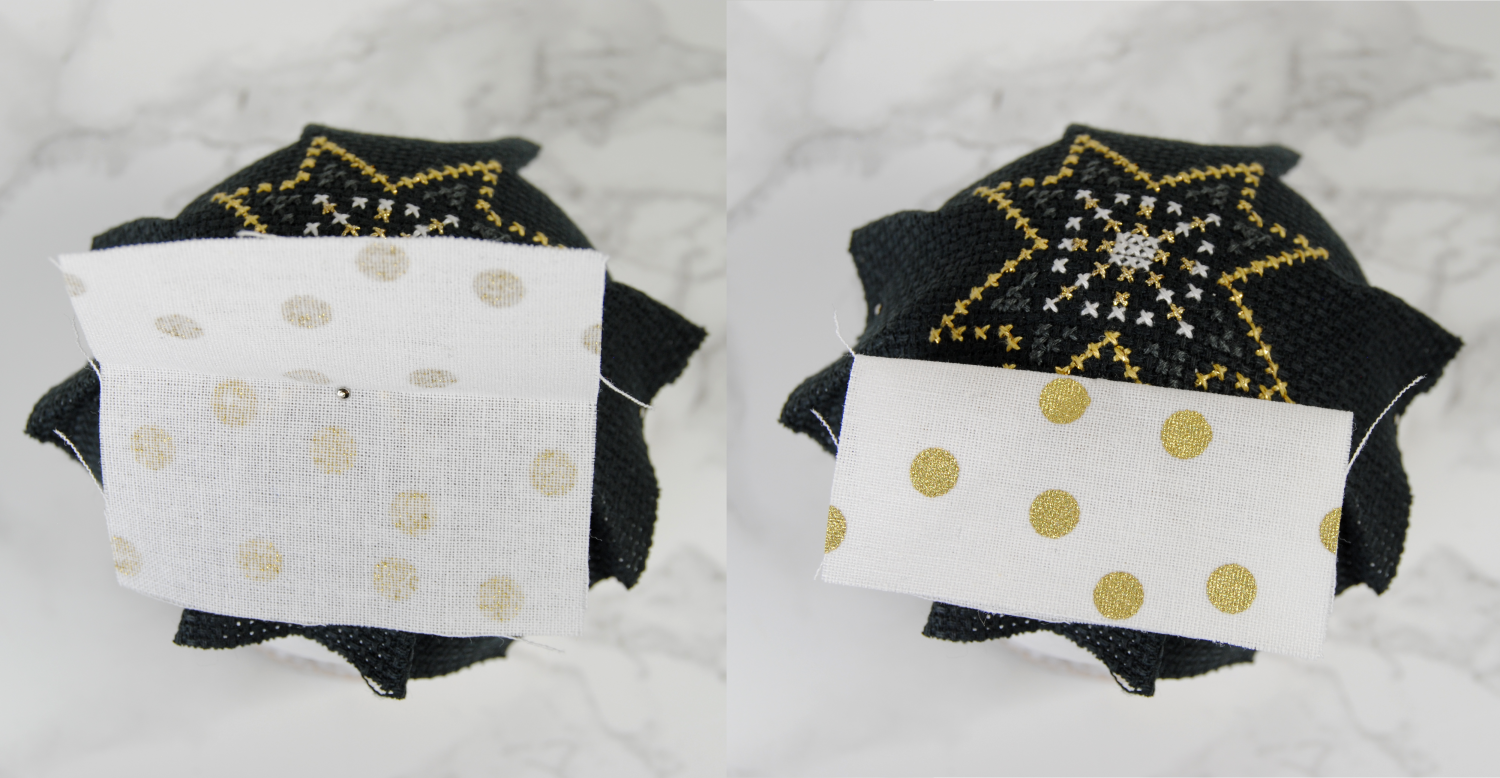
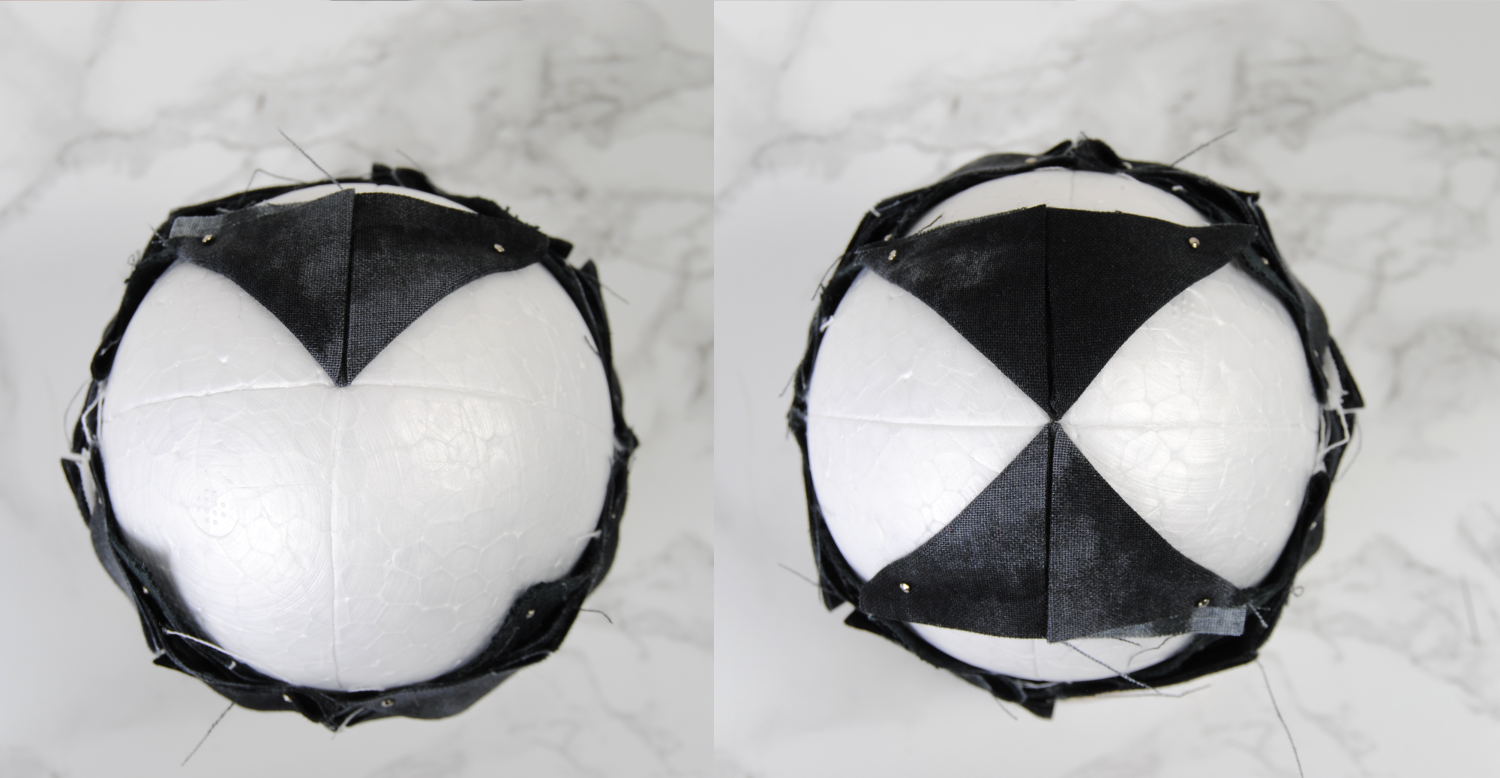
And now we’ll repeat that roughly 35 times.
Continue the first quilted layer
Next up, do the section immediately across from your first. This will help keep it balanced and avoid you having to go back and change it too much if you get all the way around and it doesn’t quite line up.
You’ll then move on to the left and right sides, and finally start with the corners. Always working across first. Don’t worry if it’s not perfectly even though. It’s a handmade bauble and it’s not meant to be perfect.
You’ll see the pieces start to cover up the sides of the aida and hiding those awkward folds. See I told you you wouldn’t have to worry about it.
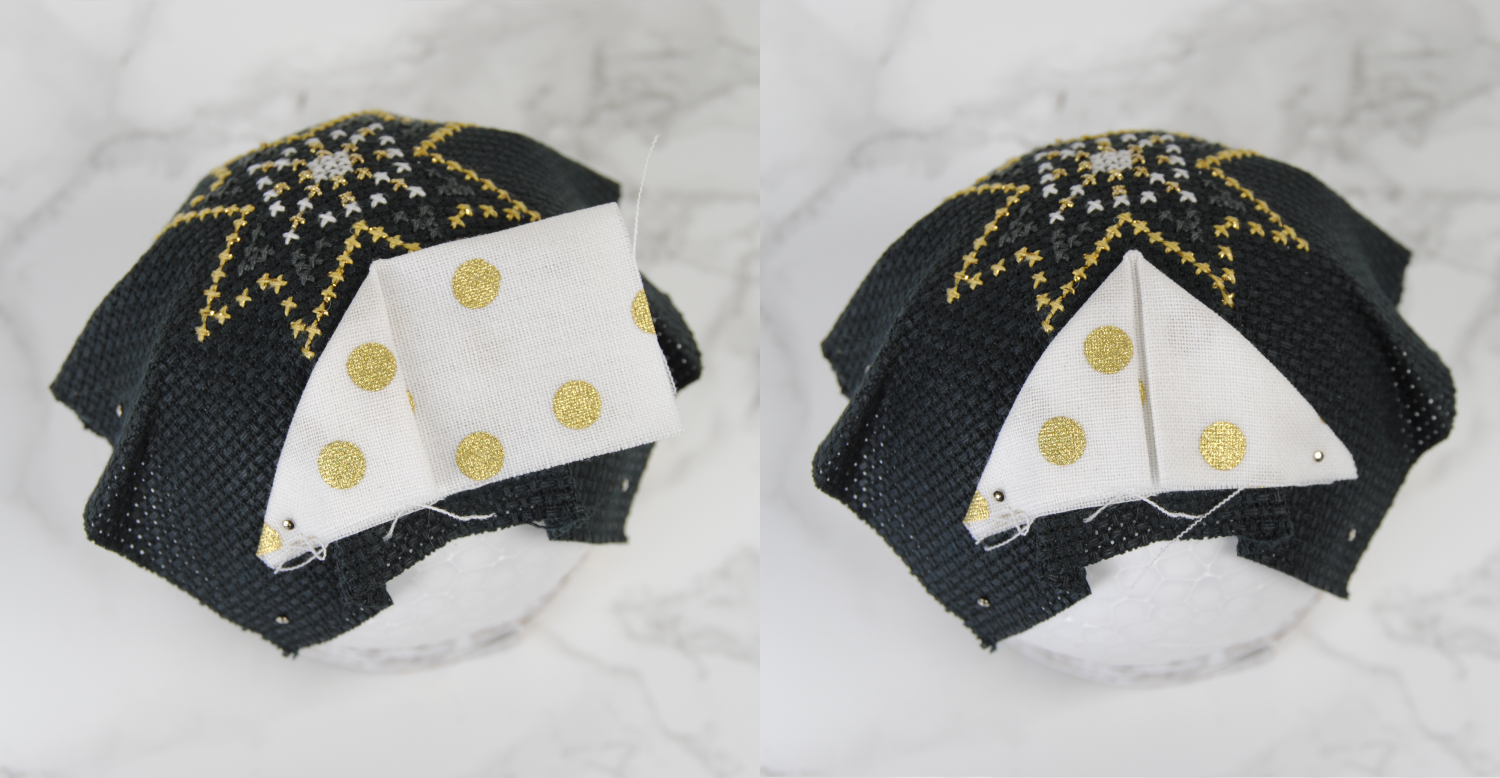
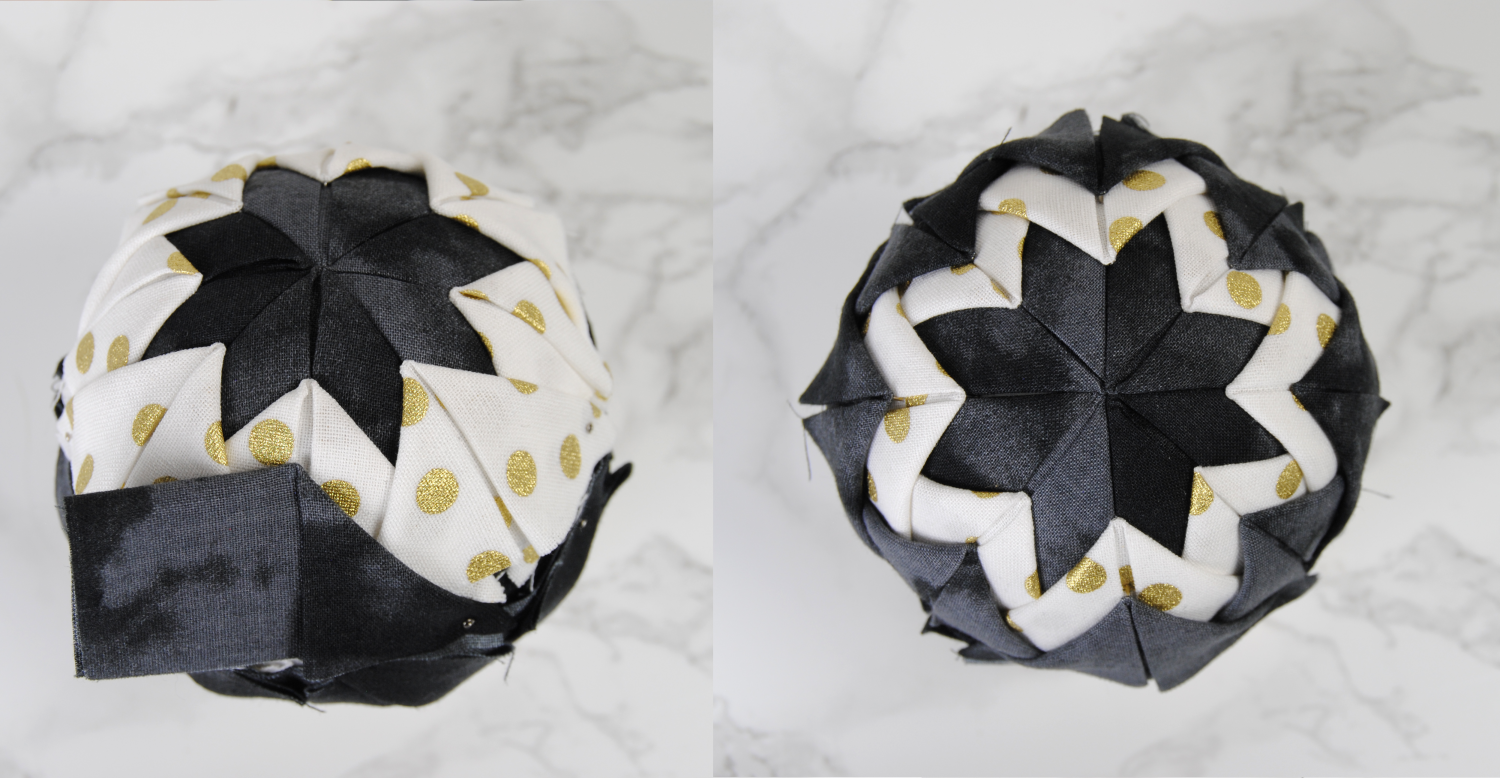
Quilted Layer 3 – More of the same
Ready to start the next layer? You’re doing the same thing, but a 1/2″(1.27cm) from the tip of your second layer. I picked out this lovely marbled black fabric because I knew I’d have a light colored ribbon and wanted it to stand out as much as possible.
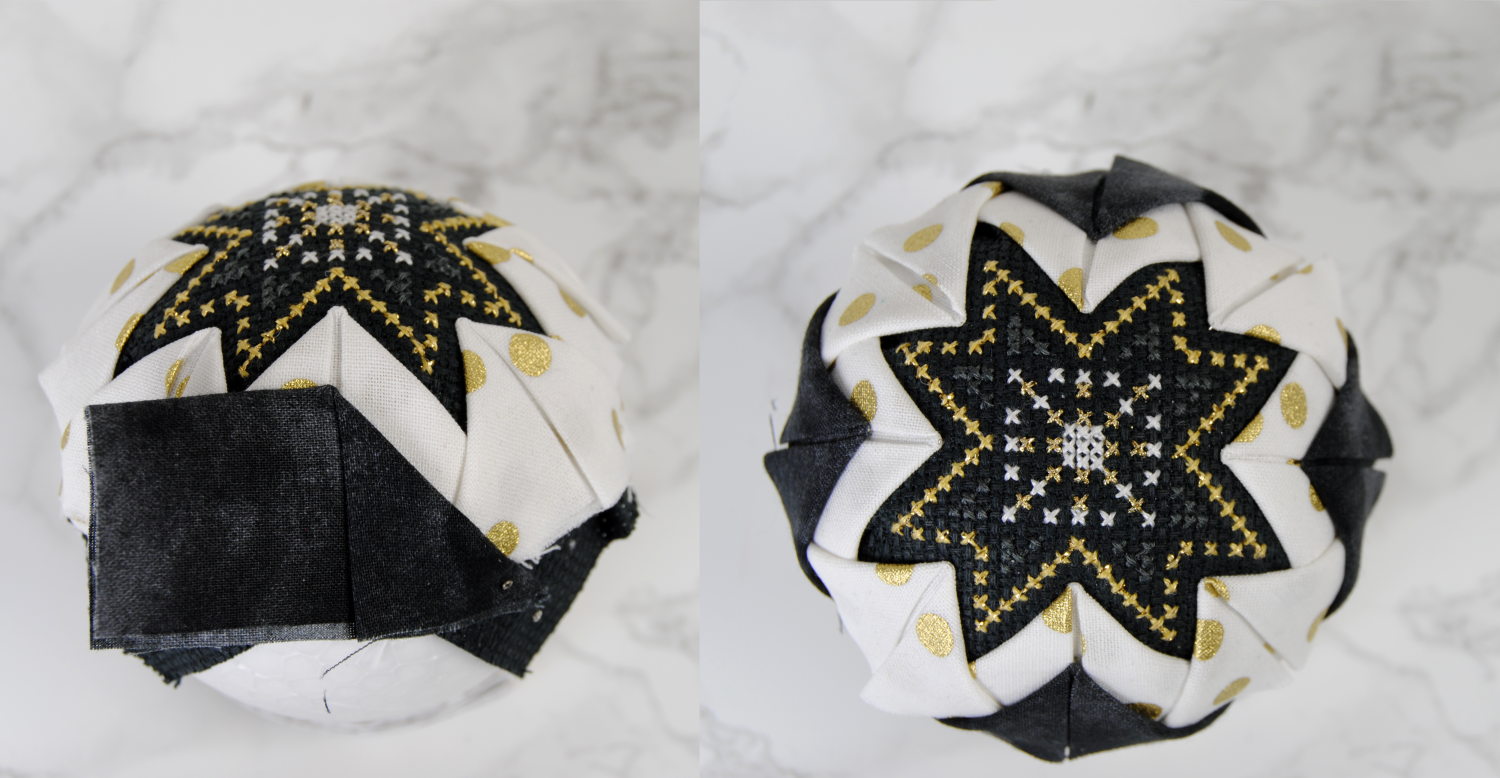
Keep going around as before, always alternating sides. You’re doing great, I promise.
You’ve likely gotten the hang of it by now, but as a reminder, feel free to rotate the fabric if it doesn’t look quite right, or s swap it out for a new square if you don’t like the way the pattern is showing. For the outer layer you’ll see a bit more of the triangle. About an inch (2.54cm) from the tip will be visible.
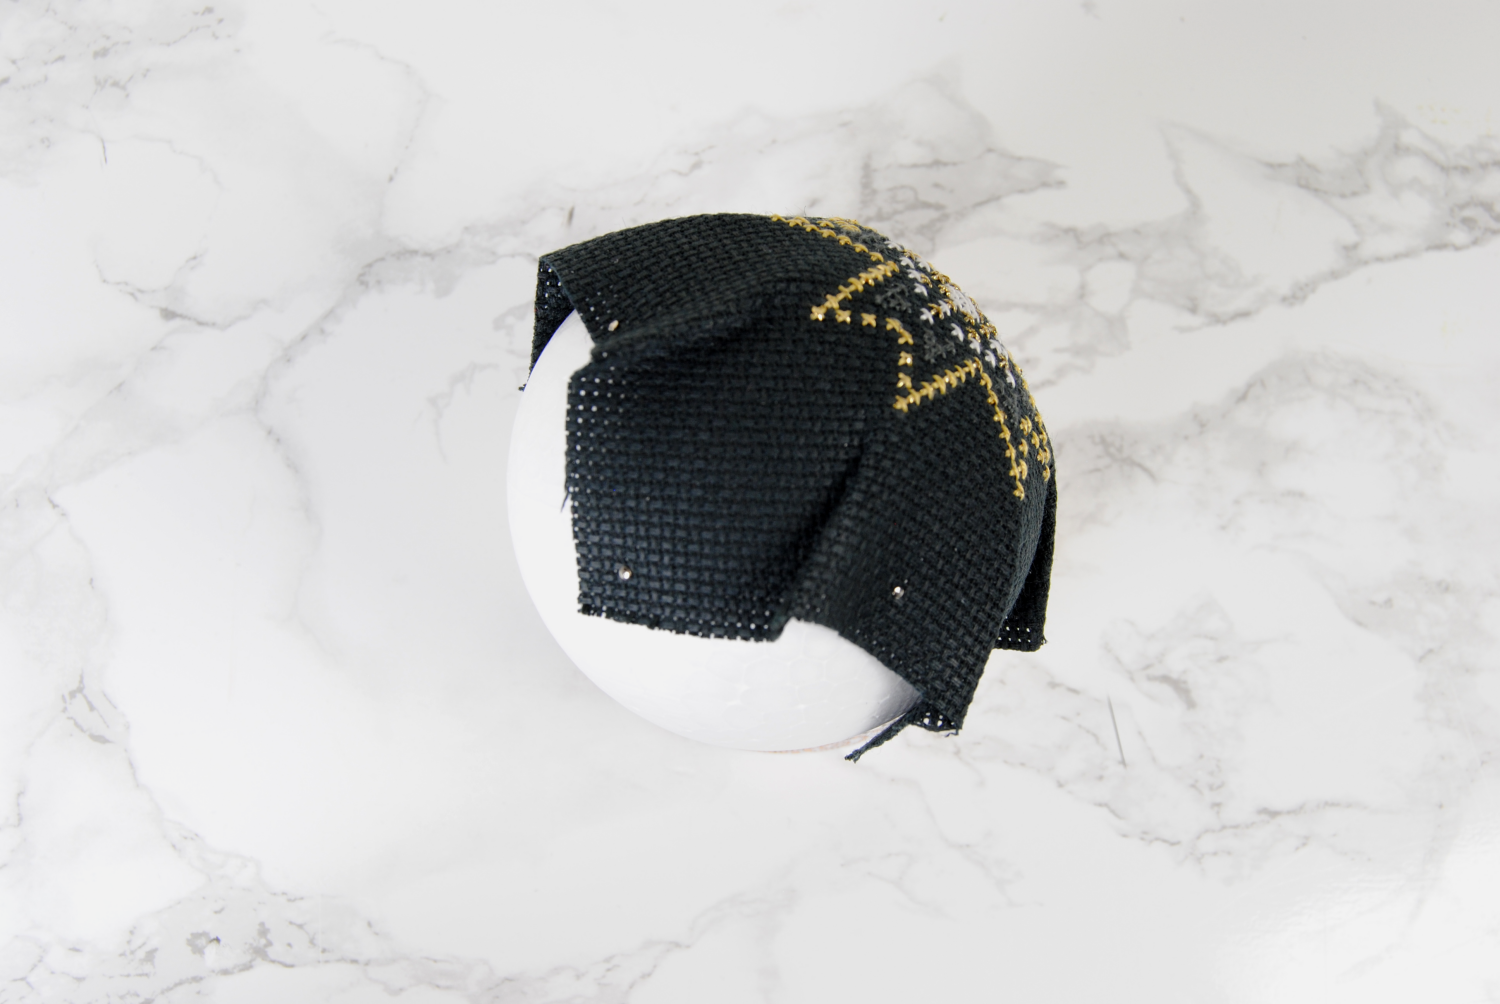
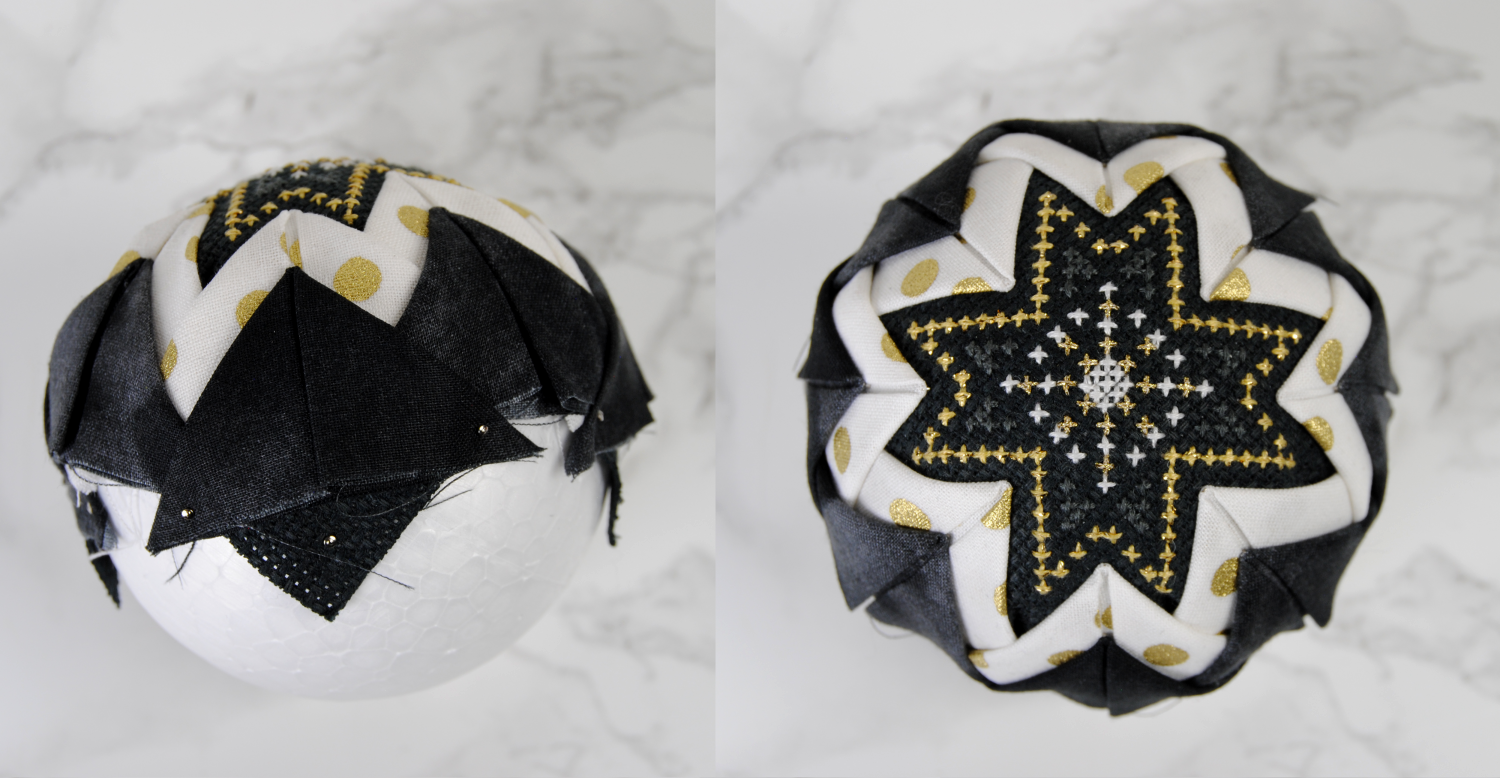
Now flip it over and do it all again!
Here’s the only ‘tricky’ part. Now that you’re done with one side, you have to flip it over and do the same thing all over again!
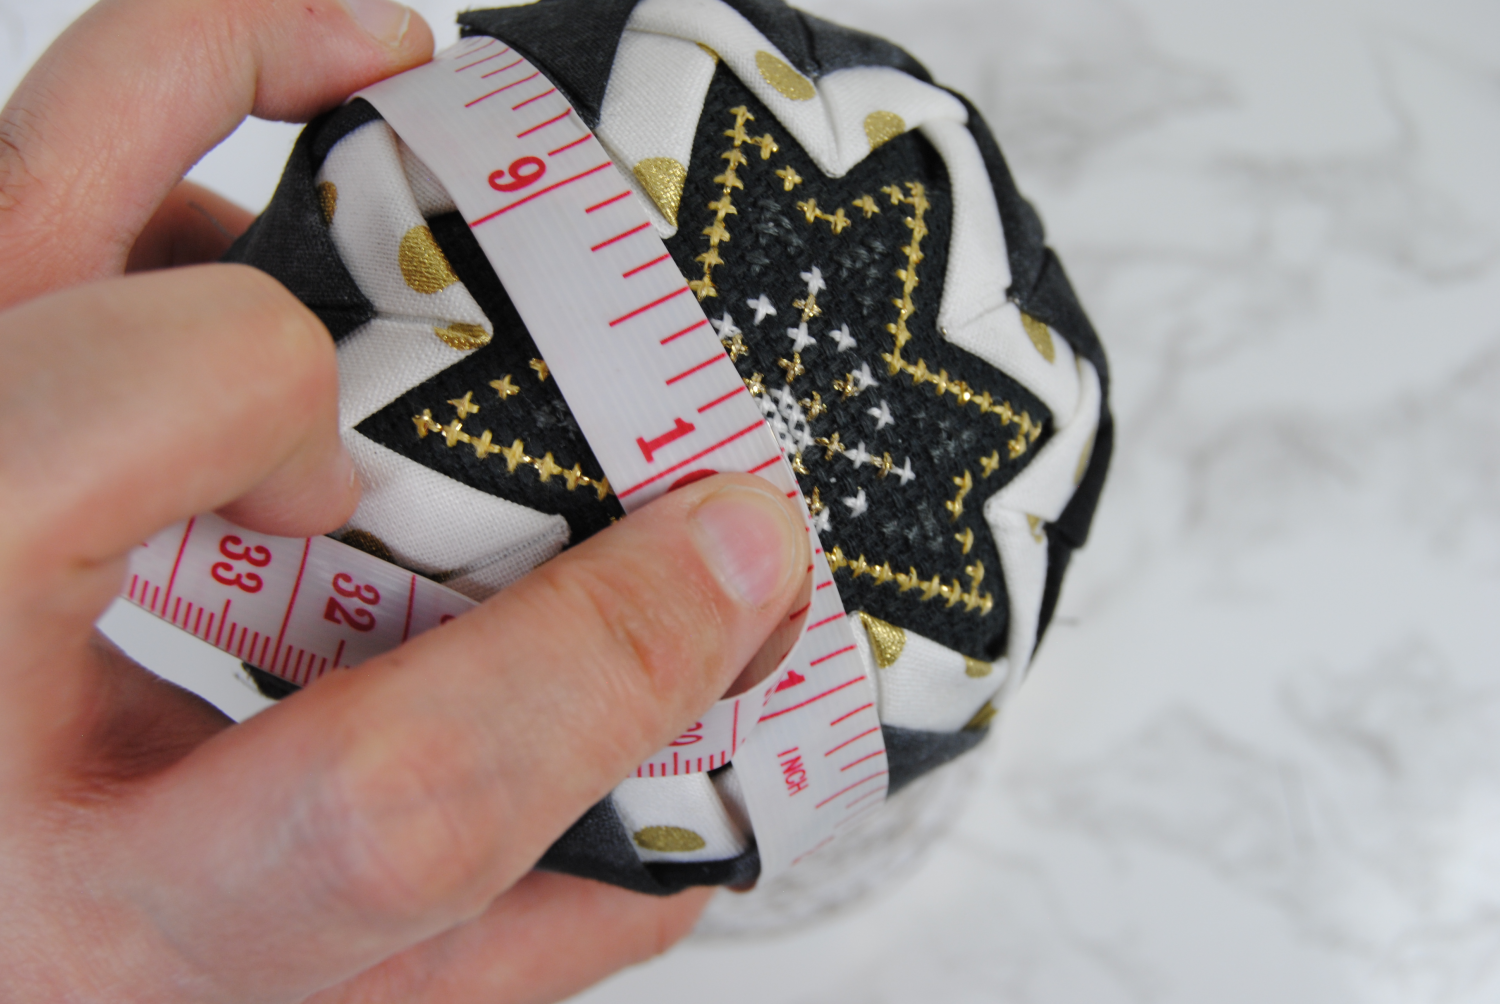
I didn’t trust myself to eyeball it, so using the ‘tracks’ of the quilted layers I had down already, I used my measuring tape to draw a light line in the foam straight across.
I then did the same thing across the other side until I had a big X on the plain side of my ball. Presumably where those lines met would be the middle. Close enough, at least.
Since I’m not doing a cross stitch on both sides, I took the extra 4 squares I had cut of this dark fabric, and pinned them as close to the center as I could, again alternating to keep it as even as possible.
And then repeat the whole process. Second layer 3/4″ (2cm) from the center of the design. Third layer a 1/2″(1.27cm) from the tip of your second layer.
Cover up the side seams
Now that you’re done with both sides, you should see the third layer overlapping a little. If it’s not perfectly centered, you might see a little gap between them. Either way is fine, because you’ll be covering it up with a ribbon!
I didn’t like how the swirly ribbon looked with the polka dots, so I ended up swapping it out for this slightly thinner 5/8″ (1.58cm) ribbon. Thankfully my seams were close enough that it still covered it all.
Now, I pinned my ribbon in place using the lines of my third layer as reference points to keep them uniform. However, you could choose to glue yours in place if you want a ‘cleaner’ look.
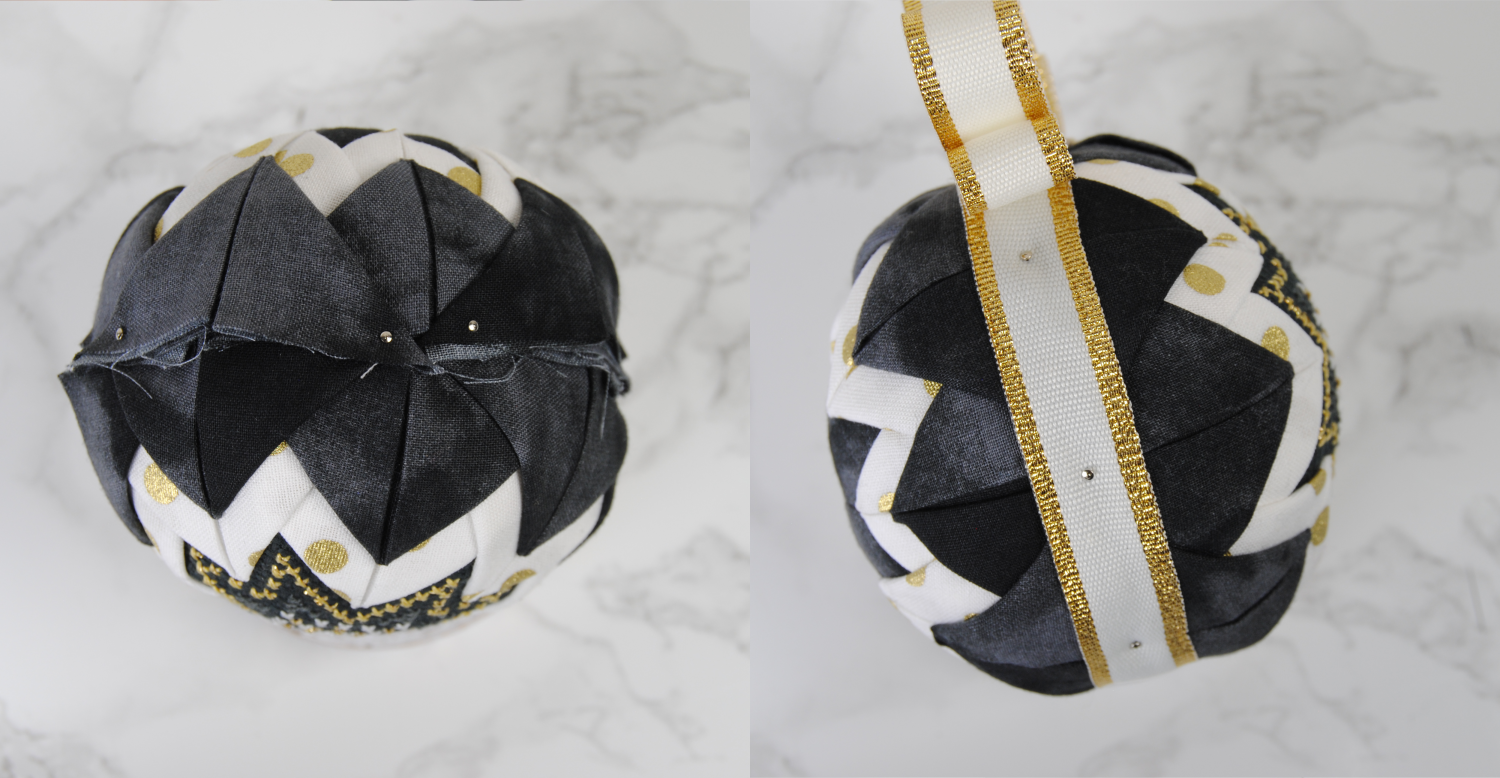
Start the ribbon at what will be the top of your ornament, and wrap it completely around. You can move bits of your third layer around if they don’t quite fall into place.
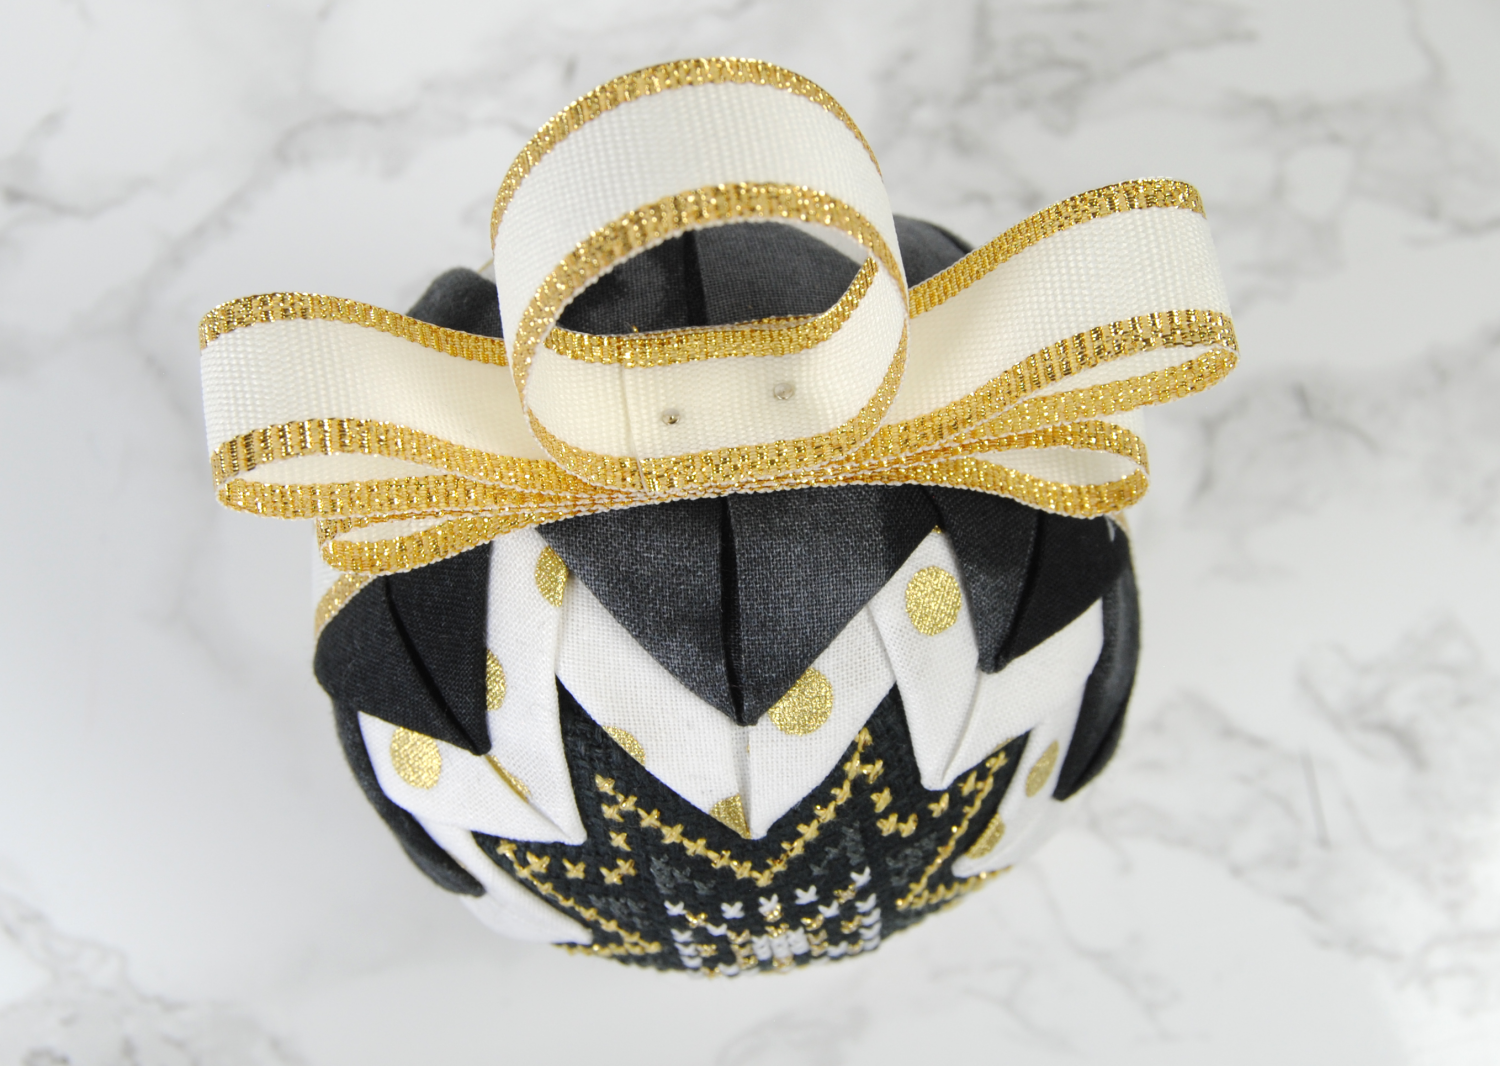
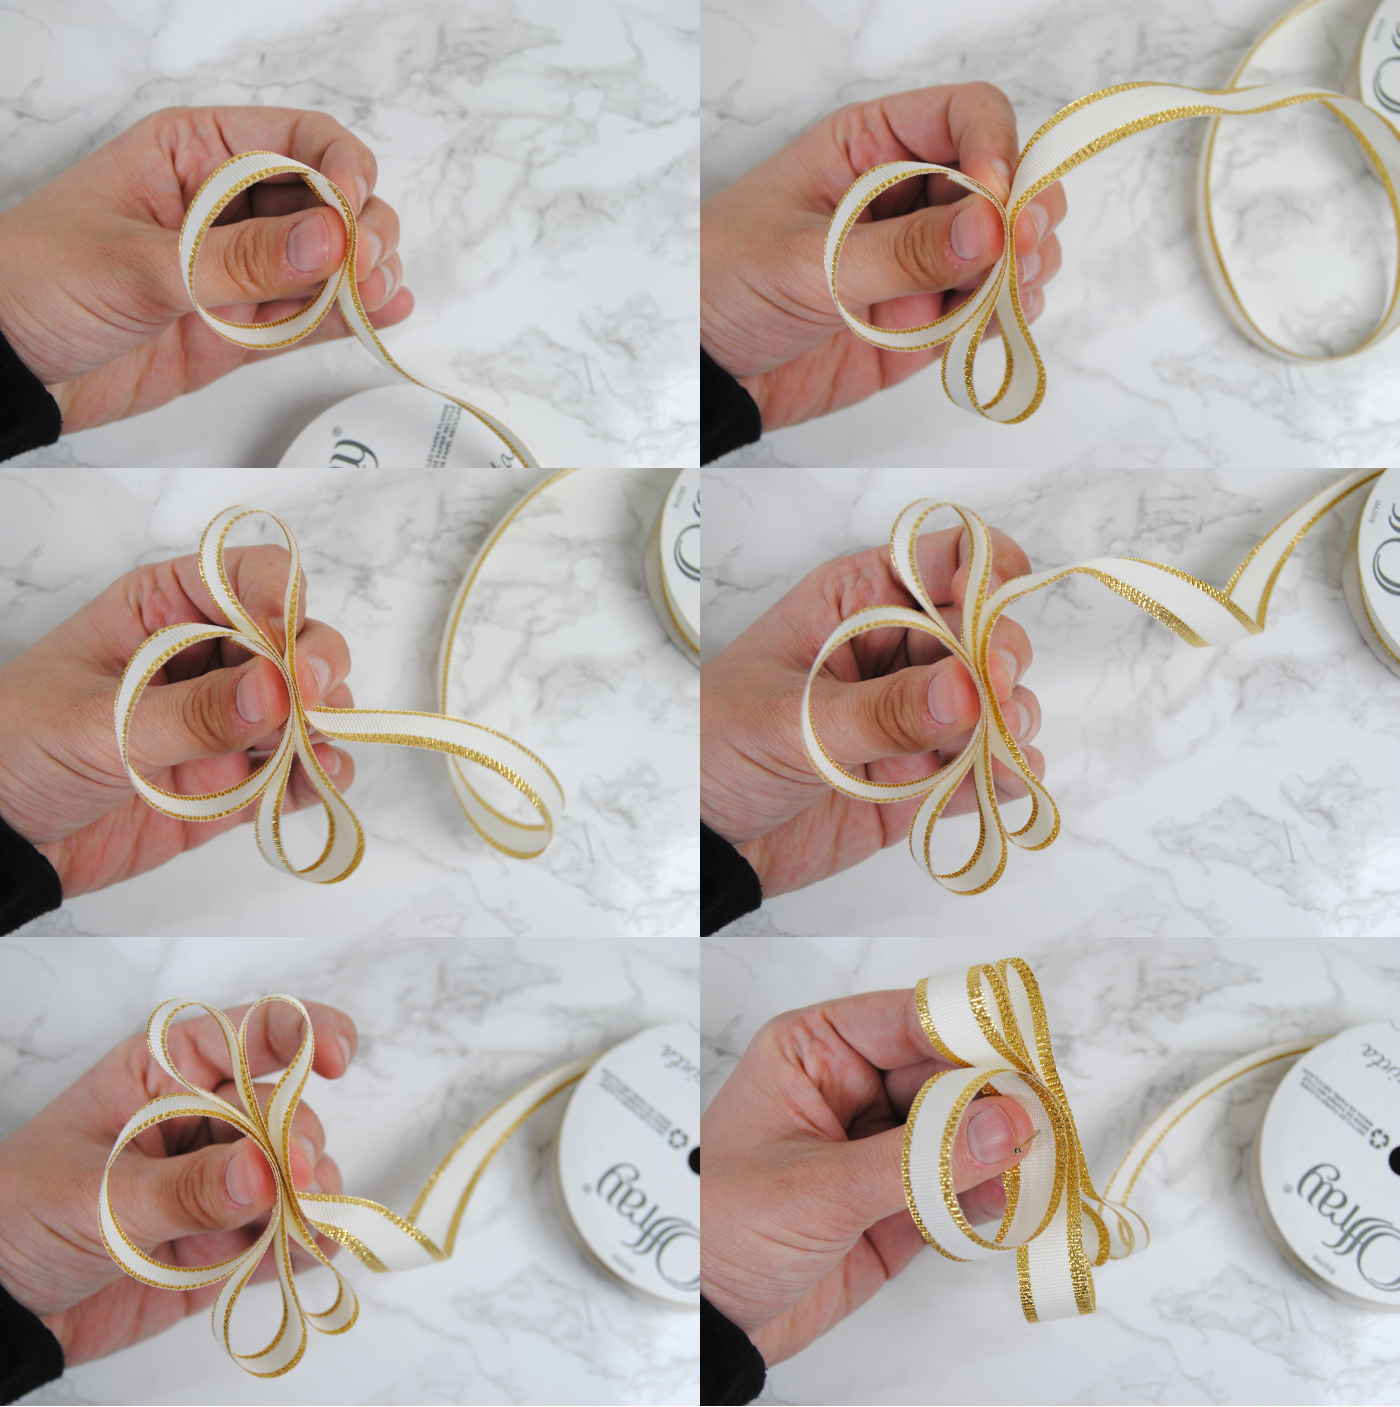
Once I got back up to the top I did some “loopdy loops” (I believe that’s the scientific term for it…) to add interest and to leave a loop for it to hang from. Then I pinned it in place. I… forgot to take pictures of this while still attached to the ball, so here’s me attempting to recreate it afterwards:
I think it turned out lovely, and I already have ideas for more I can make in the coming months so my tree this year isn’t all cheap amazon baubles. 😉 Oh! or making personalized ones as gifts for the family. Hmmmmm
Will you be trying this out? Be sure to tag me on Instagram/Twitter @sirithre so I can see what you came up with!
Since you’ve gotten this far, here’s what that purple one turned out like as well. 🙂
Next week I’ll be showing you a different style of ornament using some of the same materials! …but a lot less pins.
References used
If you’d like to see the tutorials I used to make this, or my descriptions just aren’t making sense for you, check out some of these awesome videos and tutorials:
Shabby Fabrics – No-Sew “Quilted” Christmas Ornament (Video)


