Bell Pull or Wall Hanging – Cross Stitch Finishing Tutorial
Bell Pulls are such an interesting finish that we don’t see referenced as often anymore. Even when we do, stitchers are often unaware of their history and they are now just known for being a long thin wall hanging. So let’s discuss the origins of the bell pull and then talk about how to make one yourself!
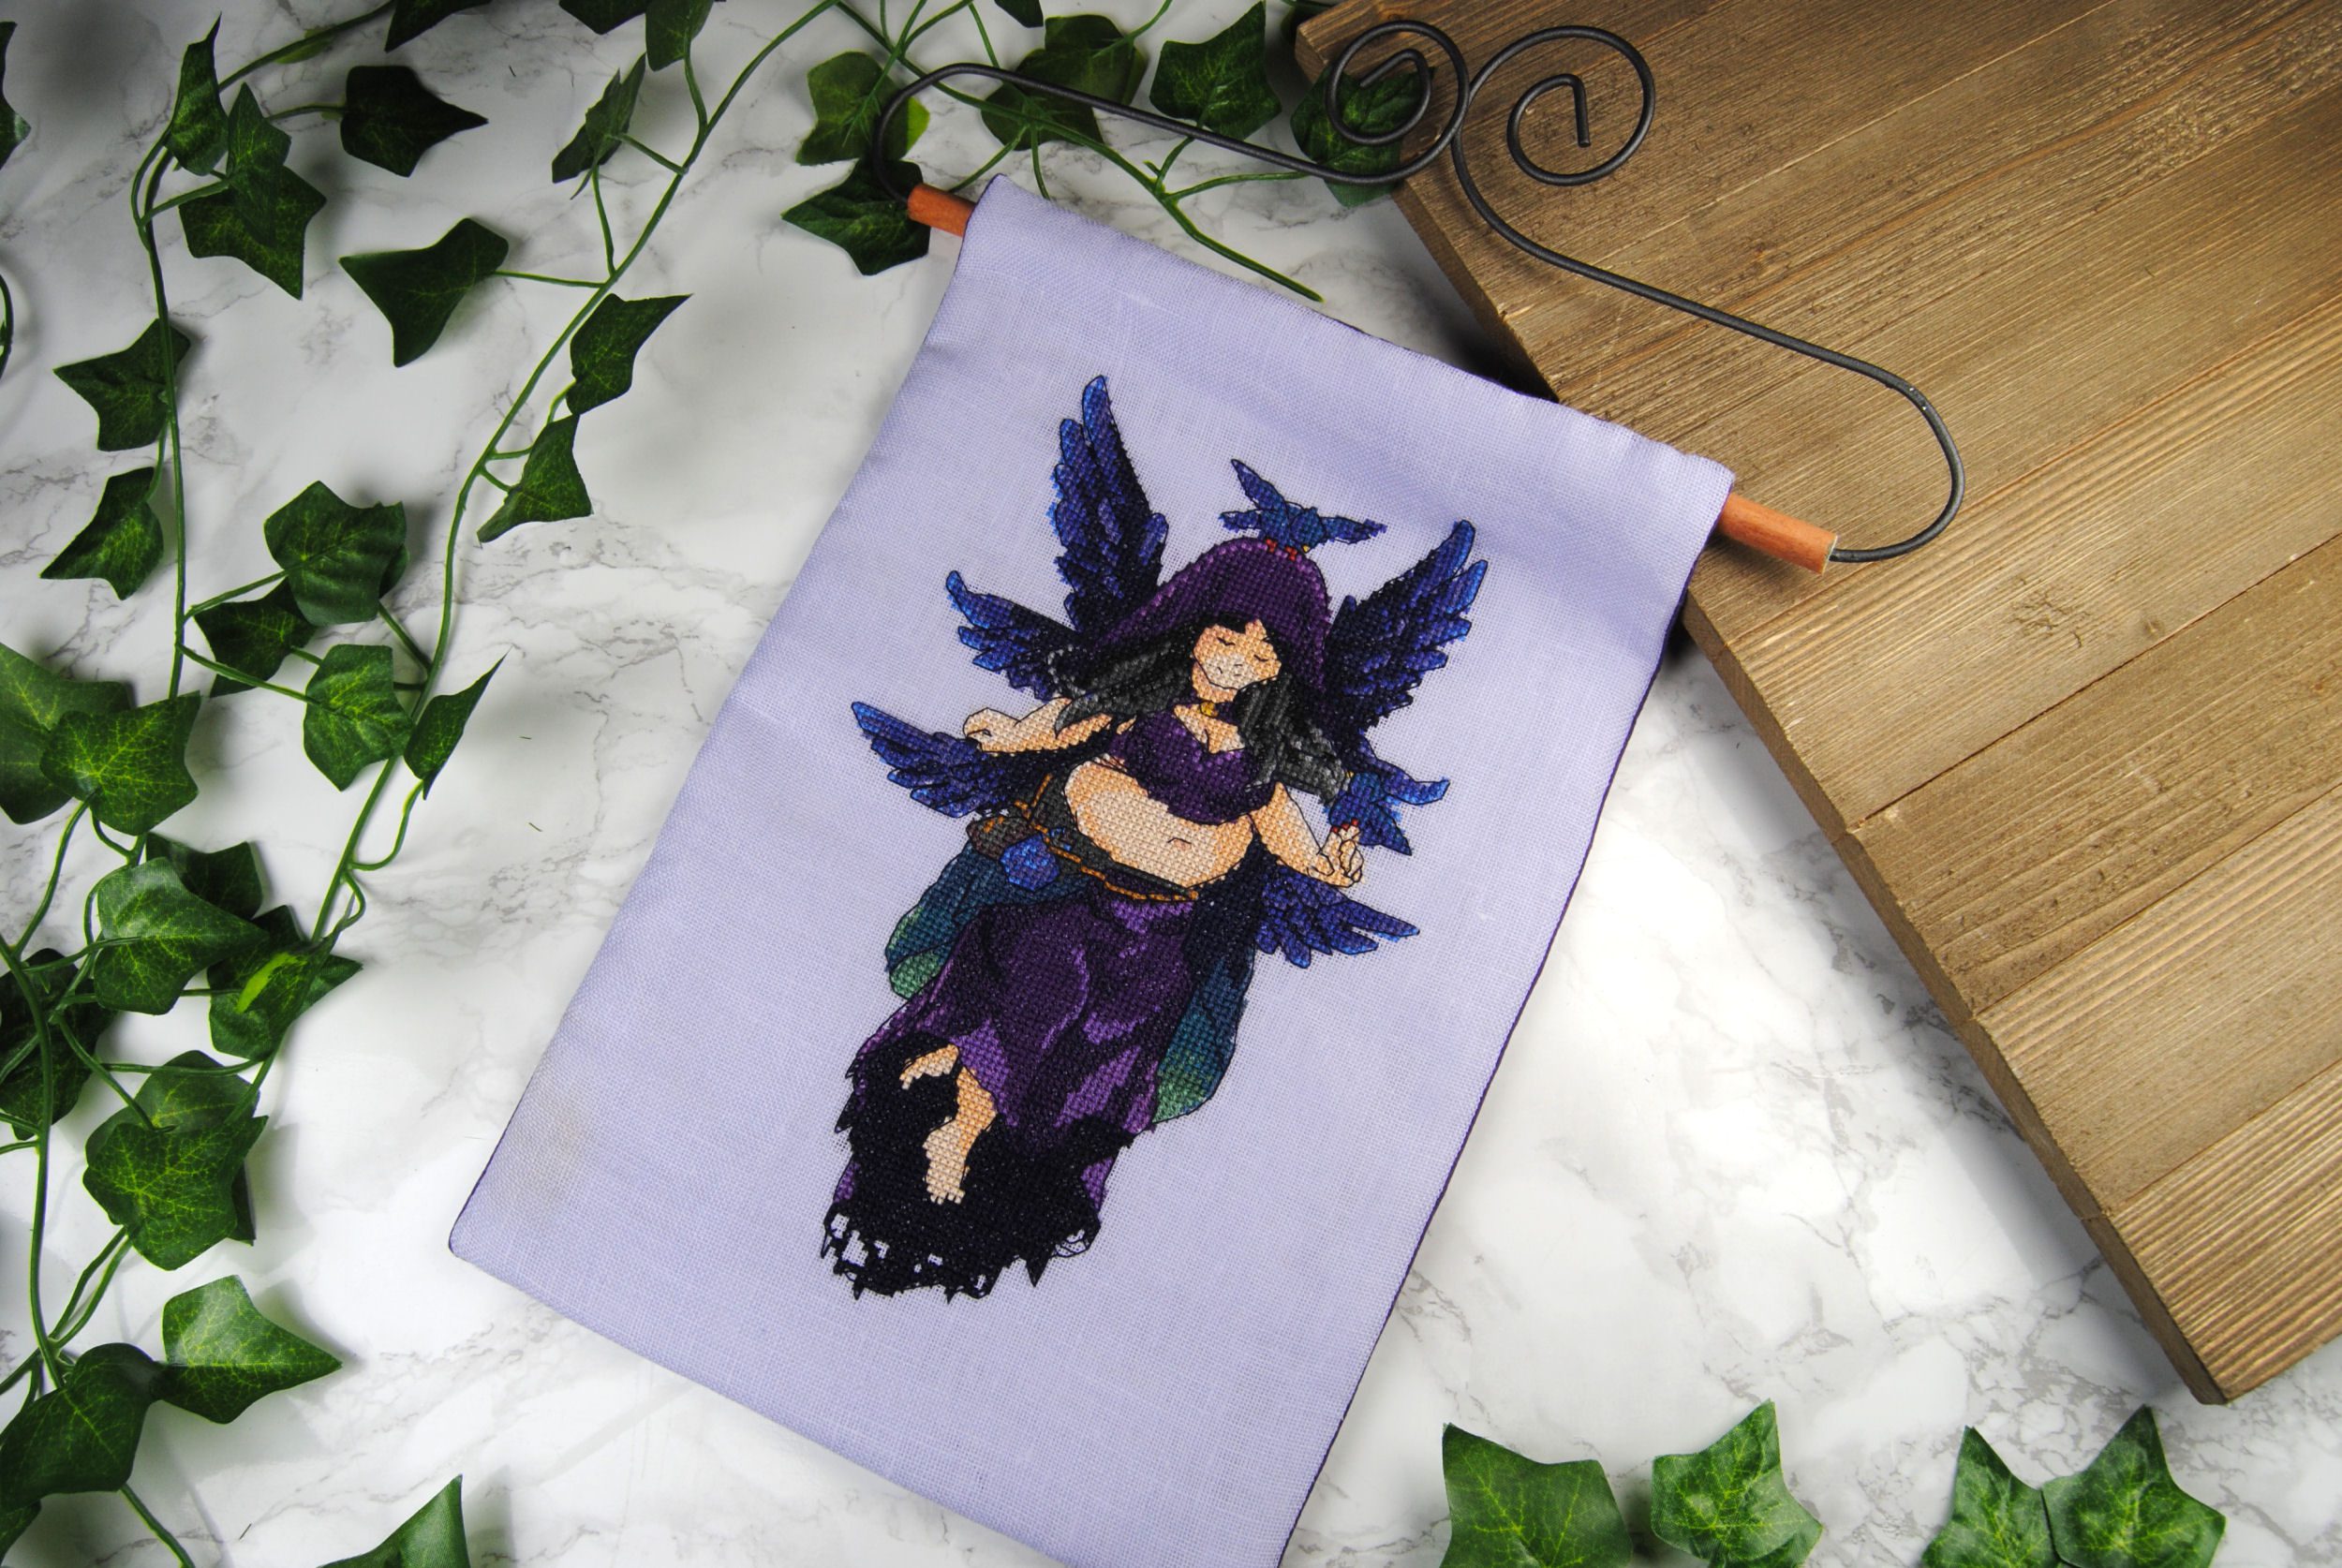
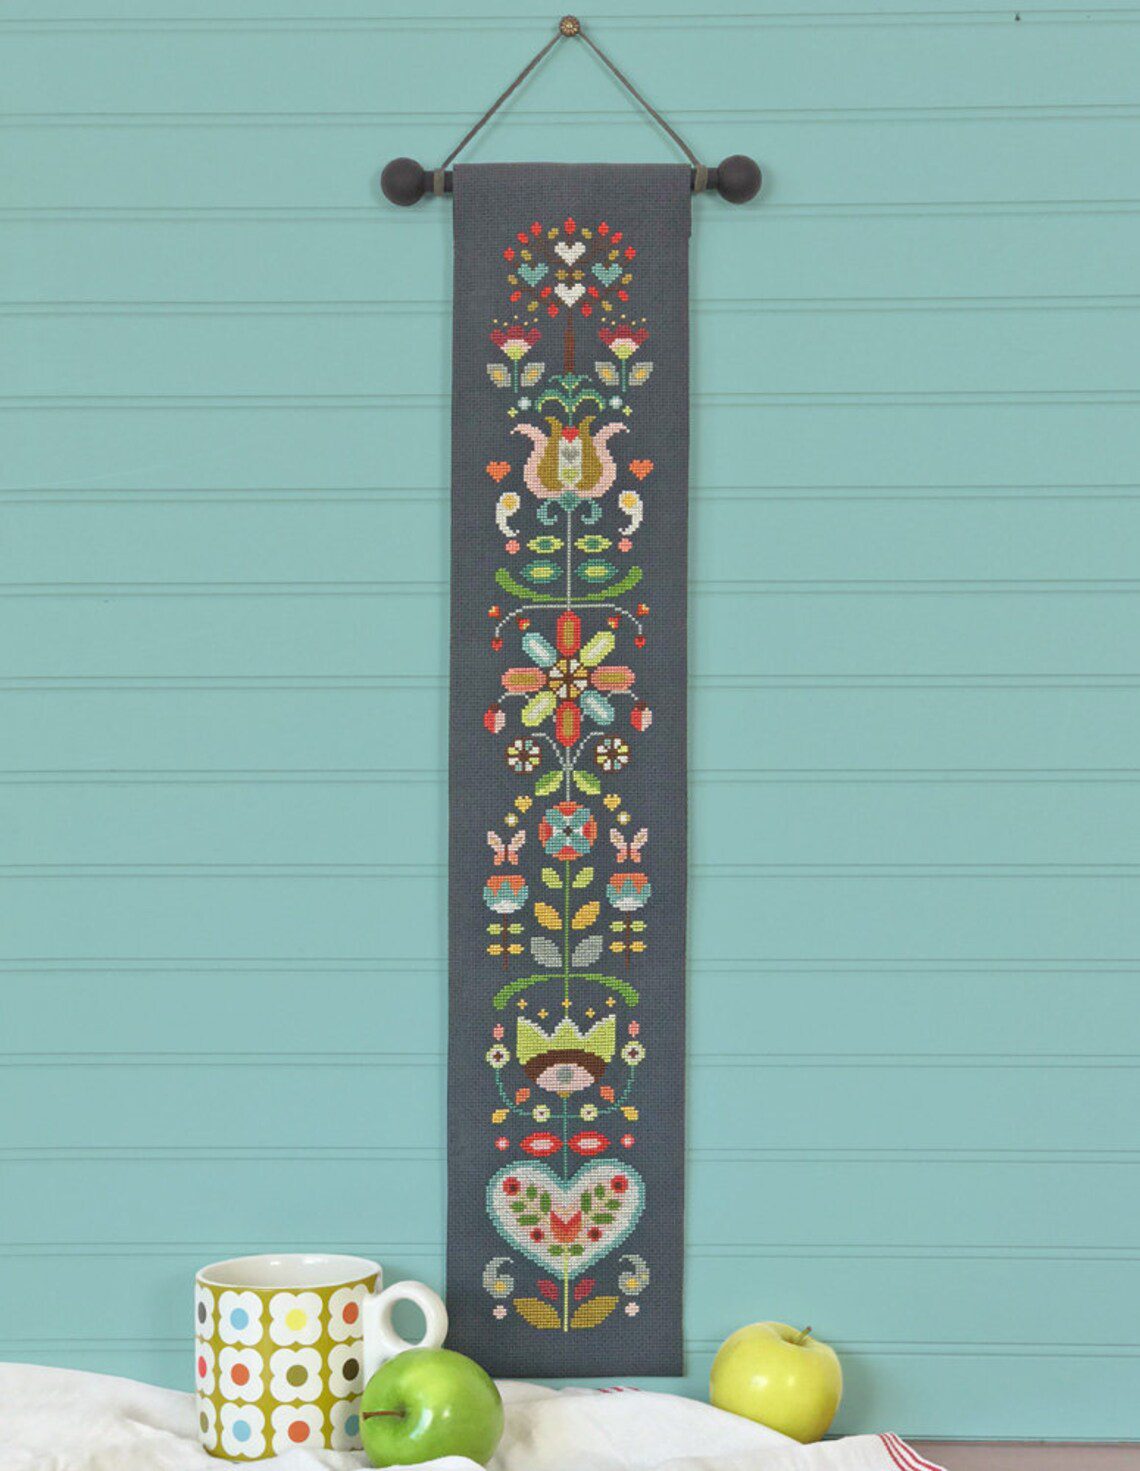
Even if you’re not making a bell pull style project specifically, this same technique can be used for making a wall hanging of any dimensions, such as this Starling Fairy design I converted for Frenone a few years back.
Stick around for a quick history lesson, or skip ahead to the tutorial using the table of contents. Up to you! Either way, I hope you find this tutorial useful during your stitching journey. <3
This post may contain affiliate links. If you buy something using one of these links, I earn a small commission. However, there is no extra cost to you. Thanks for understanding! Learn more in my Disclosures & Privacy Policy.
Table of Contents
What is a Bell Pull Anyway?
First of all, I’m no historian. If the history of these items is something you’re interested in, I highly recommend doing some research of your own! But I at least wanted to tell you what I found during my searches.
Back in the 18th century, well-to-do homes had servants. In order for these servants to be able to quickly respond to the family’s needs, they’d need to be nearby to hear a hand bell or someone calling for them. It might be simply a footman standing around, but that meant those servants couldn’t be doing other tasks; unless it was near enough to where the family members were located.
Eventually there was an invention that would make it easier for a servant to be summoned; while also allowing them to carry out their chores as needed. A system of wire and pulleys ran throughout the house allowing someone to ring a bell in the servant’s common area no matter where they were in the house. There would be a different bell for each room so the servant would know where exactly they were needed. The bells could have different tones, or simply be labeled.
These systems would need to be mounted on the walls and have wires running everywhere to work. Many of the wealthy well-to-do found the visible mechanisms of this system to be quite garish, so as the years passed these systems were improved upon and cleverly hidden. The mechanisms for ringing the bell evolved from ropes to elaborately embroidered cloth pulls that would decorate the home. Victorian homes would go all out with the lavishness of their bell pulls to flaunt their wealth.
References
Want more info? Here’s some of the articles I found relating to historic bell pulls:
- Brief History of the Bell Pull
- Ring Bell For Service ~ The Prevalency of the Regency Bell Pull
- The Servant’s Bell — A Brief History
- Servant Bells at Poplar Forest
- Calling All Servants…
Vintage vs Modern Bell Pull Designs
Examples of the Historical Bell Pull
While researching, I came across this lovely blog sharing photos and closeups of some bell pulls in their historic home.

Even some with metallic thread detailing! I can only imagine what antique metallic thread was like to work with.
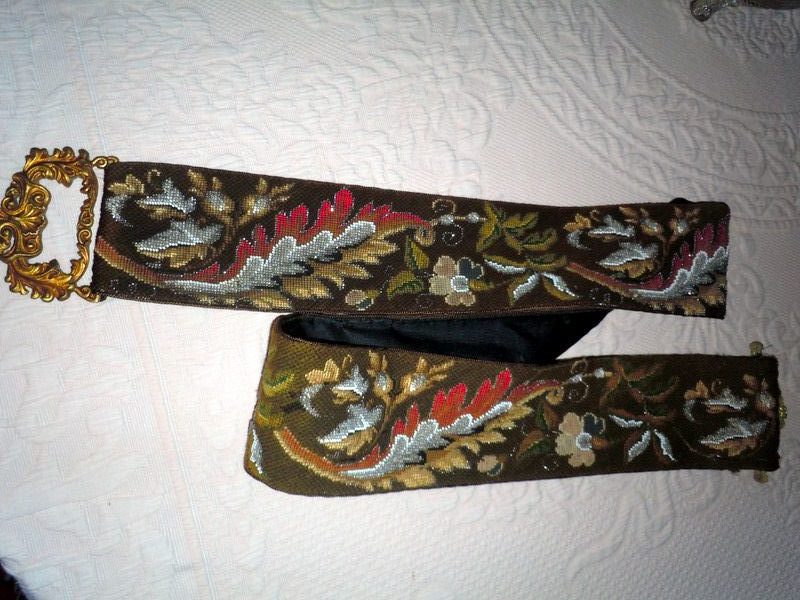
All the historic bell pulls I found were similar though. Either needlepoint, cross stitch, or embroidery. Typically fairly wide, and long enough to be easily reachable while also running all the way up to the ceiling with florals and leaves as common motifs.
That said, other than the blog above, all I could find were listings and auctions for antique bell pulls or reproductions for sale. And not much online documenting historical examples of this style of finish. If you know of any, please dolet me know!
Bell Pull for the Modern Home
Nowadays we don’t have slaves or servants. And if you are rich enough to have people at your beck and call, you’ll be communicating with them with much more modern methods than elaborate bell systems.
But, the style of bell pulls still make for lovely decor. So this finish has persisted into more modern embroidery designs. They’ve gotten much shorter over the years, as they no longer need to stretch up to the hidden hardware in the ceiling. But also the designs are sometimes wider, too.
I’ll talk later about how to find these types of patterns. But for now here’s some of my favorite examples of modern bell pull designs:
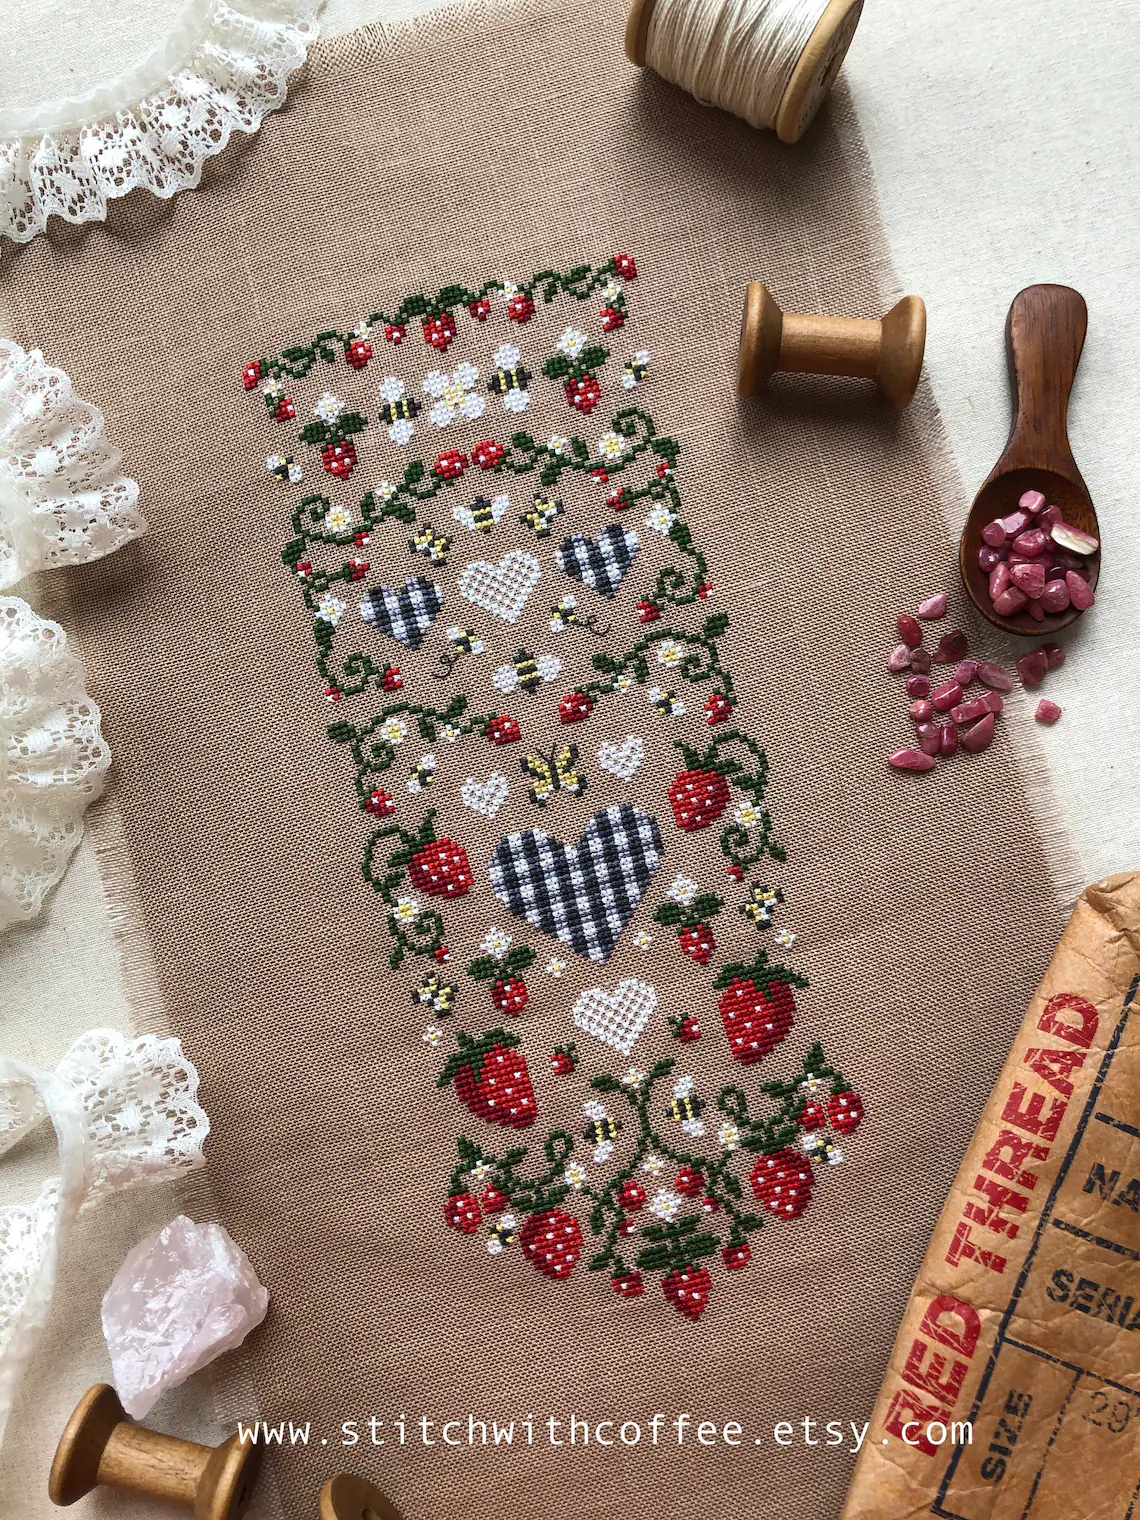
StitchWithCoffee Strawberry Bell Pull:
Materials Needed
So what do we need to make a cross stitch bell pull or wall hanging, anyway? You’ll need a finished cross stitch piece, some coordinating fabric of the same size for the back, and the hanging hardware.
Optionally you can also include interfacing or batting for added stiffness or weight to the piece.
Also optionally, you can add some decorative bits at the bottom of your bell pull, but we’ll discuss that later as I want you to get familiar with the process first.
How to Find Patterns
As stated previously, you can use this same technique for most designs. Whether you’re making a bell pull or just a cool wall hanging there is no specific dimensions for a design to be. However, the standard bell pull design is going to be a long thin design, generally much taller than it is wide.
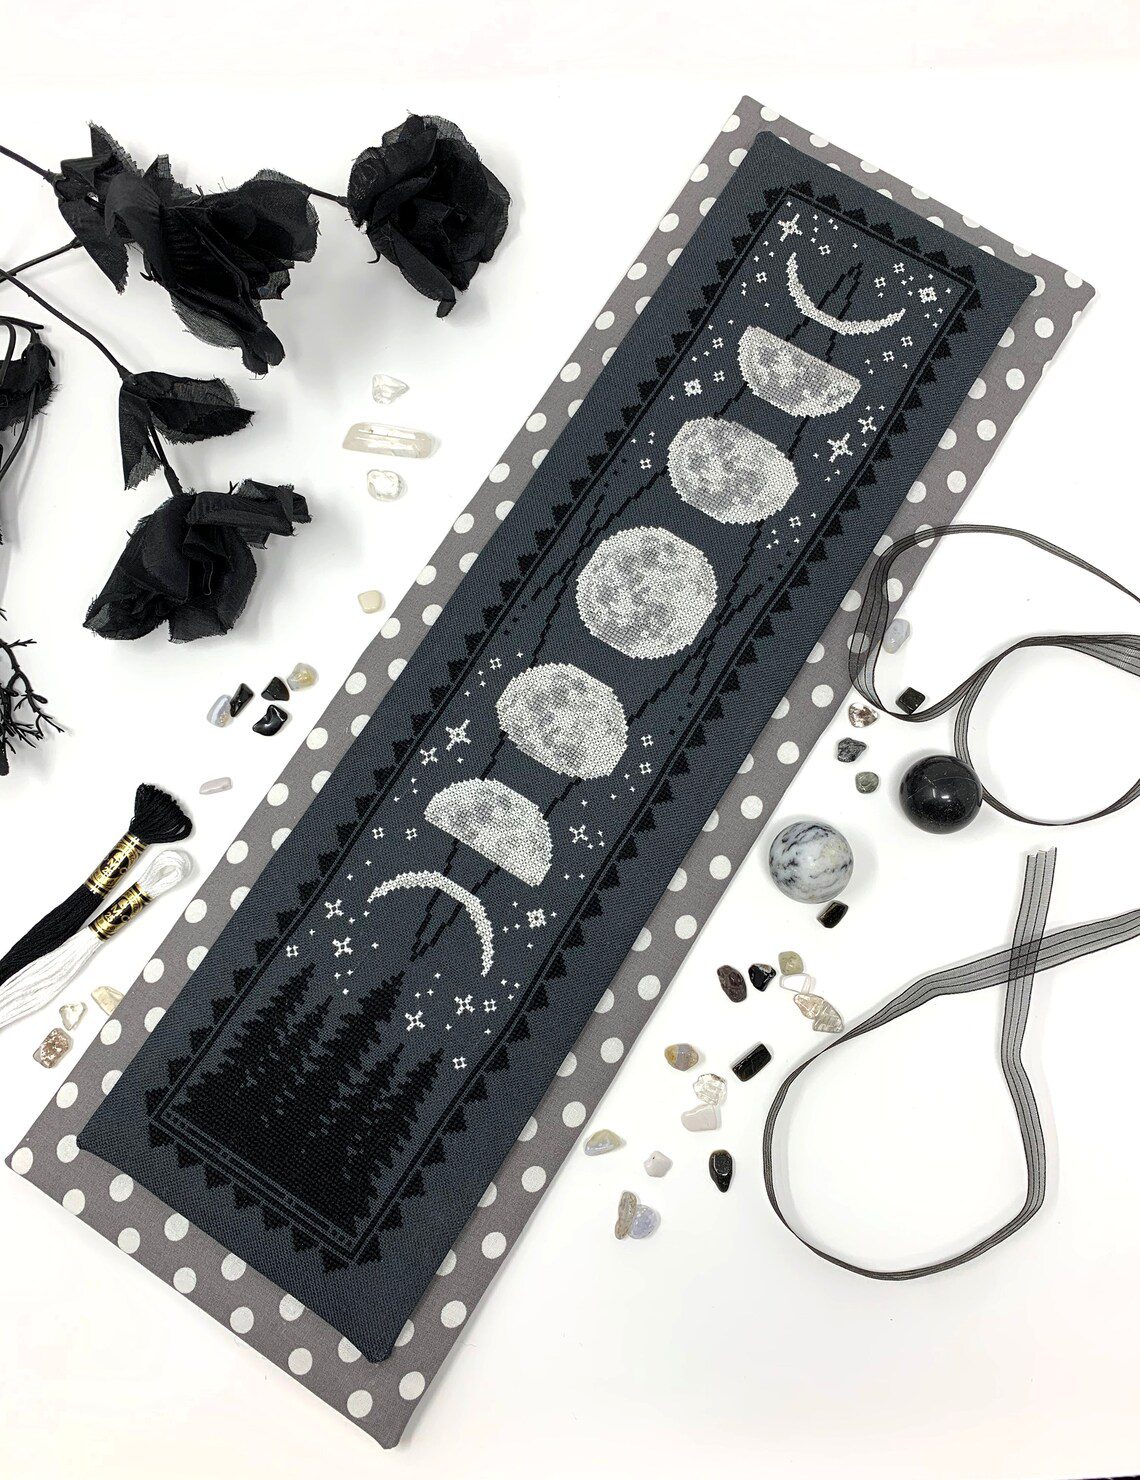
I’ve already linked several examples above, but the main keywords you can search for are of course “bell pull,” such as this modern Christmas design by Satsuma Street.
Another keyword to look for is “band sampler.” While this is technically its own thing, many of these styles of patterns are done in a similar long vertical style that easily lend themselves to bell pulls. Such as this example by WorksbyABC.
You could look for “table runner” designs, such as this one by CoricamoEmbroidery, though many runner patterns are designed to be displayed horizontally rather than vertically.
Sometimes designs just aren’t labeled with any of these key words and you just have to simply look for designs that would work well for the format. For example, this Vulcan calligraphy design by PerfectIsTheEnemy would be perfect for a finish such as this.
The pattern I’m using in today’s tutorial is a free design available on my Ko-Fi page.
Picking the Right Fabric
Once you’ve chosen your pattern you need to determine what size hardware you’re looking for to go with it. The thing is, that’s pretty variable depending on your design, where you’re going to hang it, etc. And that size changes depending on the fabric you use!
Before placing even the first stitch I had to decide what fabric I was going to stitch it on, and how big I wanted it to be. Then how big the hardware needed to be to fit the project. You could do this in reverse and stitch first and figure all that out later. Or if you already have something stitched that you just want to finish, that’s okay! It just limits your choices in hardware.
But if you haven’t started yet, I recommend doing some math first. You could use a cross stitch calculator. But learning how to calculate these sizes with a normal calculator may serve you better. Up to you. So let’s do some math together as an example.
Doing the Math
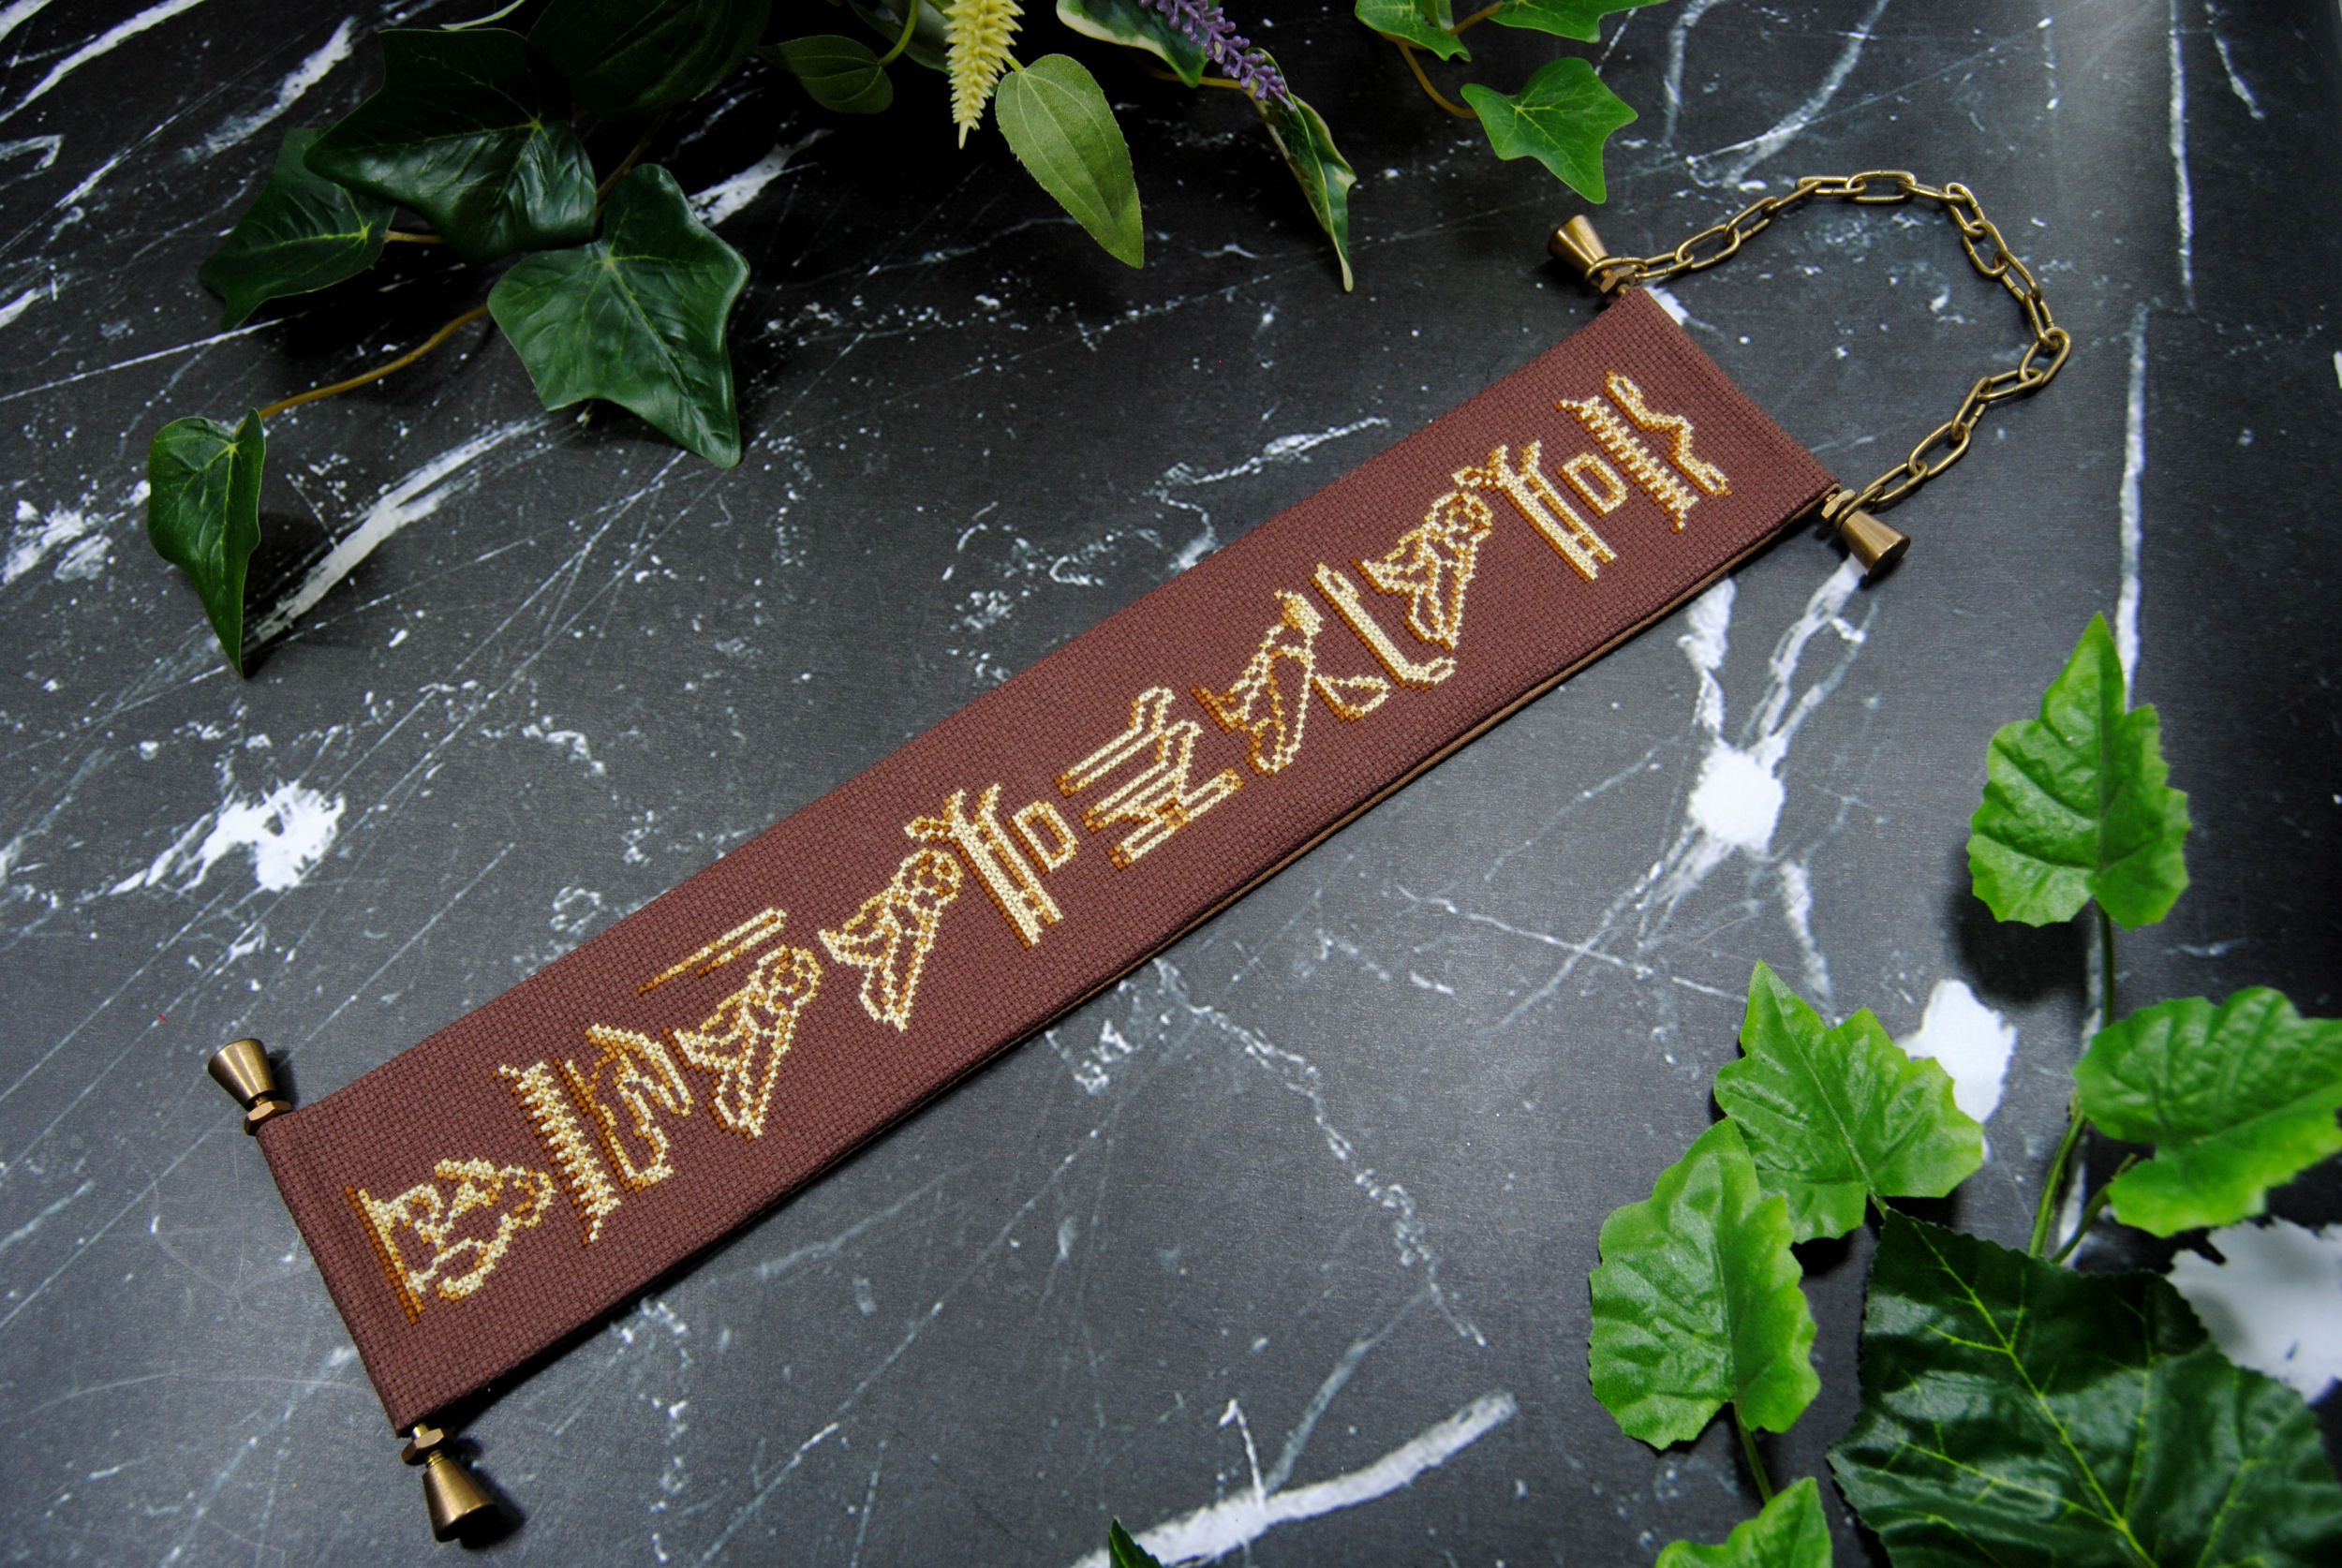
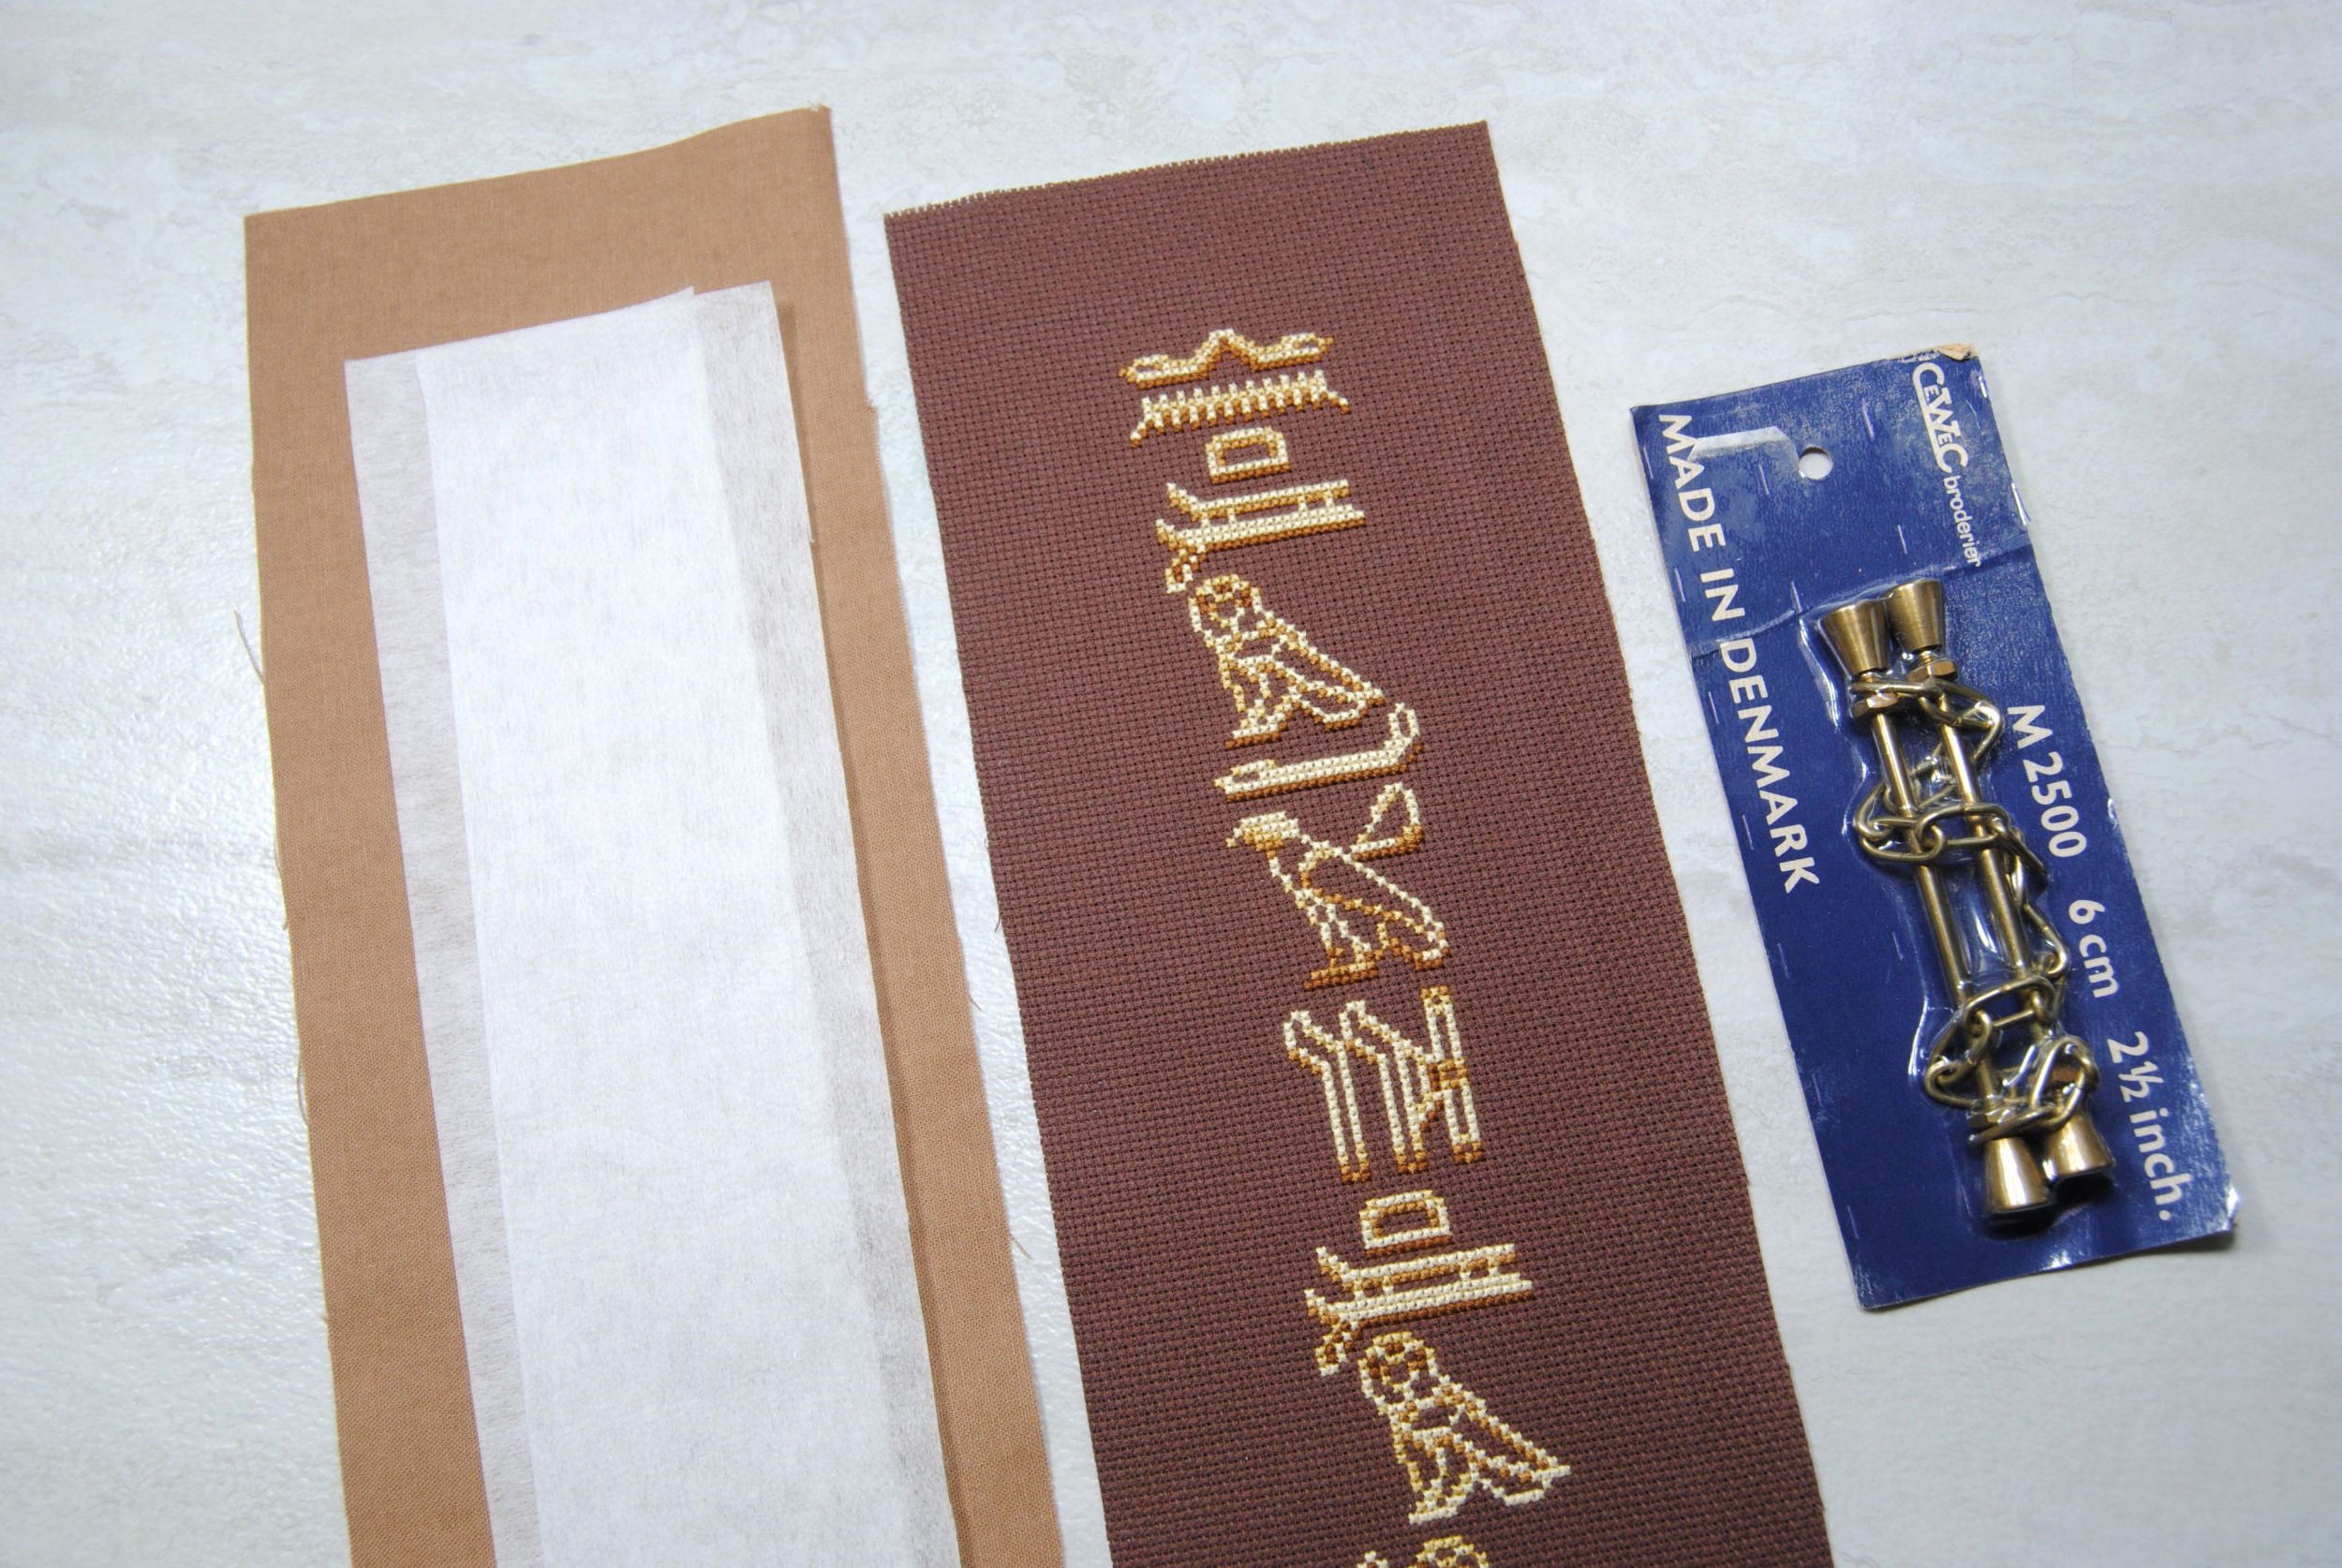
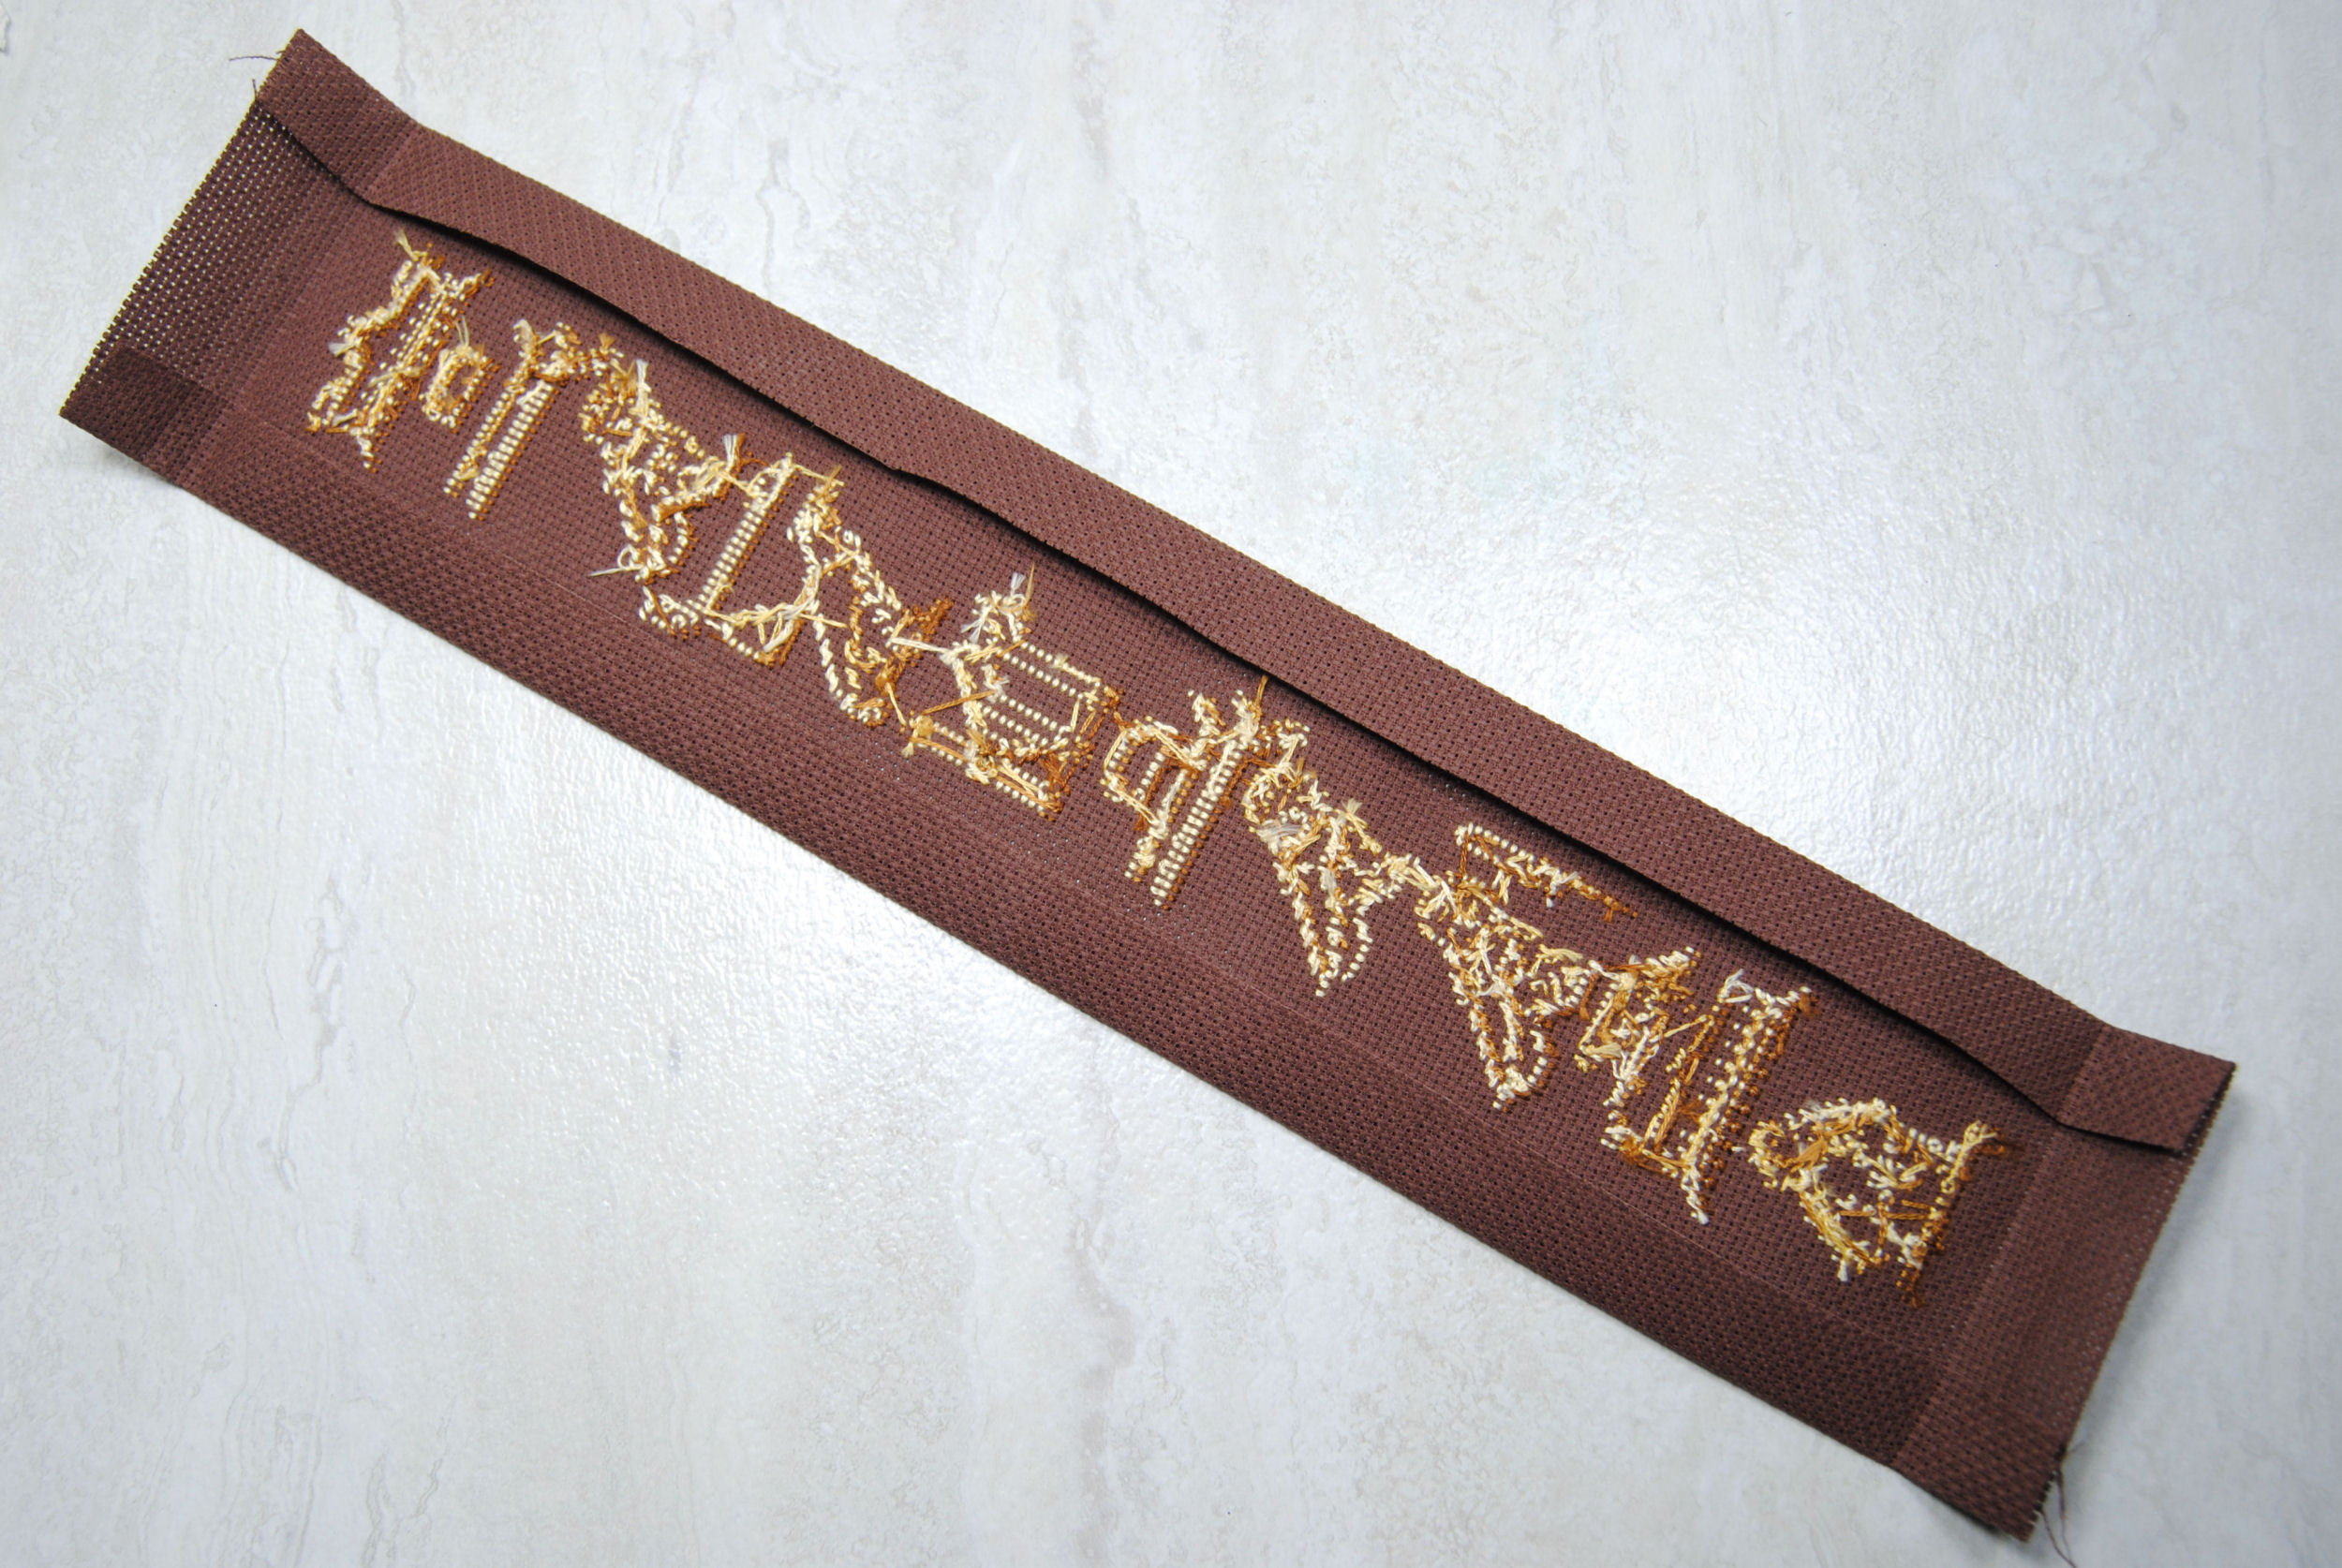
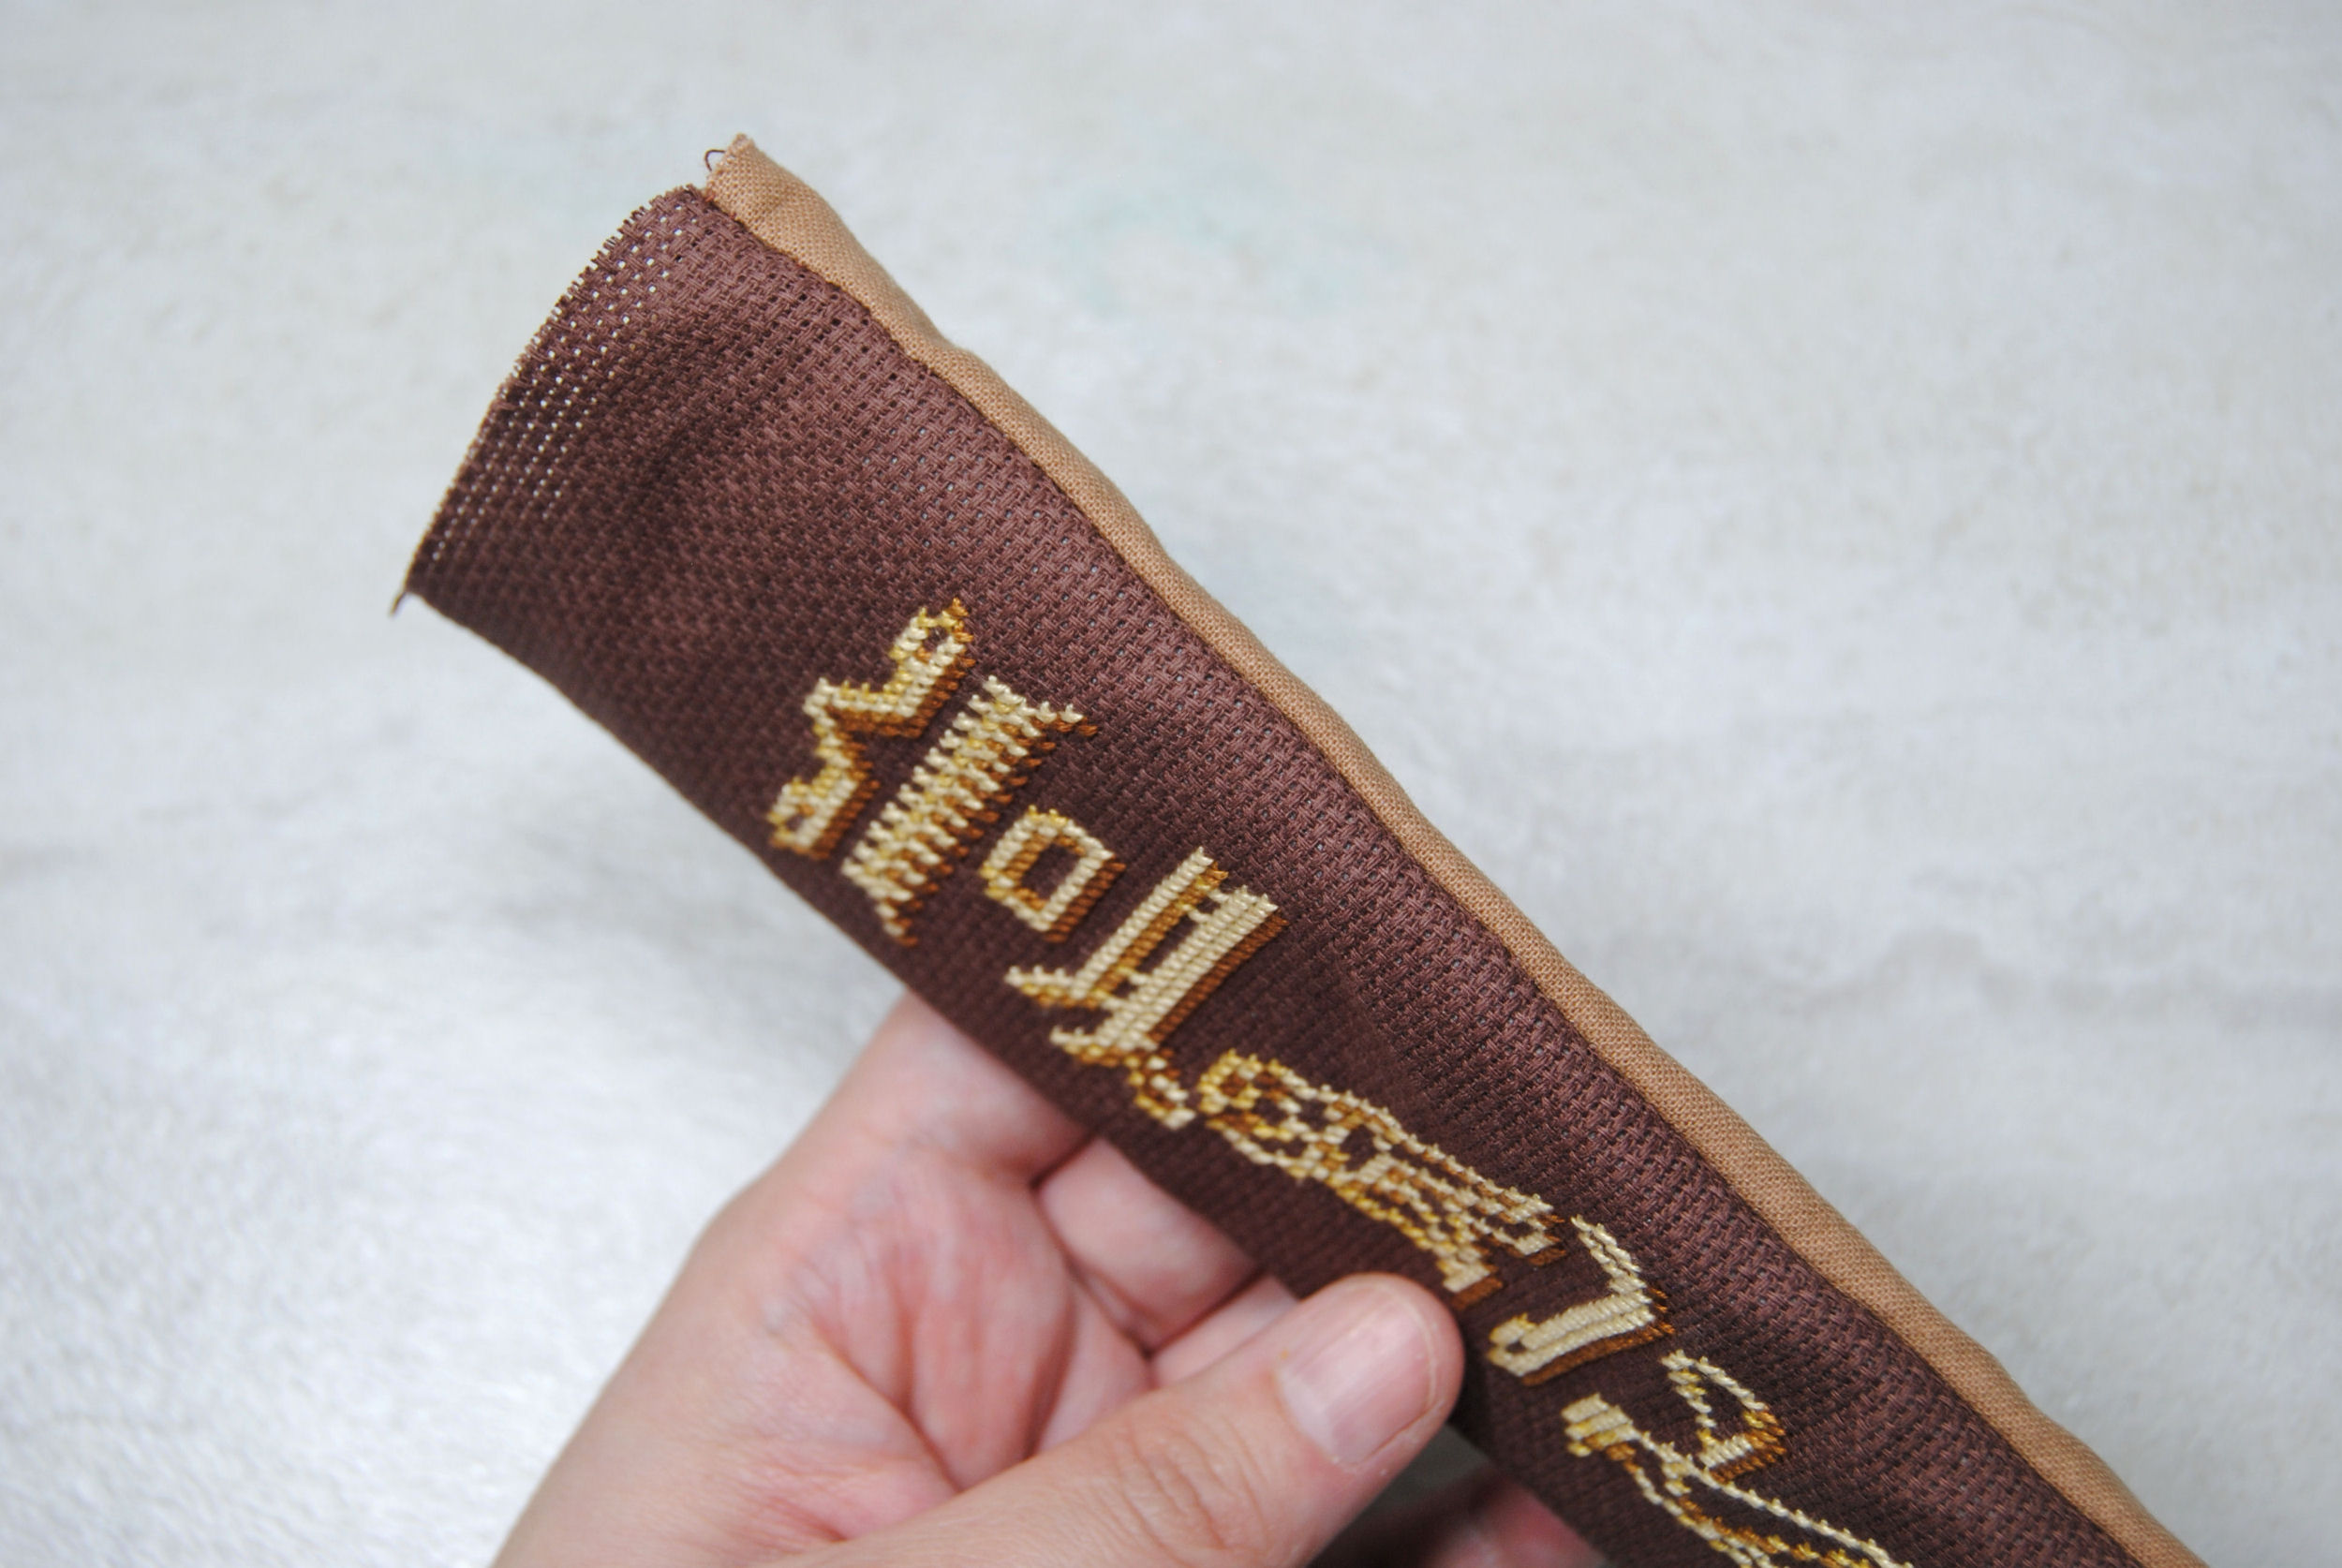
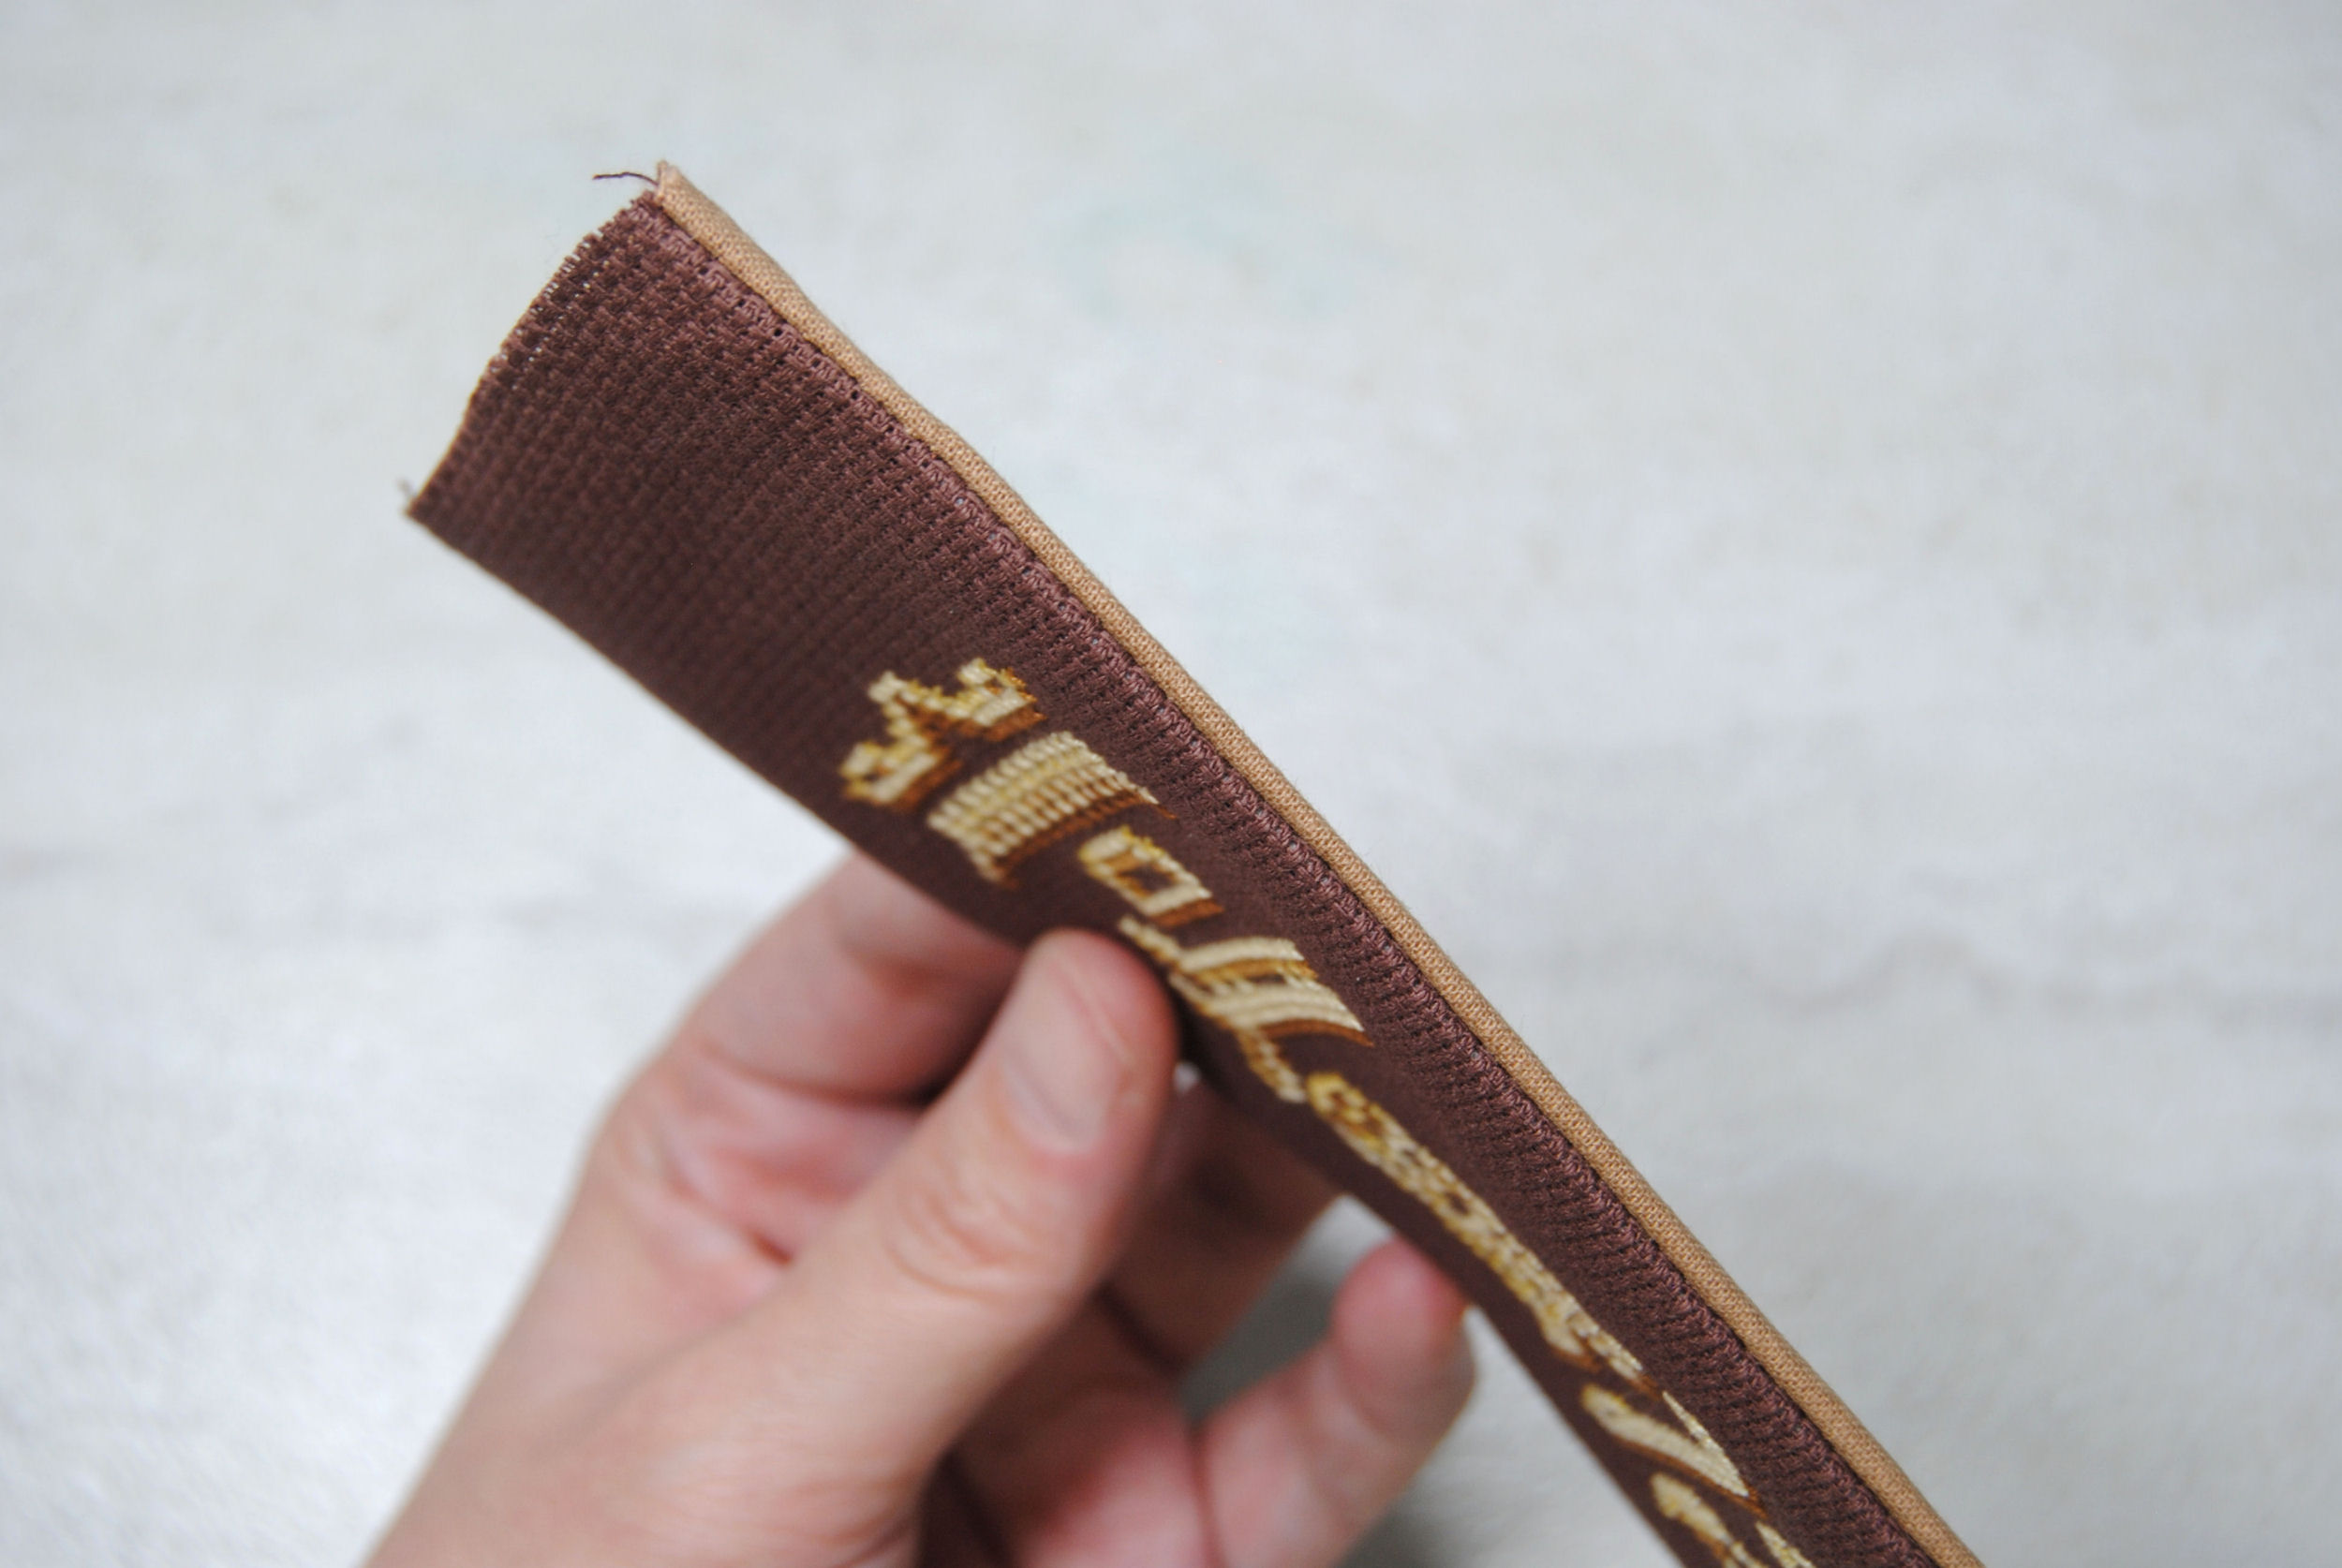
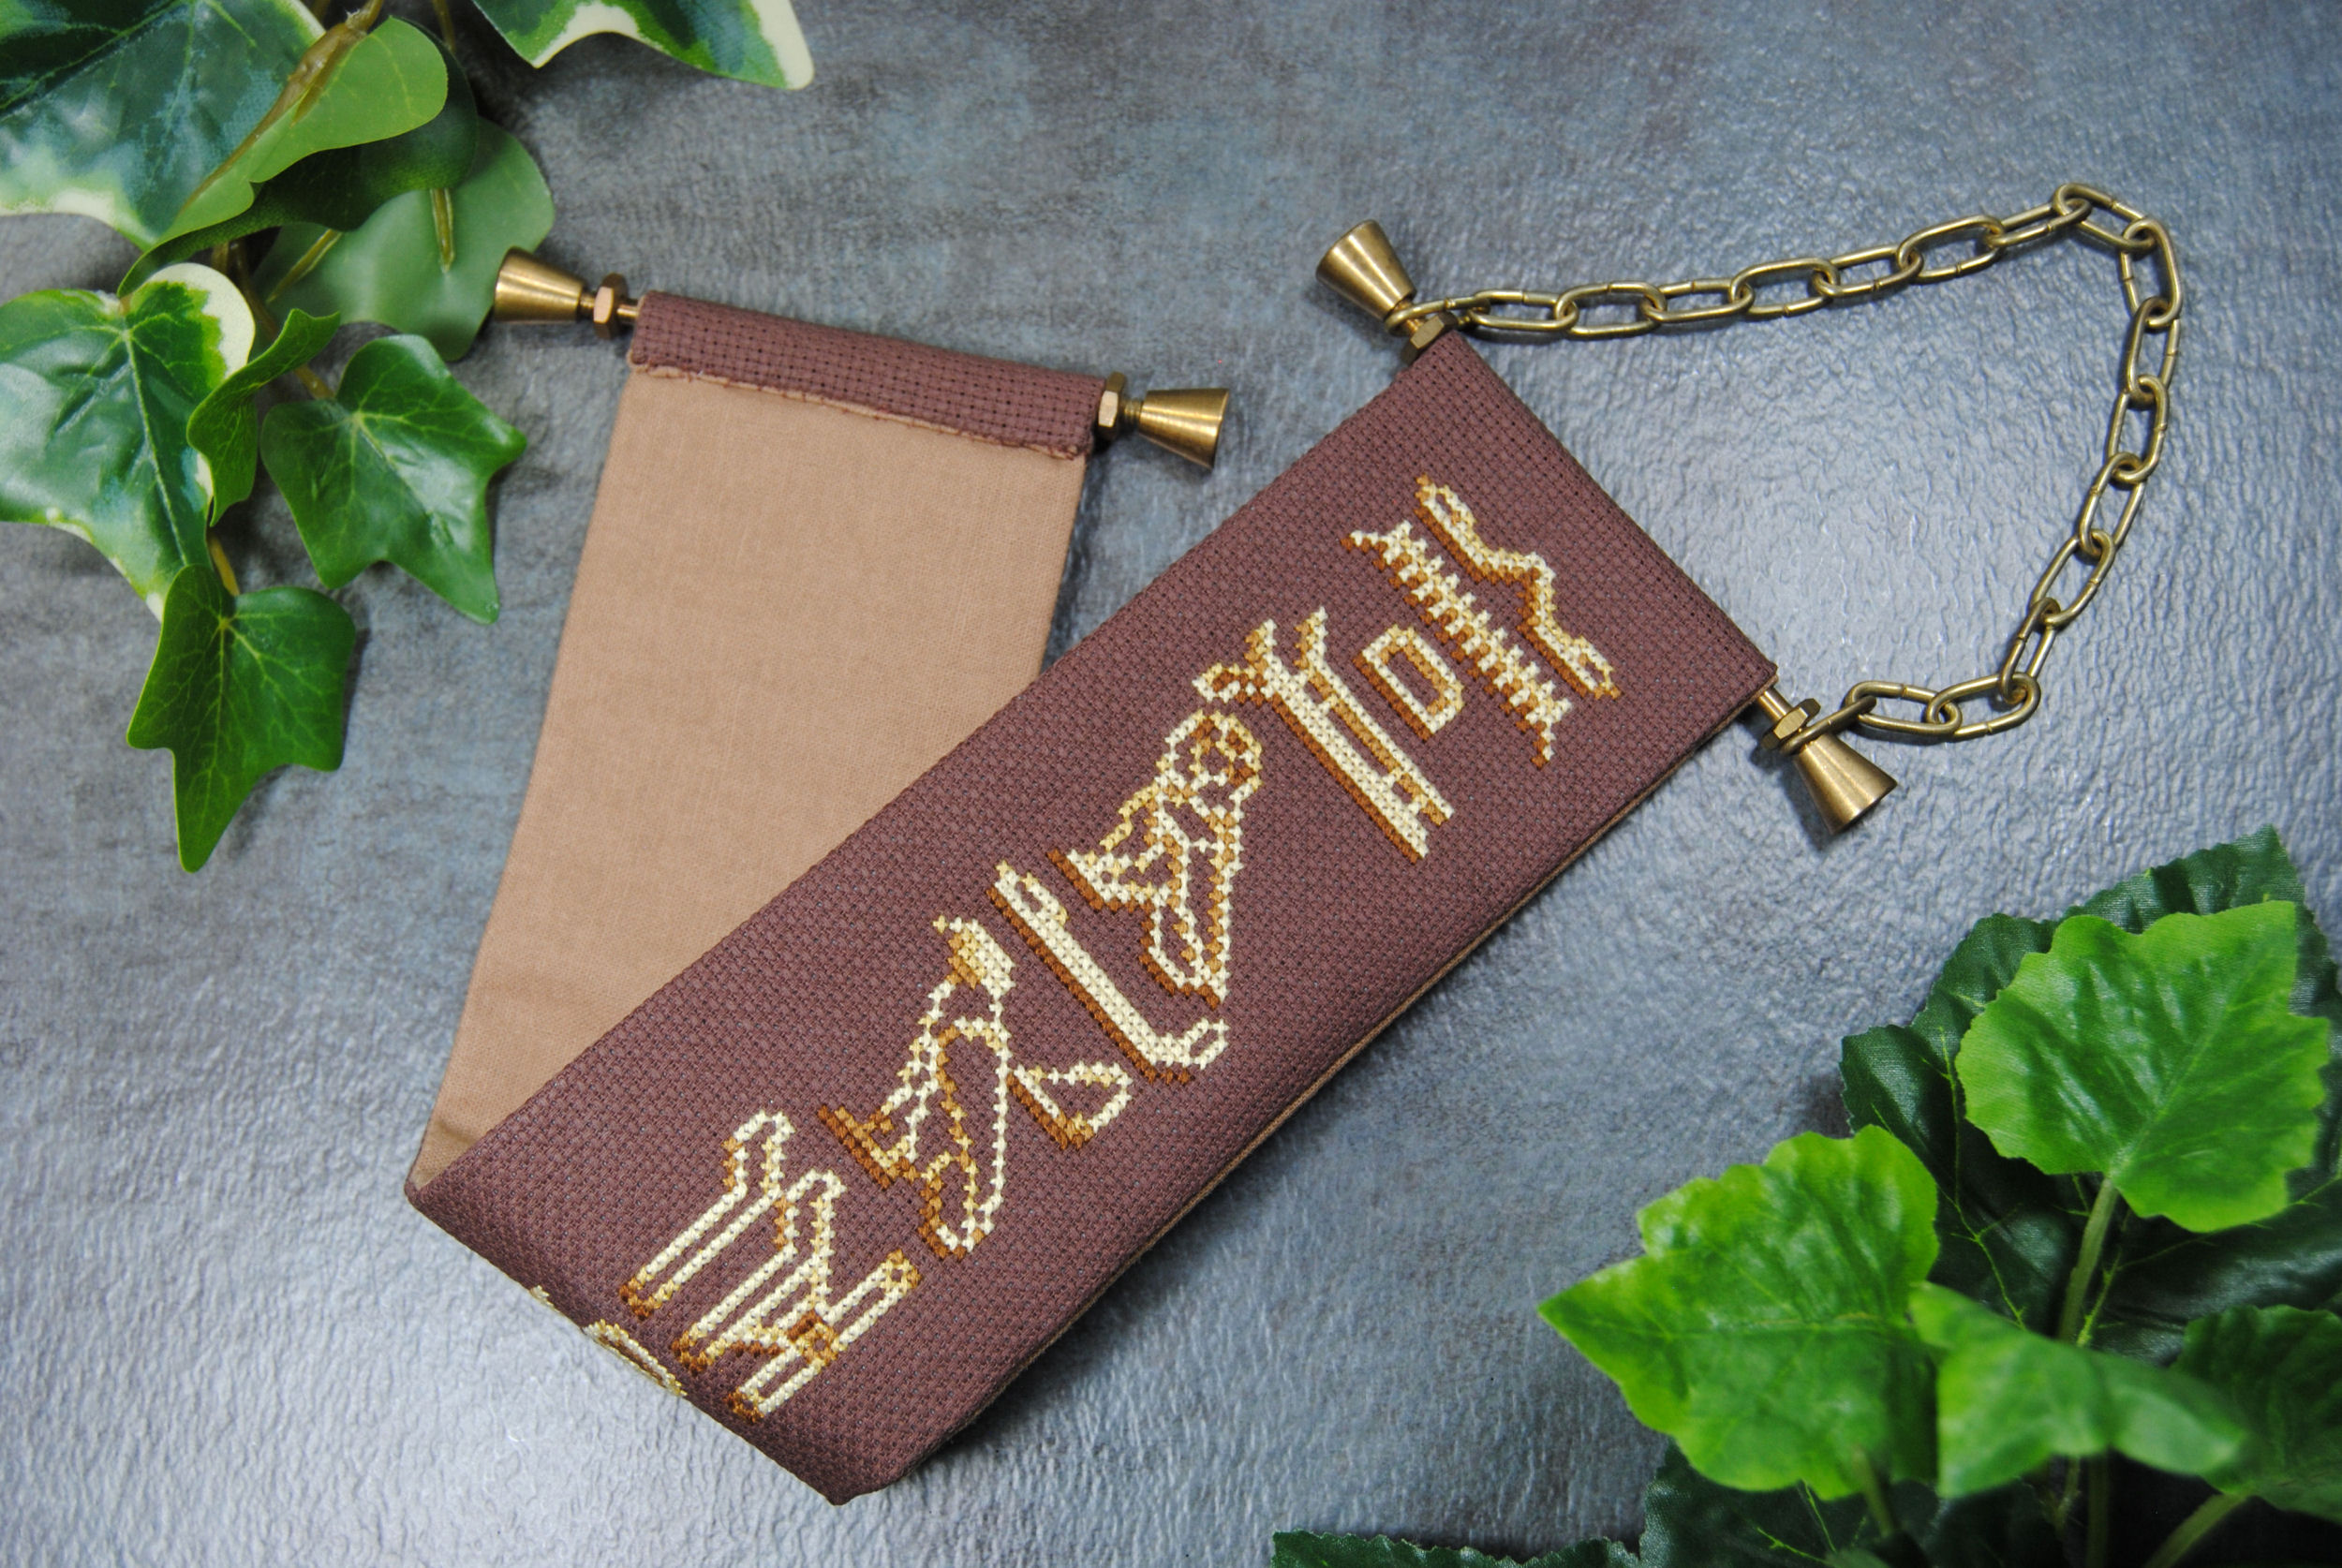
First, take the stitch dimensions of your pattern. In my example I’ll be using a pattern I designed as part of a stitch swap on the Pixel Stitch Discord server. It was originally intended to be a bookmark, but once I had it all patterned out I realized it was far too long and decided to turn it into a mini bell pull instead. For reference, it is 25 stitches wide and 197 stitches long.
Fabric ‘count’ is just a number that means stitches per inch. Yes, often even in countries that don’t use inches. It’s not exact since dyes and different weaves can distort the grid and make fabric end up at 14 3/4 stitches an inch or other random amounts. But we’re still going to categorize that as 14 count fabric. Let’s call that close enough for now.
25 stitches divided by 14 count fabric means it’ll be 1.8 inches wide. Doing that same math for 16 count (1.6 inches) and 18 count (1.4 inches) gives us a general idea of what range we can work in when it comes to hardware. The height doesn’t really matter for hardware, but you can do the same calculations to figure out how much fabric you need overall, both for stitching and as your backing. But you’re not going to be stitching right up to the edge, so let’s talk about how much extra fabric you need.
How Much Extra Fabric is Needed?
Like with any cross stitch finish, you’re going to want some extra fabric around the actual pattern area. There’s two types of extra fabric I’m going to refer to here, and during the assembly process.
Buffer Fabric
First there’s what I call the buffer fabric. It’s just the empty space around the pattern so that it doesn’t look cramped. I did these calculations before stitching, but I’m showing my results here of about 3/4″ extra on the sides. With a bit less on the top and bottom because the fabric I had on hand was smaller than I wanted. The thing is, I could have easily gone down to a 1/4″ buffer to match the top and bottom. Or gone up to a full inch if needed without it looking too ’empty.’
Why would it be needed? Because hardware is going to come in standardized sizes and you don’t want your project to feel too small (or too big) for the hardware you’re using.
Seam Allowance
The other type of extra fabric is your seam allowance. The extra part of the fabric that is used for whatever finishing technique you’re using. It won’t be visible on the final piece, but is needed for structural integrity. Here I used about the same 3/4″ extra on the sides, and an inch more on the top and bottom because it needed to also be able to wrap over a rod. I used an inch for my hardware, but that will be determined by the thickness of whatever hardware you’re using.
You can fold your fabric around your hardware as a test to gauge how much extra you need. You can see the creases in my aida where I did this to ensure I had enough.
This really depends on the type of hardware. Just a thin bar will need much less to wrap over than a thick wooden hanger. But if you don’t have hardware yet, just expect to need extra fabric at the top and bottom. It’s better to over-estimate and trim it down later than not have enough.
Determining Hardware Size
Once you’ve chosen your pattern and fabric you need to determine what size hardware you’re looking for to go with it. The thing is, that’s pretty variable depending on your design, the theme, where you’re going to hang it, etc.
The ideal hanger is gonna be just bigger than the width of your pattern + buffer fabric. Aka just the parts that’ll be visible once assembled. You can ignore the seam allowance for now.
Using the math we did earlier, that means on 14 count, my finished fabric could have been as small as 2.3″ wide (1.8″ stitch, with 0.25″ on either side) or as large as 3.8″ wide (1.8″ stitch, with 1″ on either side). Again, counting the extra bit of fabric needed as seam allowance.
I personally had a nice piece of 16 count brandywine fabric that I wanted to use, so the math for that ended up being from 2.1″ wide to 3.4″ wide. Chances are I’m not going to find hardware down to that precise of a size, so let’s call that 2.5″ to 3.5″ for my ideal hardware. But if I found a 4″ rod I really liked, I could switch to 14 count fabric instead.
If you’ve already finished a piece and are just looking to turn it into something nice, part of that decision is already done. You’ll just need an idea of how wide it can be while not looking too cramped or too empty, and while still having enough for a seam allowance. Either way, you should have a small range of sizes to work with.
Where to Find Bell Pull Hardware
Now that you know what size hardware you’re looking for, WHERE can you find them? I actually had a hard time tracking something down as they seem to be a bit less prevalent than they were when I started stitching. And the ones I did find were much larger in size than what I needed, as mine would be pretty small. But here’s some of the resources I found.
Ebay
I don’t spend a ton of time on Ebay usually. But as most of the hardware we’re looking for is going to be antique or at the very least vintage at this point, this seemed a great place to look. Sure enough, there’s a ton of relatively inexpensive kits and hardware pieces available. If you like the hardware from a kit, keep in mind you don’t have to use the pattern and materials that come with it. You can stash those for later if you’re just wanting that hanger!
Antique Stores
If you have a local antique shop, it might be worth taking a look! These probably won’t be cheap, but you’ll find some really intricate designs available such as these available from The Country Gallery.
Kits
Speaking of kits, there are still plenty of modern commercial kits available that include hardware. Just pay close attention to whether it’s a kit, or just a pattern. For example, this cute Dimensions kit that includes a hanger designed for a 5″ wide banner. Check your favorite stitchy shop to see what they have!
Etsy
There’s a number of Etsy shops that sell bell pull hardware. These range from more traditional brass hangers and wire hangers, to laser wood cut hangers with intricate designs. Here’s some shops I found during my search:
Woolpleasure: Lots of options all the way from Norway
OneThriftyStitcher: Painted 6″ and 8″ wooden rods.
I also found several from random vintage sellers that don’t have any other stitchy stuff, so be sure to just search for “bell pull hardware” as well and see what comes up!
Yarntree
Not a ton of options, but I did find two on the Yarntree site that you might find useful.
Amazon
Also limited options, but if you need it in a rush and don’t mind giving Bezos your money, that two day shipping can be tempting. This is actually where I got the simple wire hanger for that Starling Fairy wall hanging from the beginning of the post.
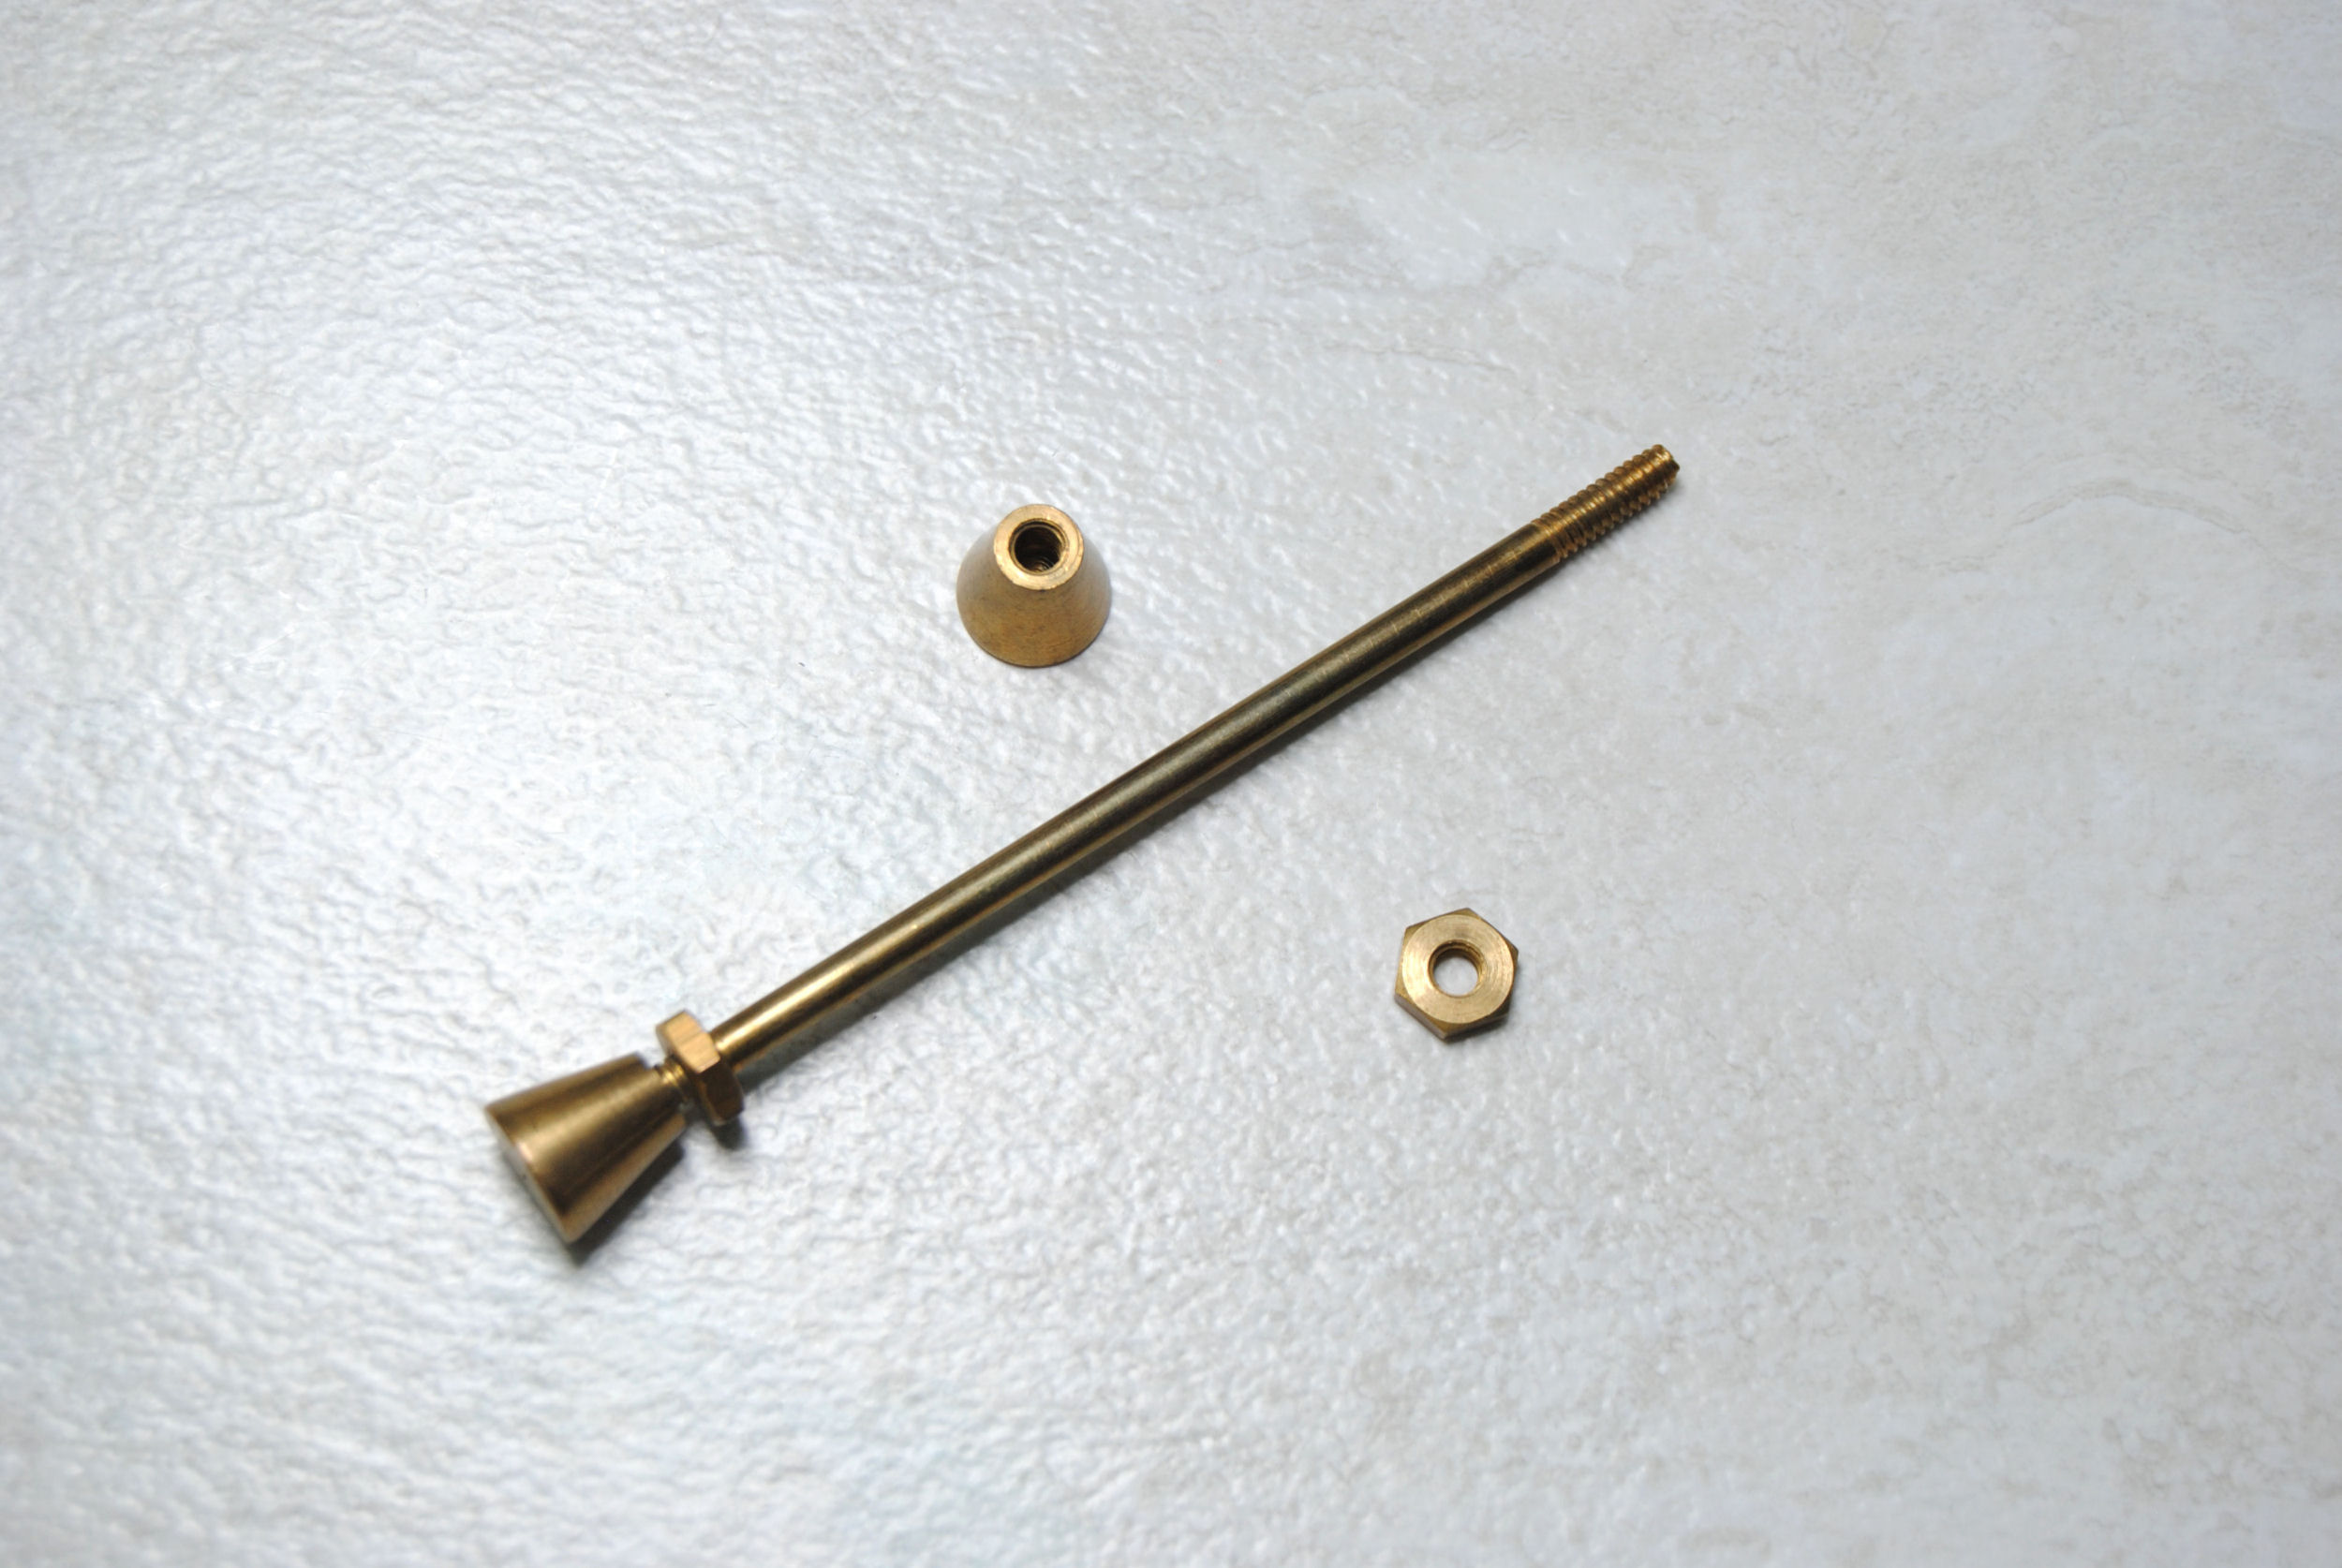
The Hardware Store
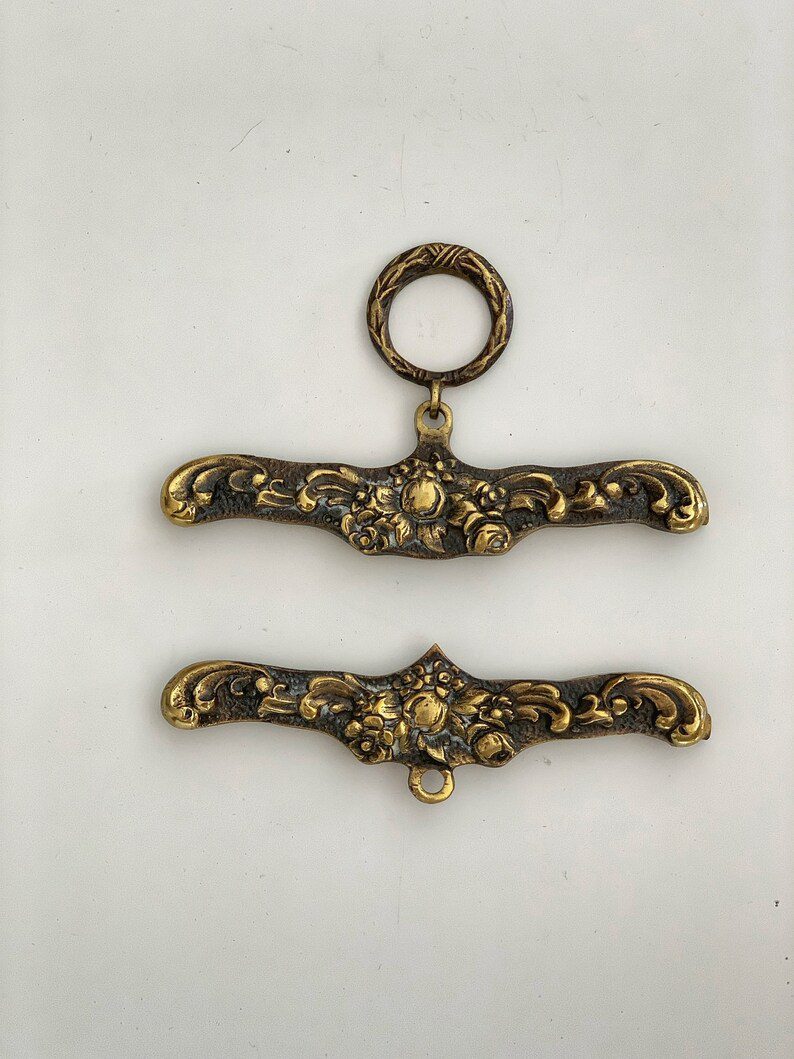
This one will take some luck. But if you take a look at the hardware I bought close up: It’s really just a metal rod with washers, some decorative ends and a chain. Chances are you can find something similar at the hardware store. Problem is, I have no idea what you’d search to find these items individually online. I’m afraid you’re on your own there.
DIY it
You don’t need specific fancy hardware for this project really. You could just use a decorative clothes hanger (baby or doll clothed sized maybe?). A dowel rod and some string braided into a cord. A mini flag pole. A small curtain rod for a big project. A cinnamon stick for small autumnal designs. A cool stick you picked up during a neighborhood walk. Get creative!
Bell Pull Assembly Tutorial
Got all your materials together? Great! After all the math, decisions, and shopping, this should be the easy part! Let’s start with a completely optional step: Interfacing
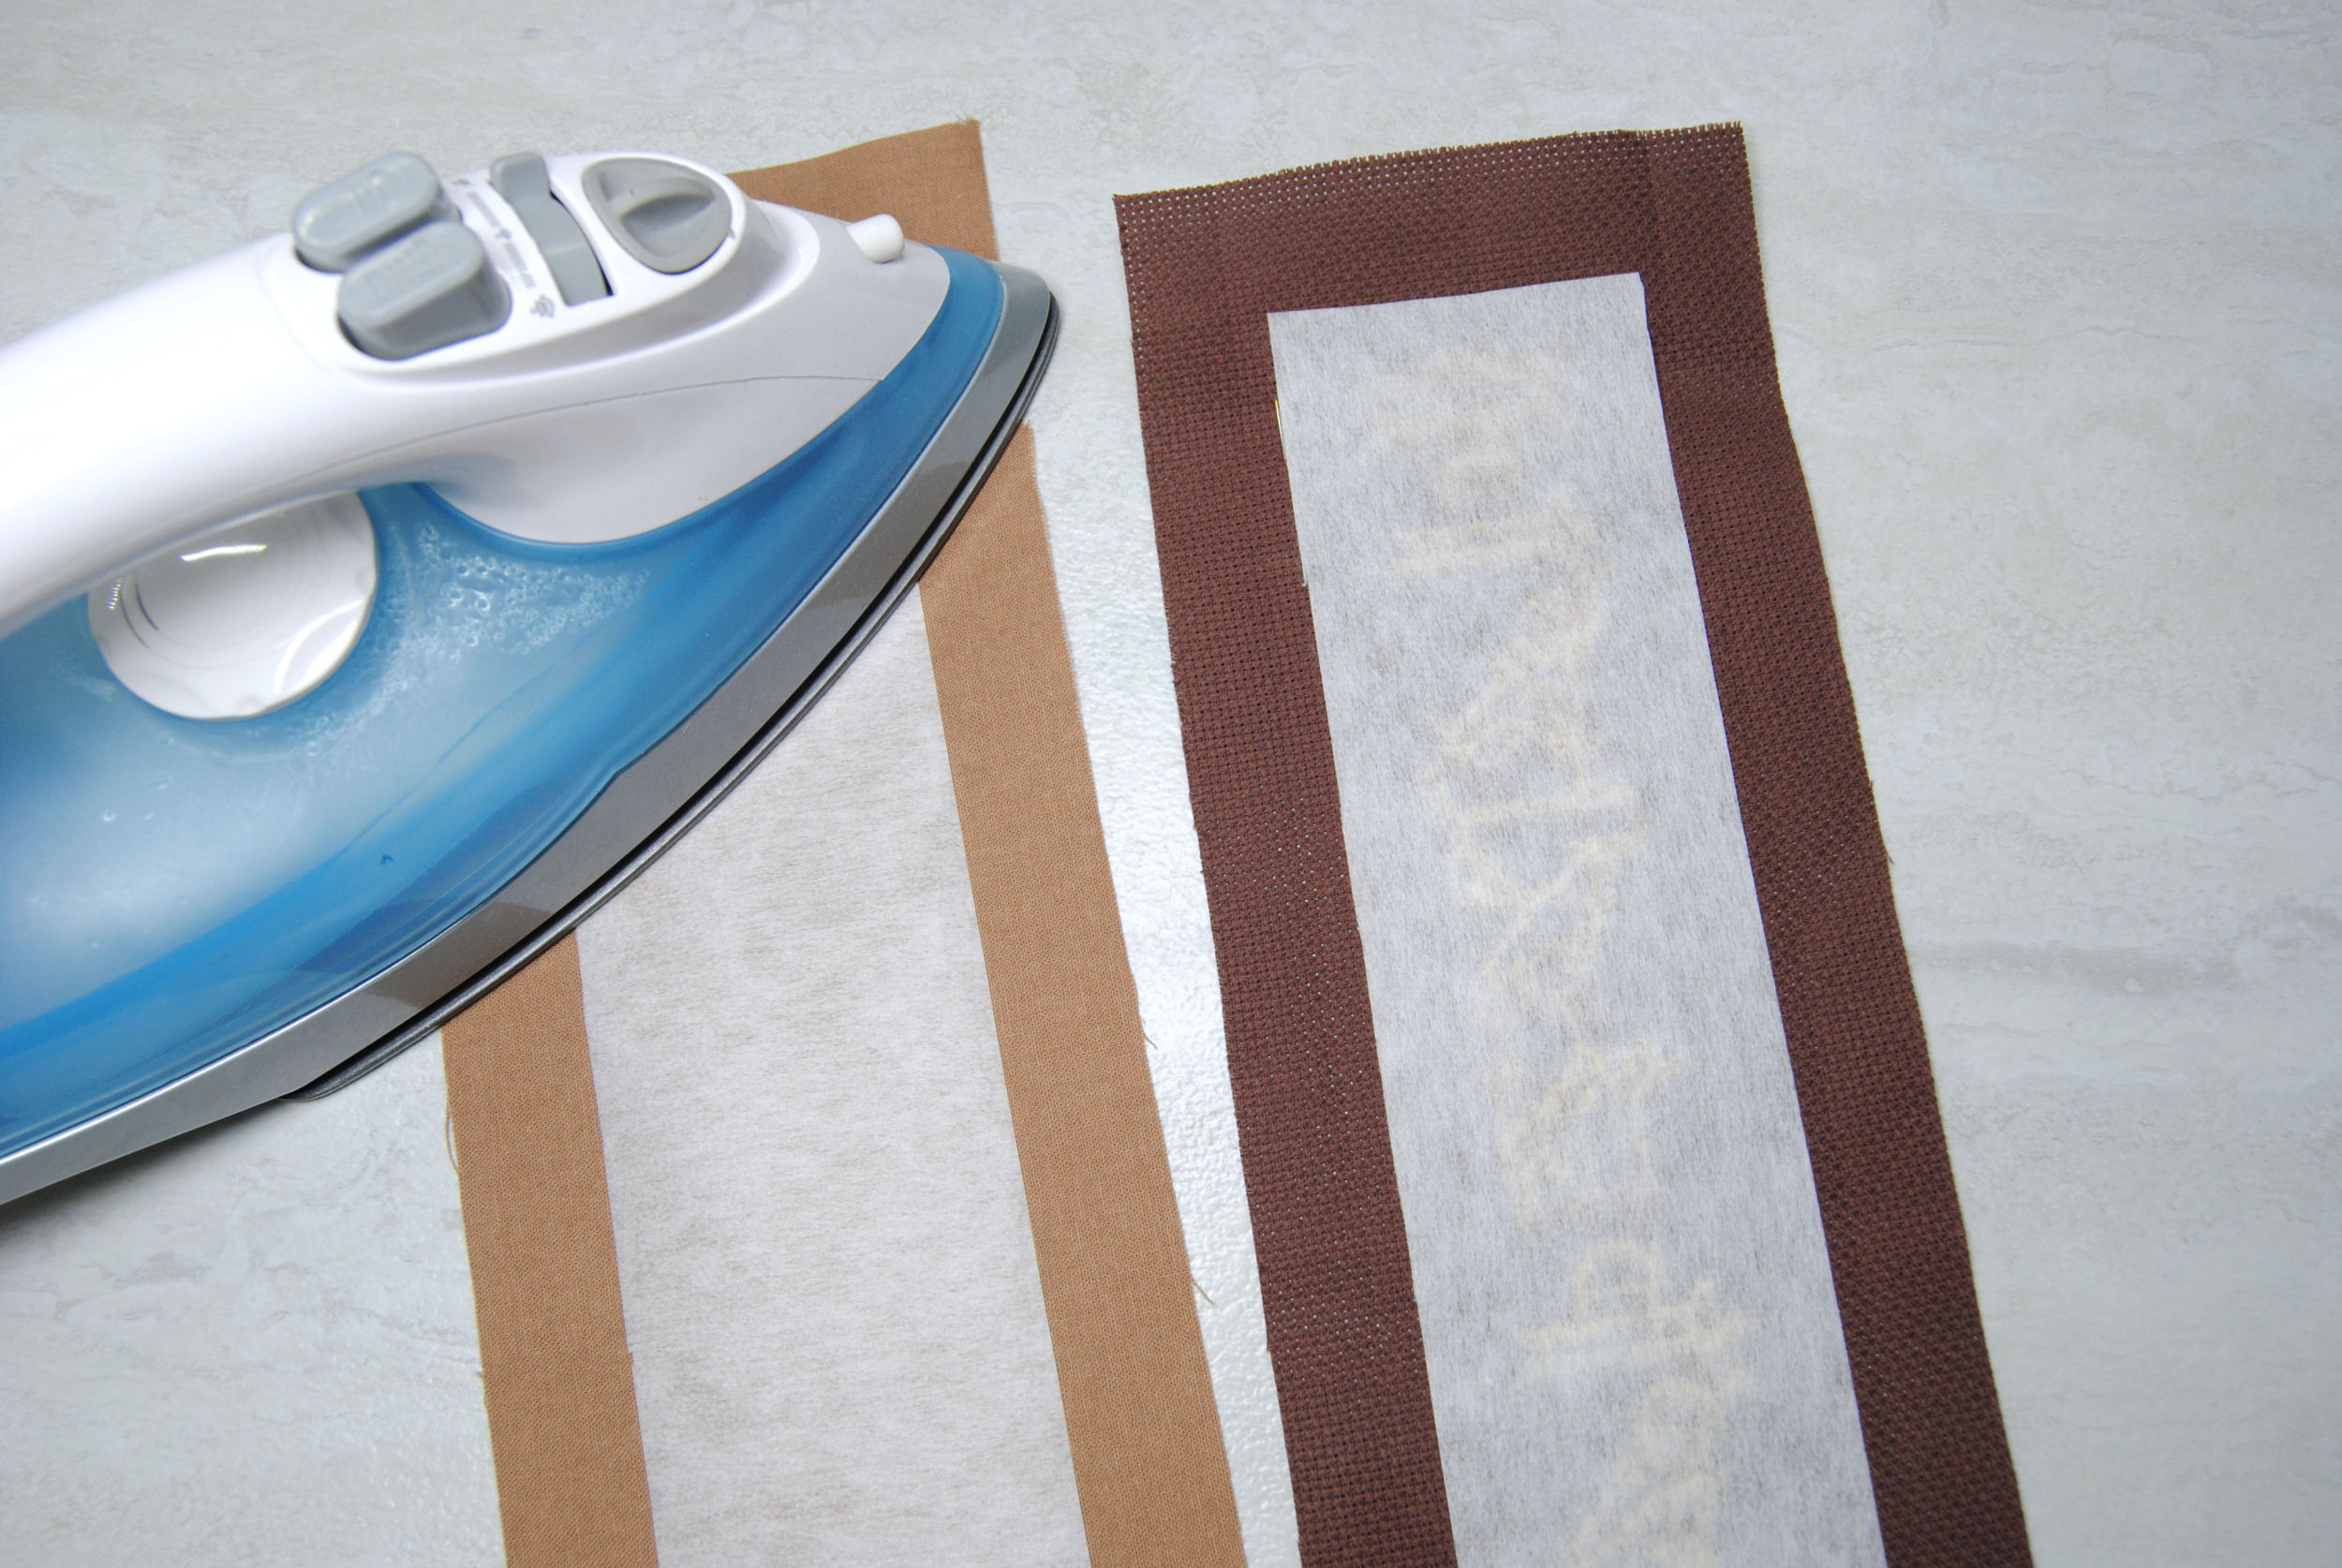
Iron on Interfacing
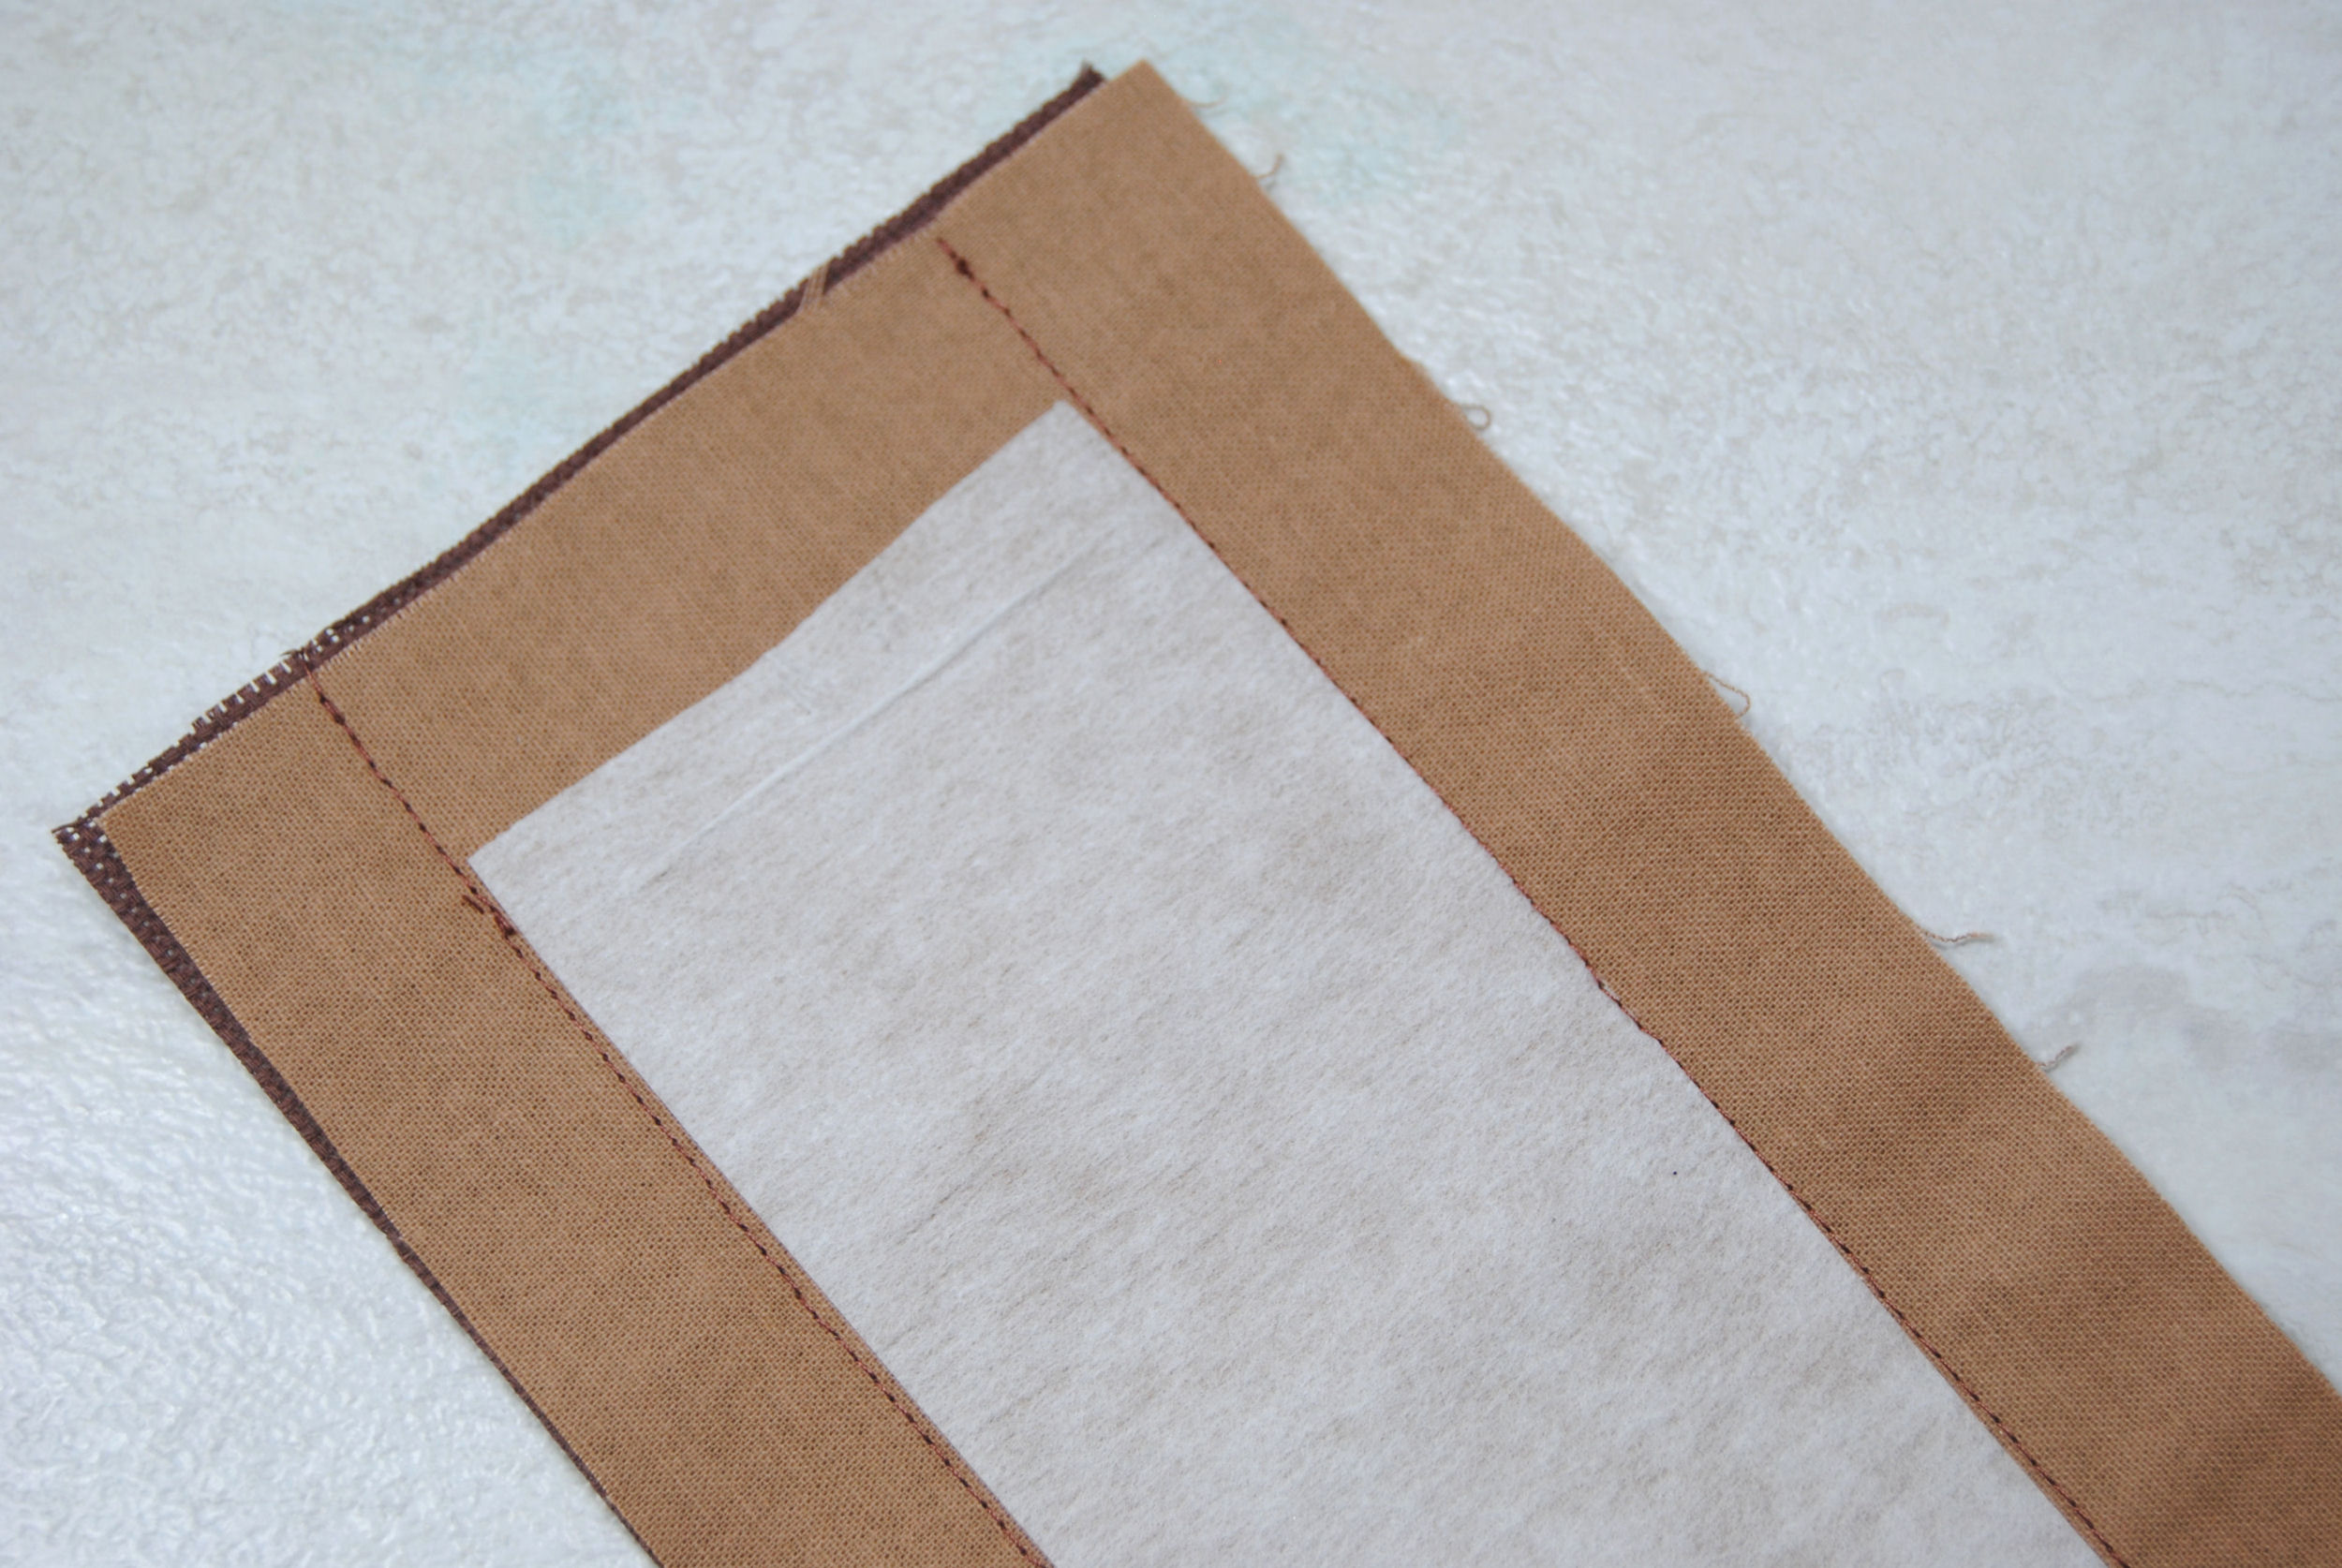
I chose to add fusible interfacing in my project to give it a bit of stiffness, and to secure the backs of my stitches just in case. I ironed some on to both the back of the aida and my backing fabric. It adds a bit of stiffness to the project, which I like.
Note the interfacing is JUST on the portion that is the pattern+buffer. This also makes it pretty clear what is your seam allowance when sewing together.
It’s not strictly necessary, but it’s in all my photos so I may as well tell you what I did. 😅
If you want to as well, be sure to follow the ironing instructions on the package you purchase.
Sewing Together
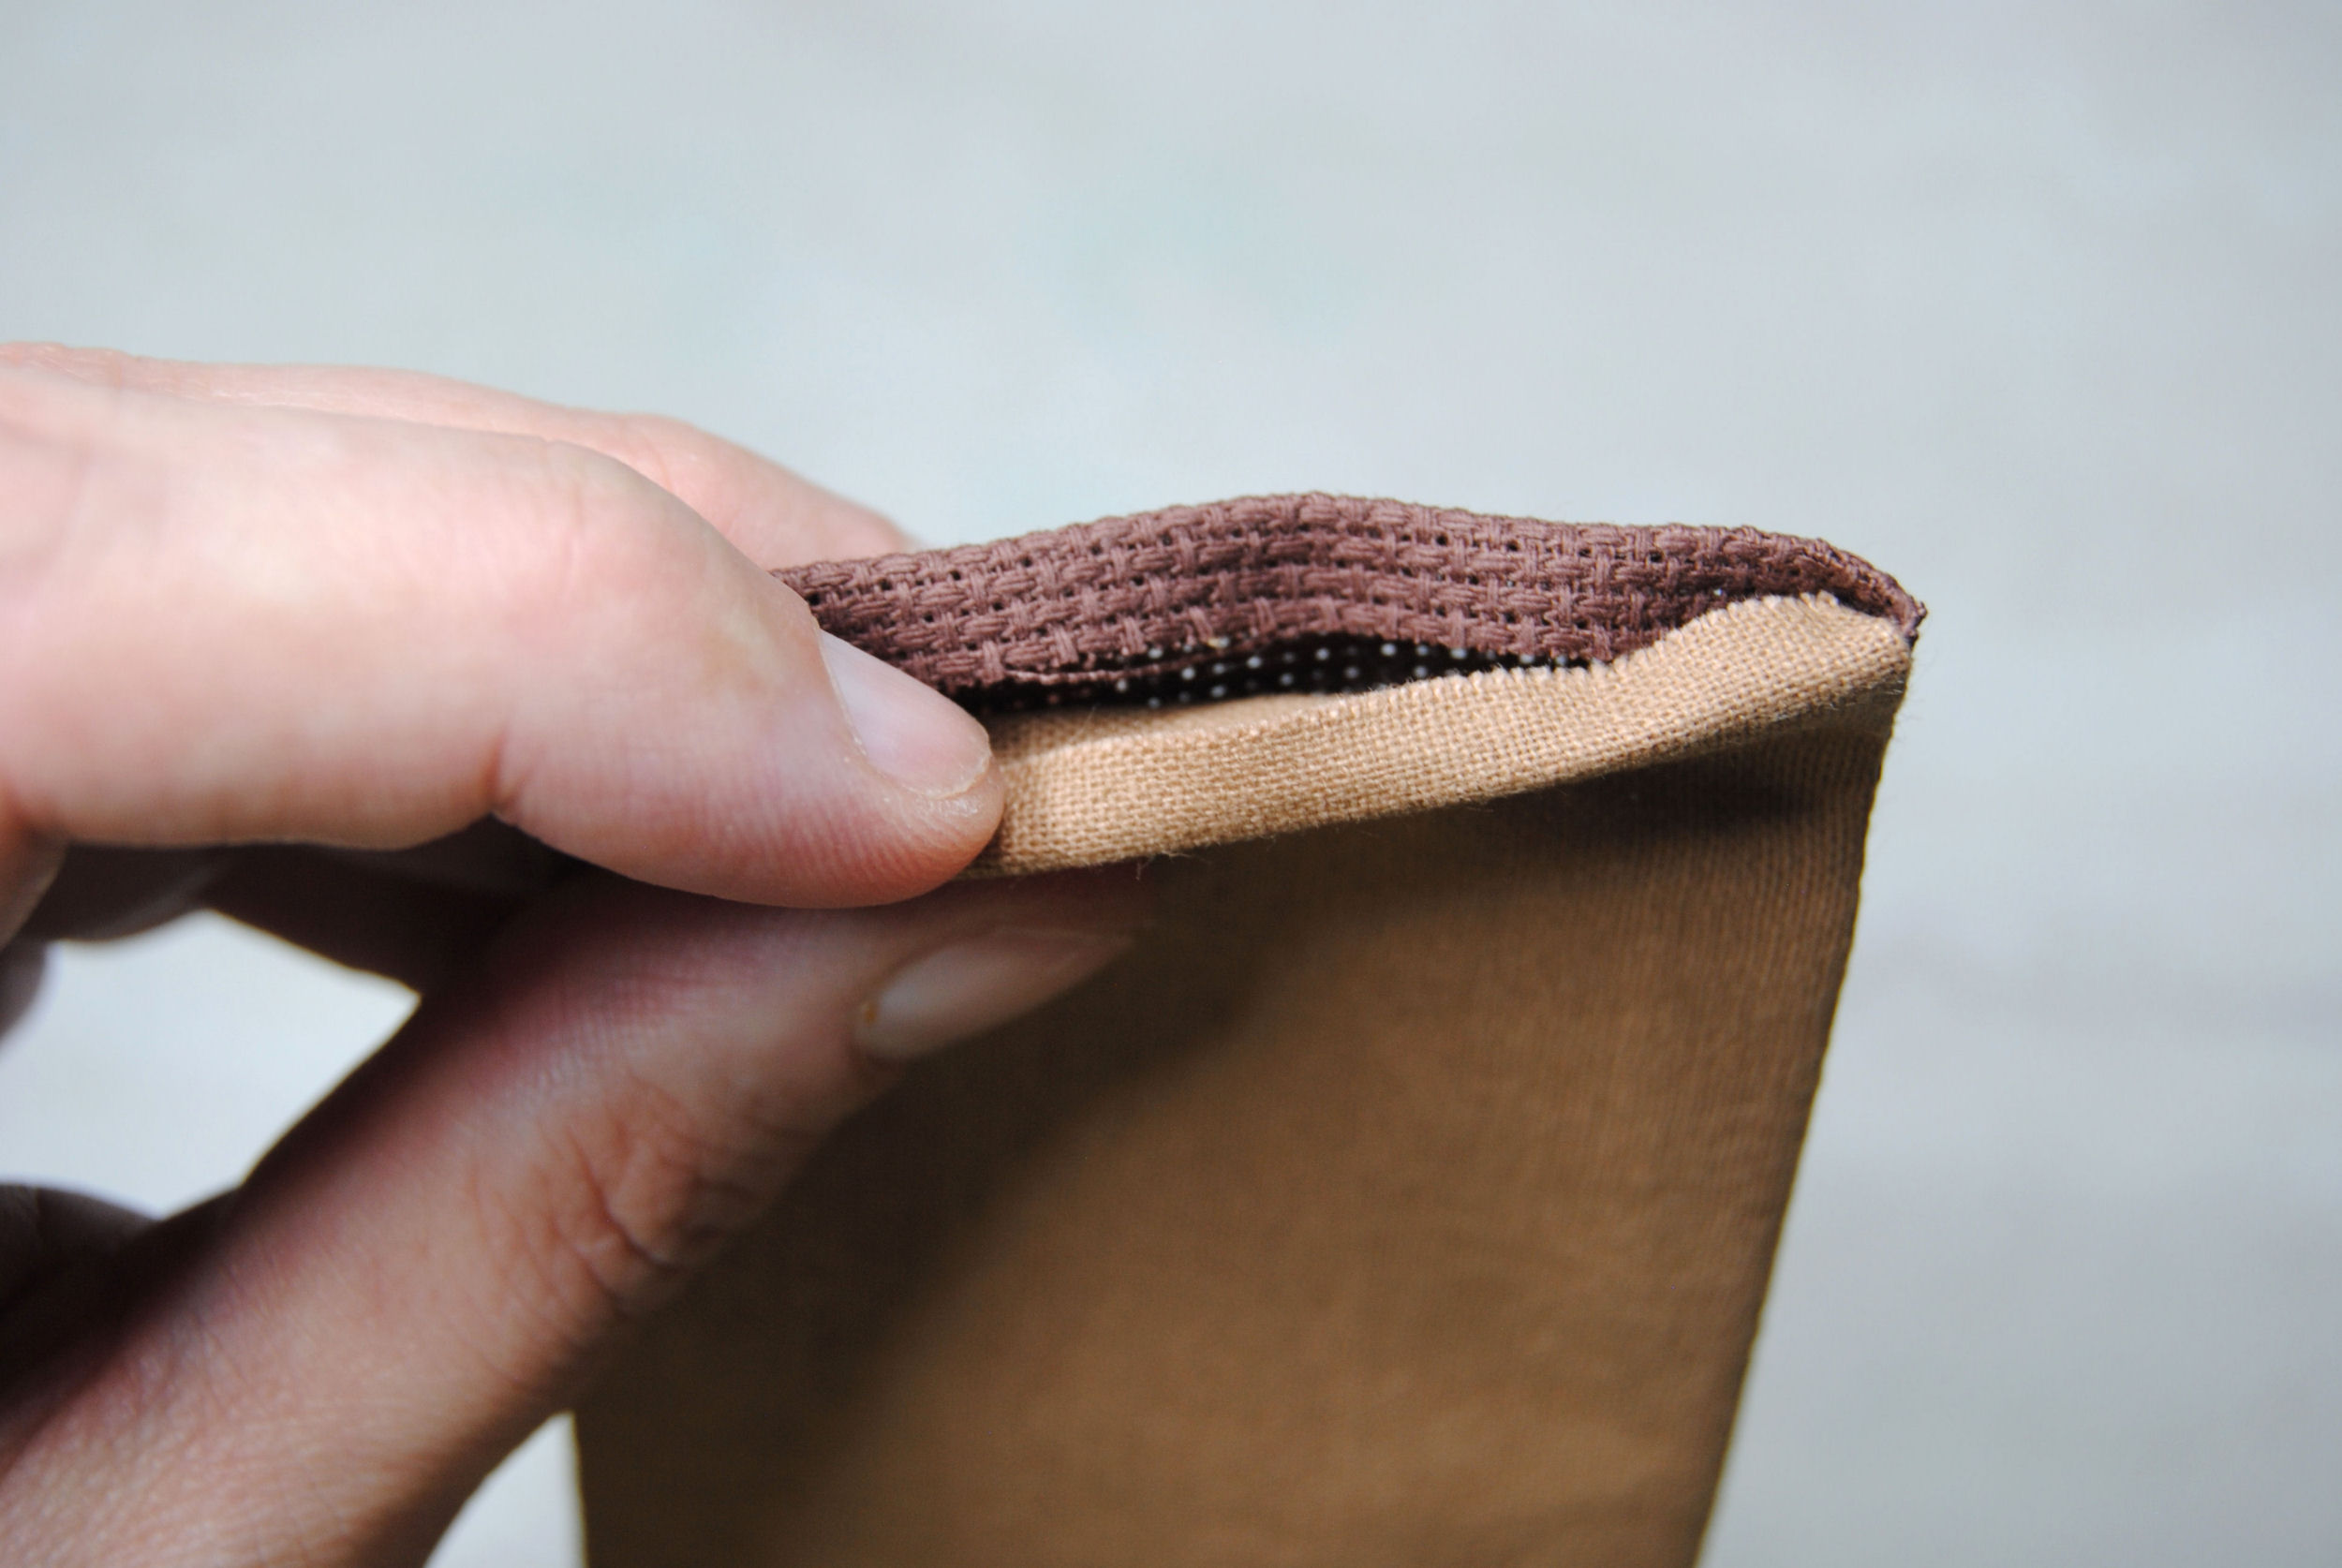
Alright, now we’re ready to start sewing things together. Start by clipping or pinning your two fabrics front sides, or ‘right sides’ facing.
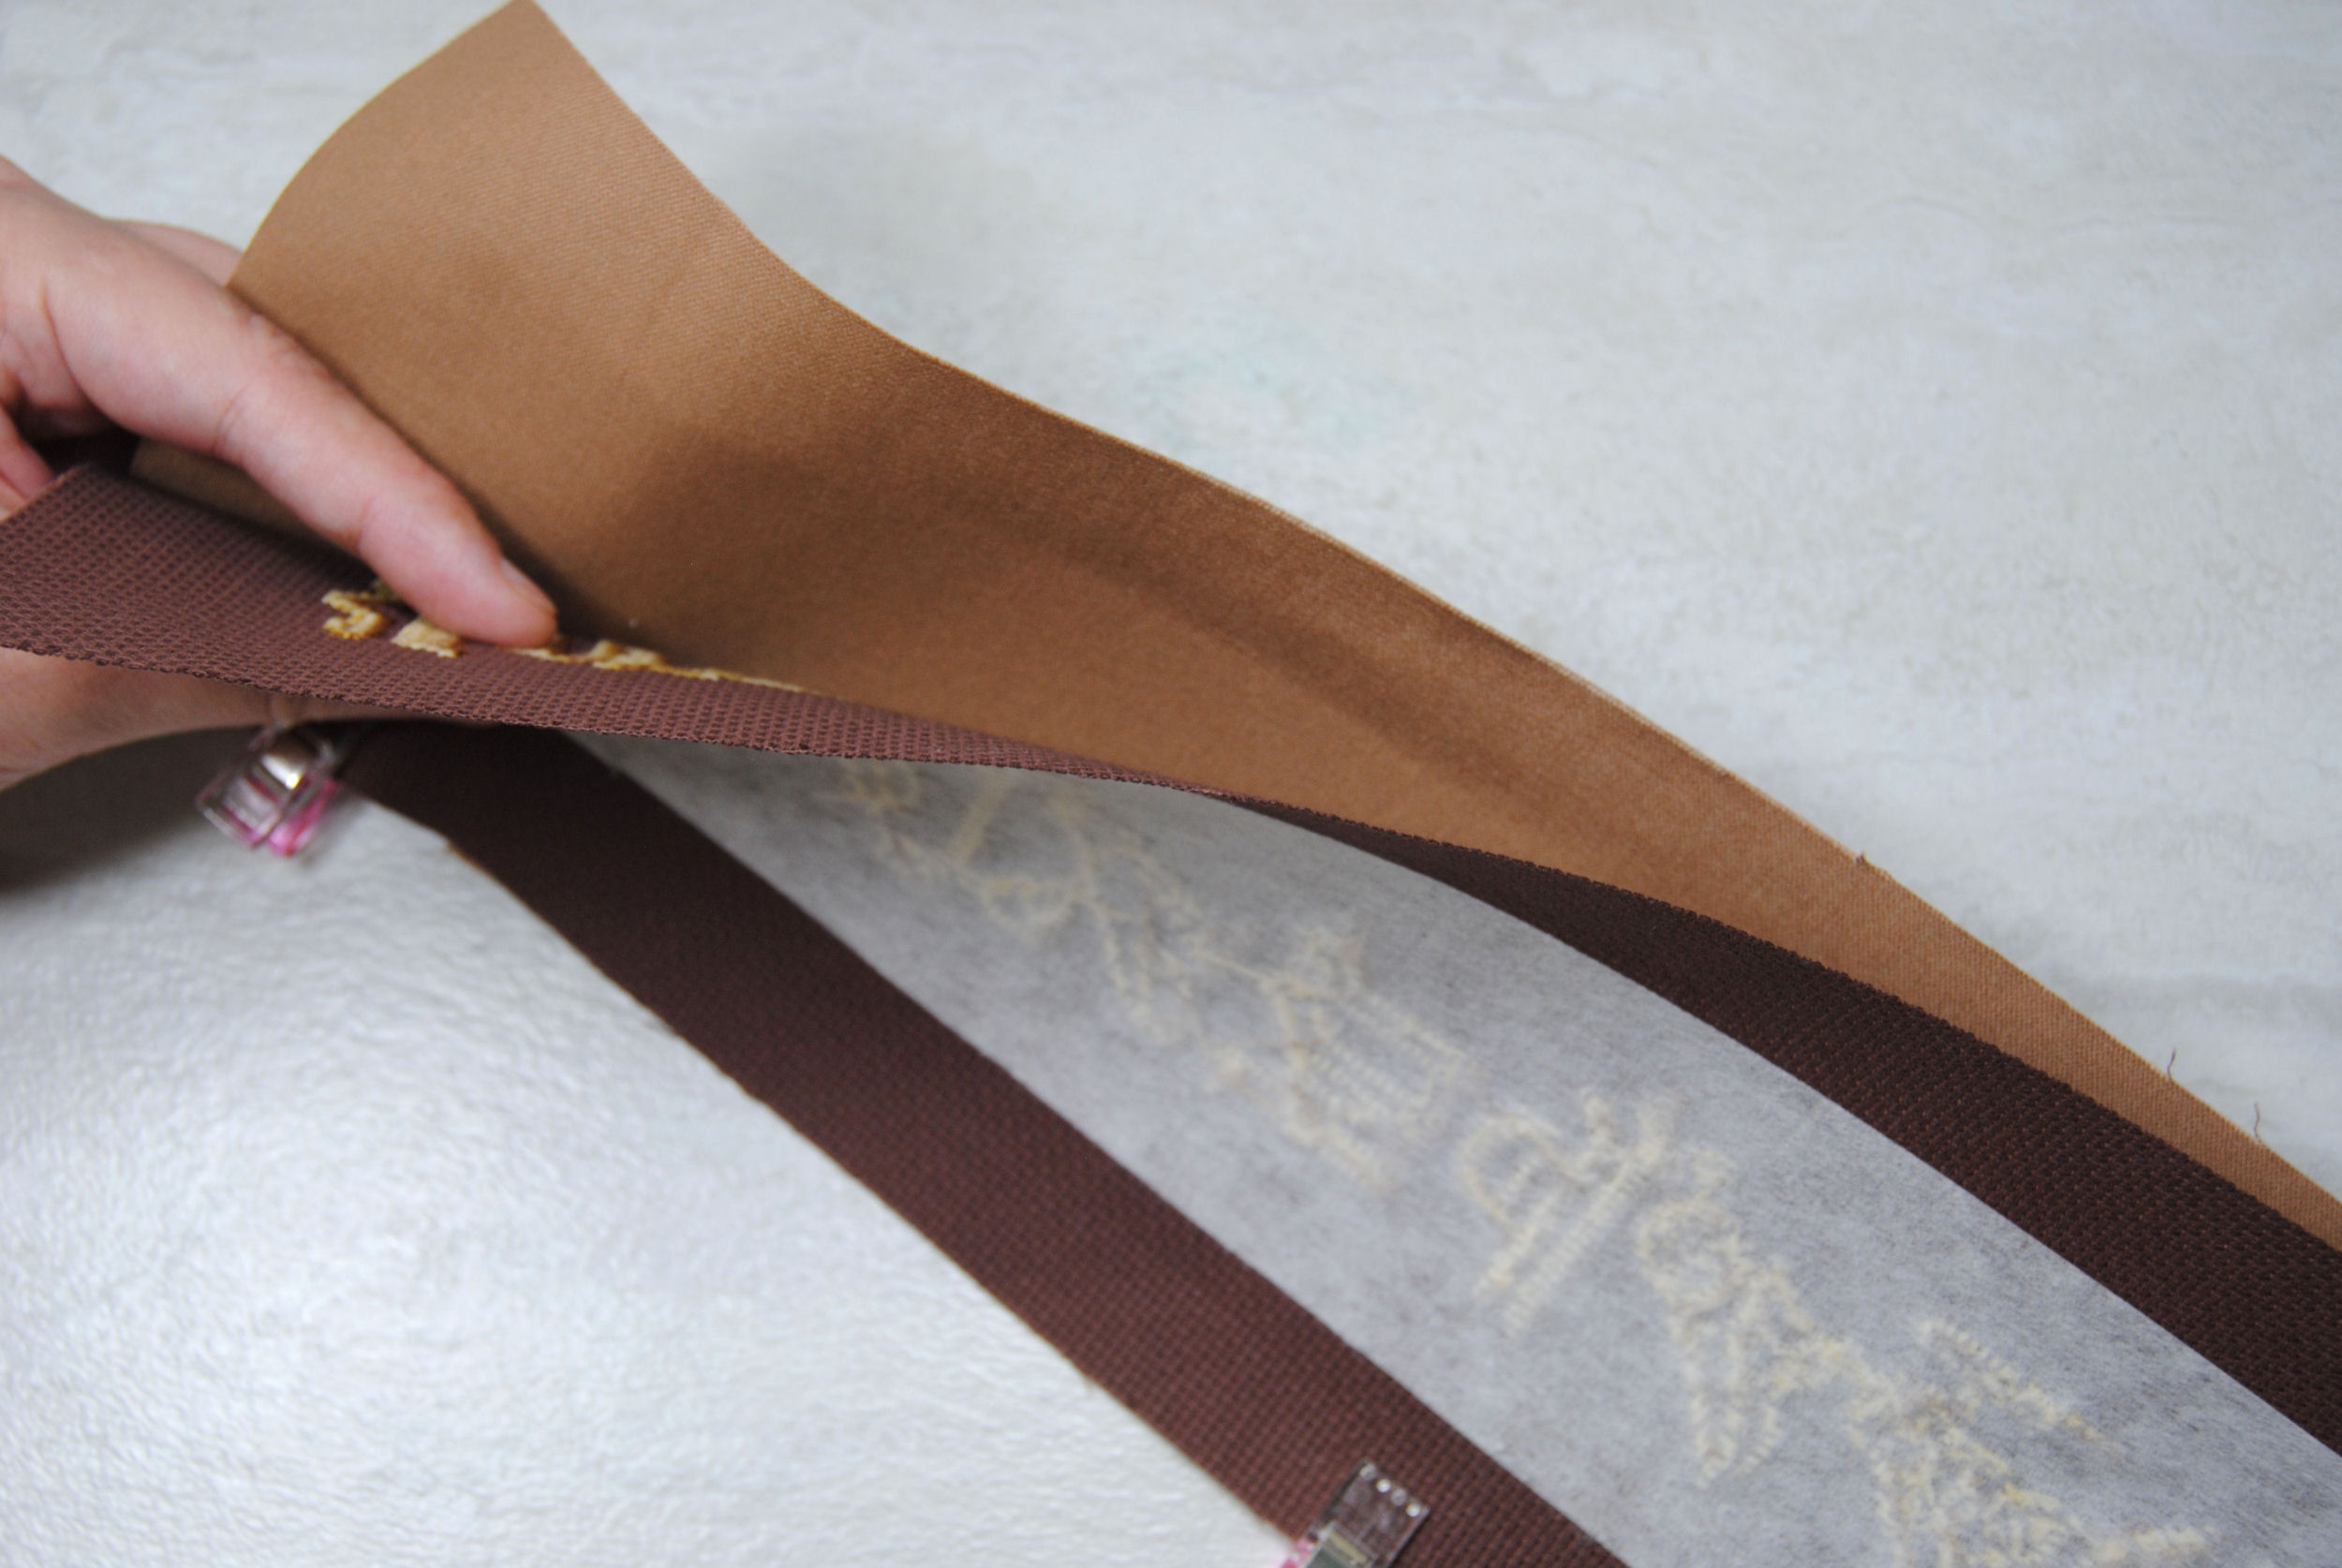
Then stitch the long sides together at your buffer line. I chose to sew this by machine, but you could also sew this by hand just by backstitching a line all the way up using the aida layer as your guide and simply stitching through both layers. I used my interfacing layer as a guide to sew straight, but you could also use the aida grid as your guide.
Once stitched together, you’ll want to turn it right side out. For a thinner piece like this, it can be a bit tricky, but take your time and pull from the inside out and it’ll be fine.

It’ll be a bit wrinkled from all the manhandling it went through to get turned right side out though, so I recommend ironing it at this point to neatly press it in place.
See? Much nicer!
If you’d like, you can also topstitch the edge in place. I opted not to, however.
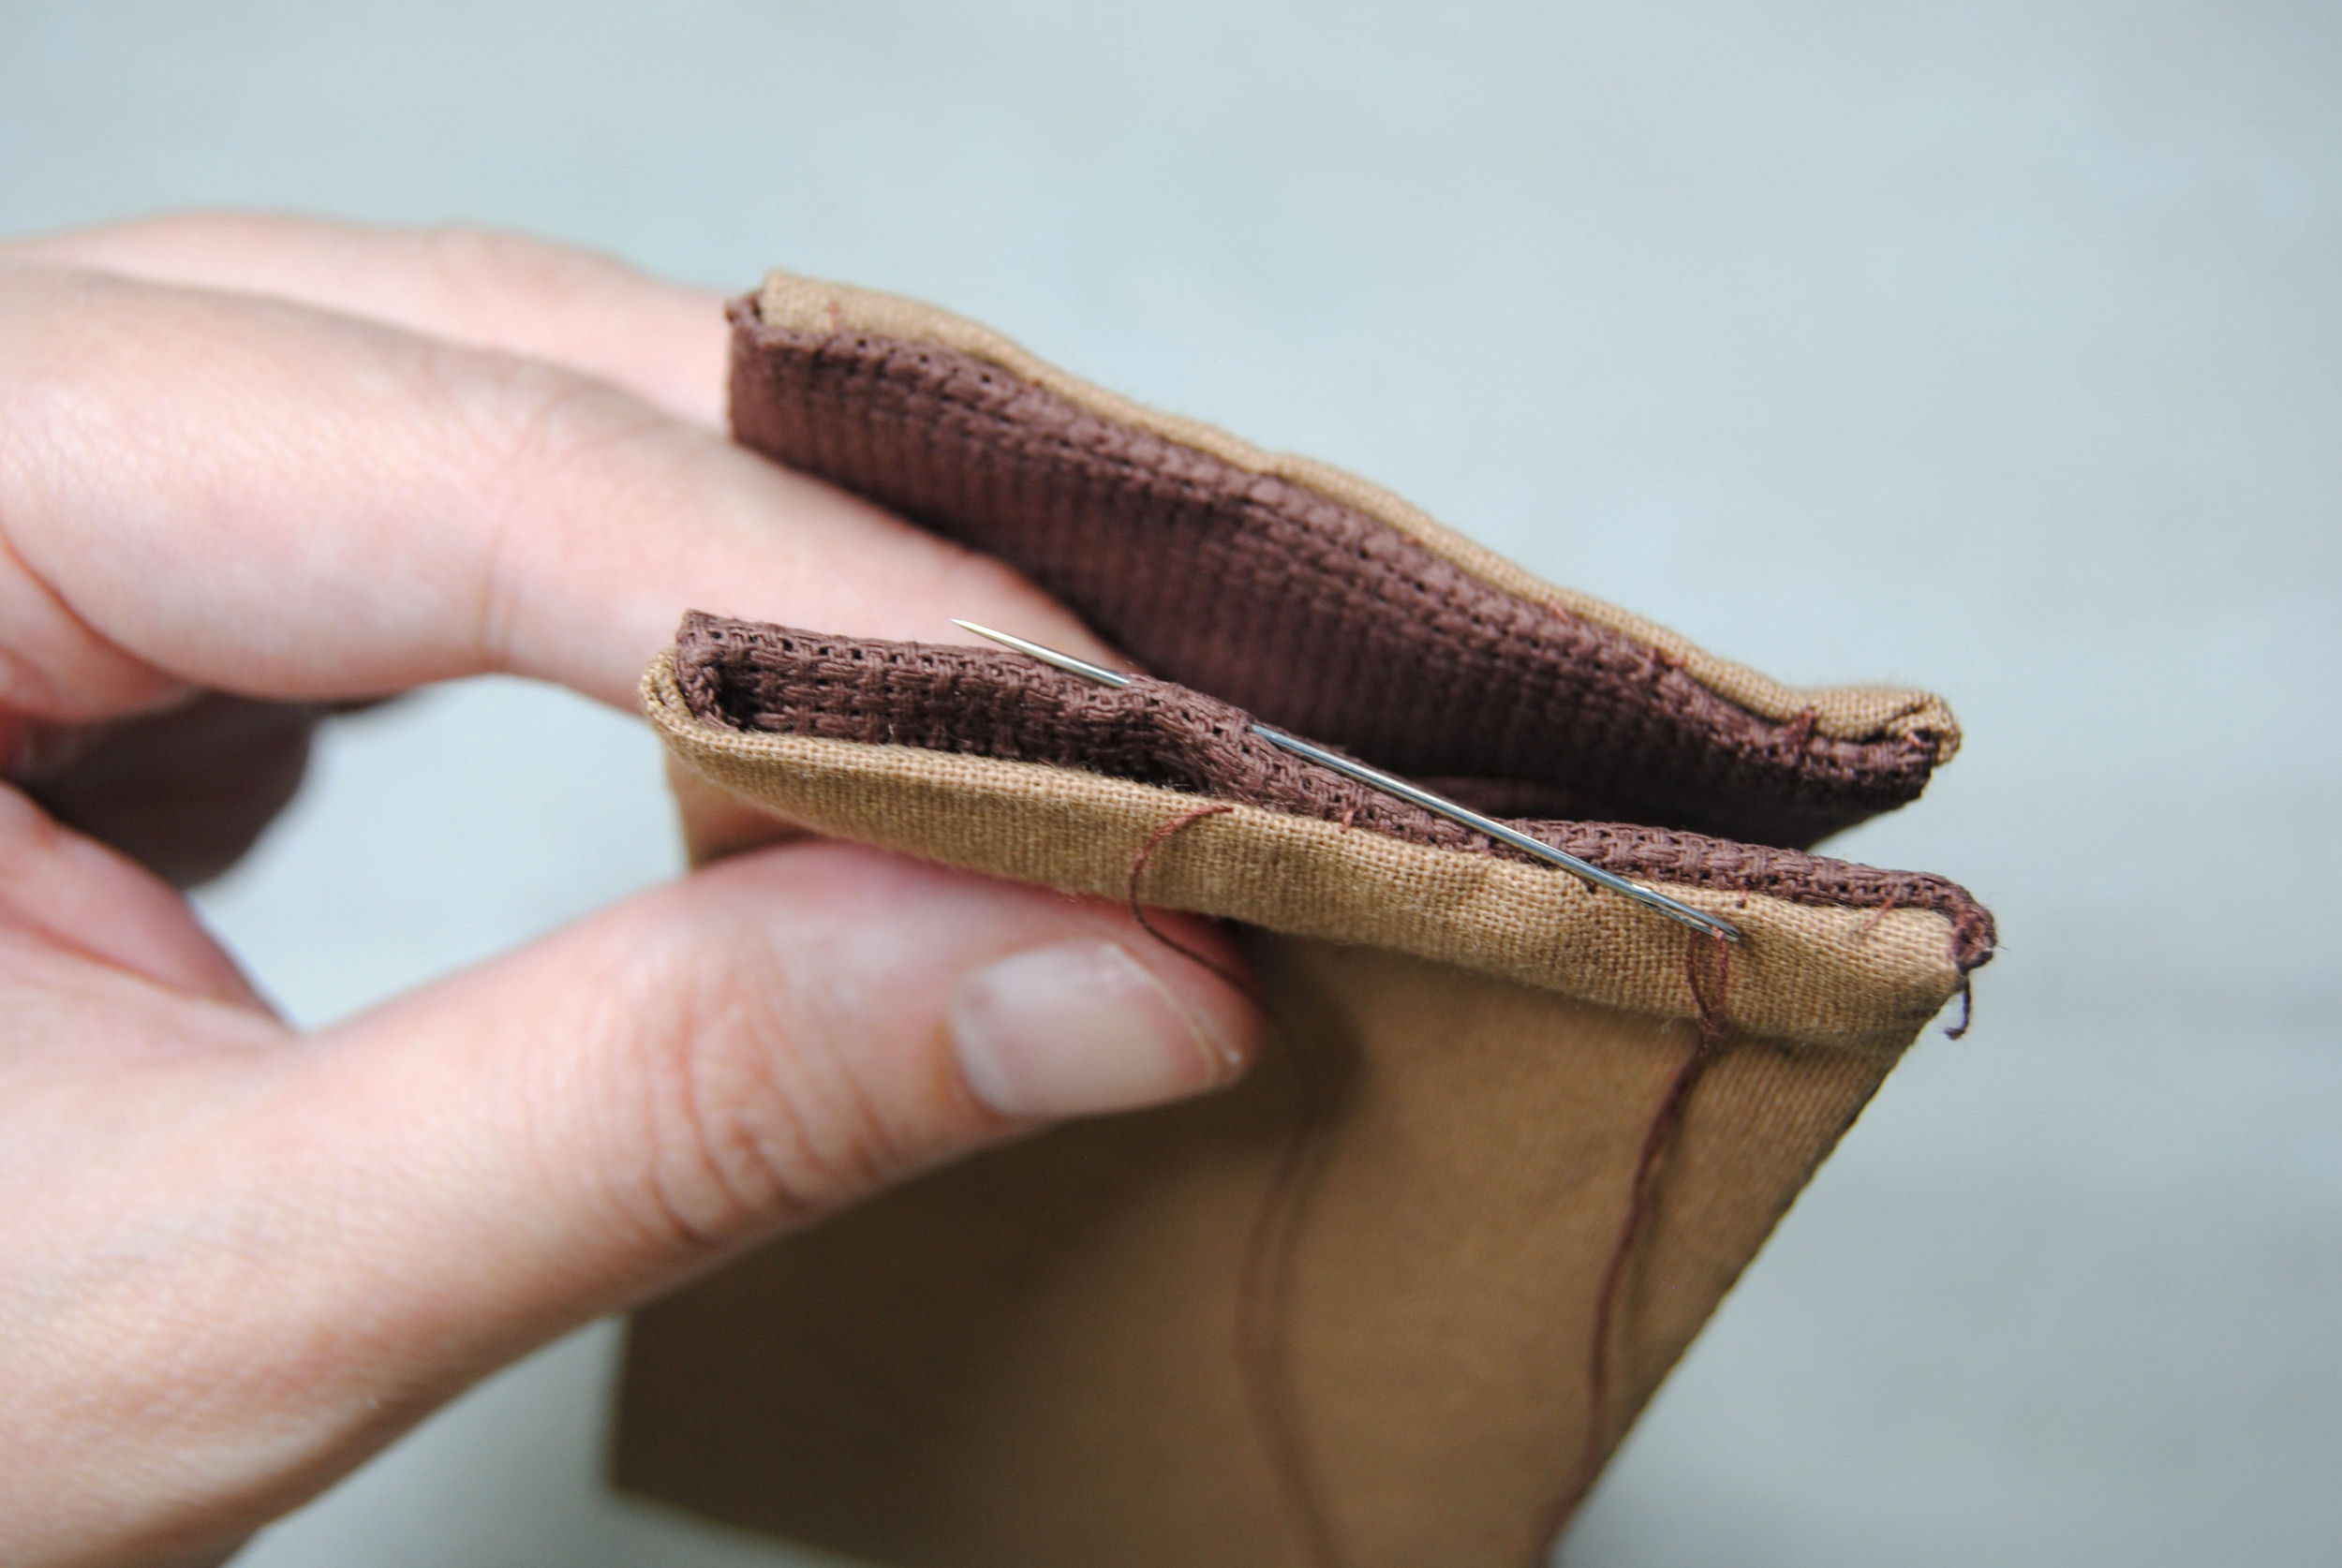
Hand Sew Ends
Time to sew the ends closed! Let’s start by folding in a bit of the fabric so you’re not sewing on raw edges. Note this won’t be the full seam allowance, as we’ll also be folding this over the rods. Just a small amount.
You could machine sew the top closed as well and then just hand sew when you go to wrap it on your hardware. But I opted to do both by hand using a ladder stitch.
If you’re not familiar with the ladder stitch, I included some photos below. But there are also great tutorials online in both video and blog format, such as the one I linked here.
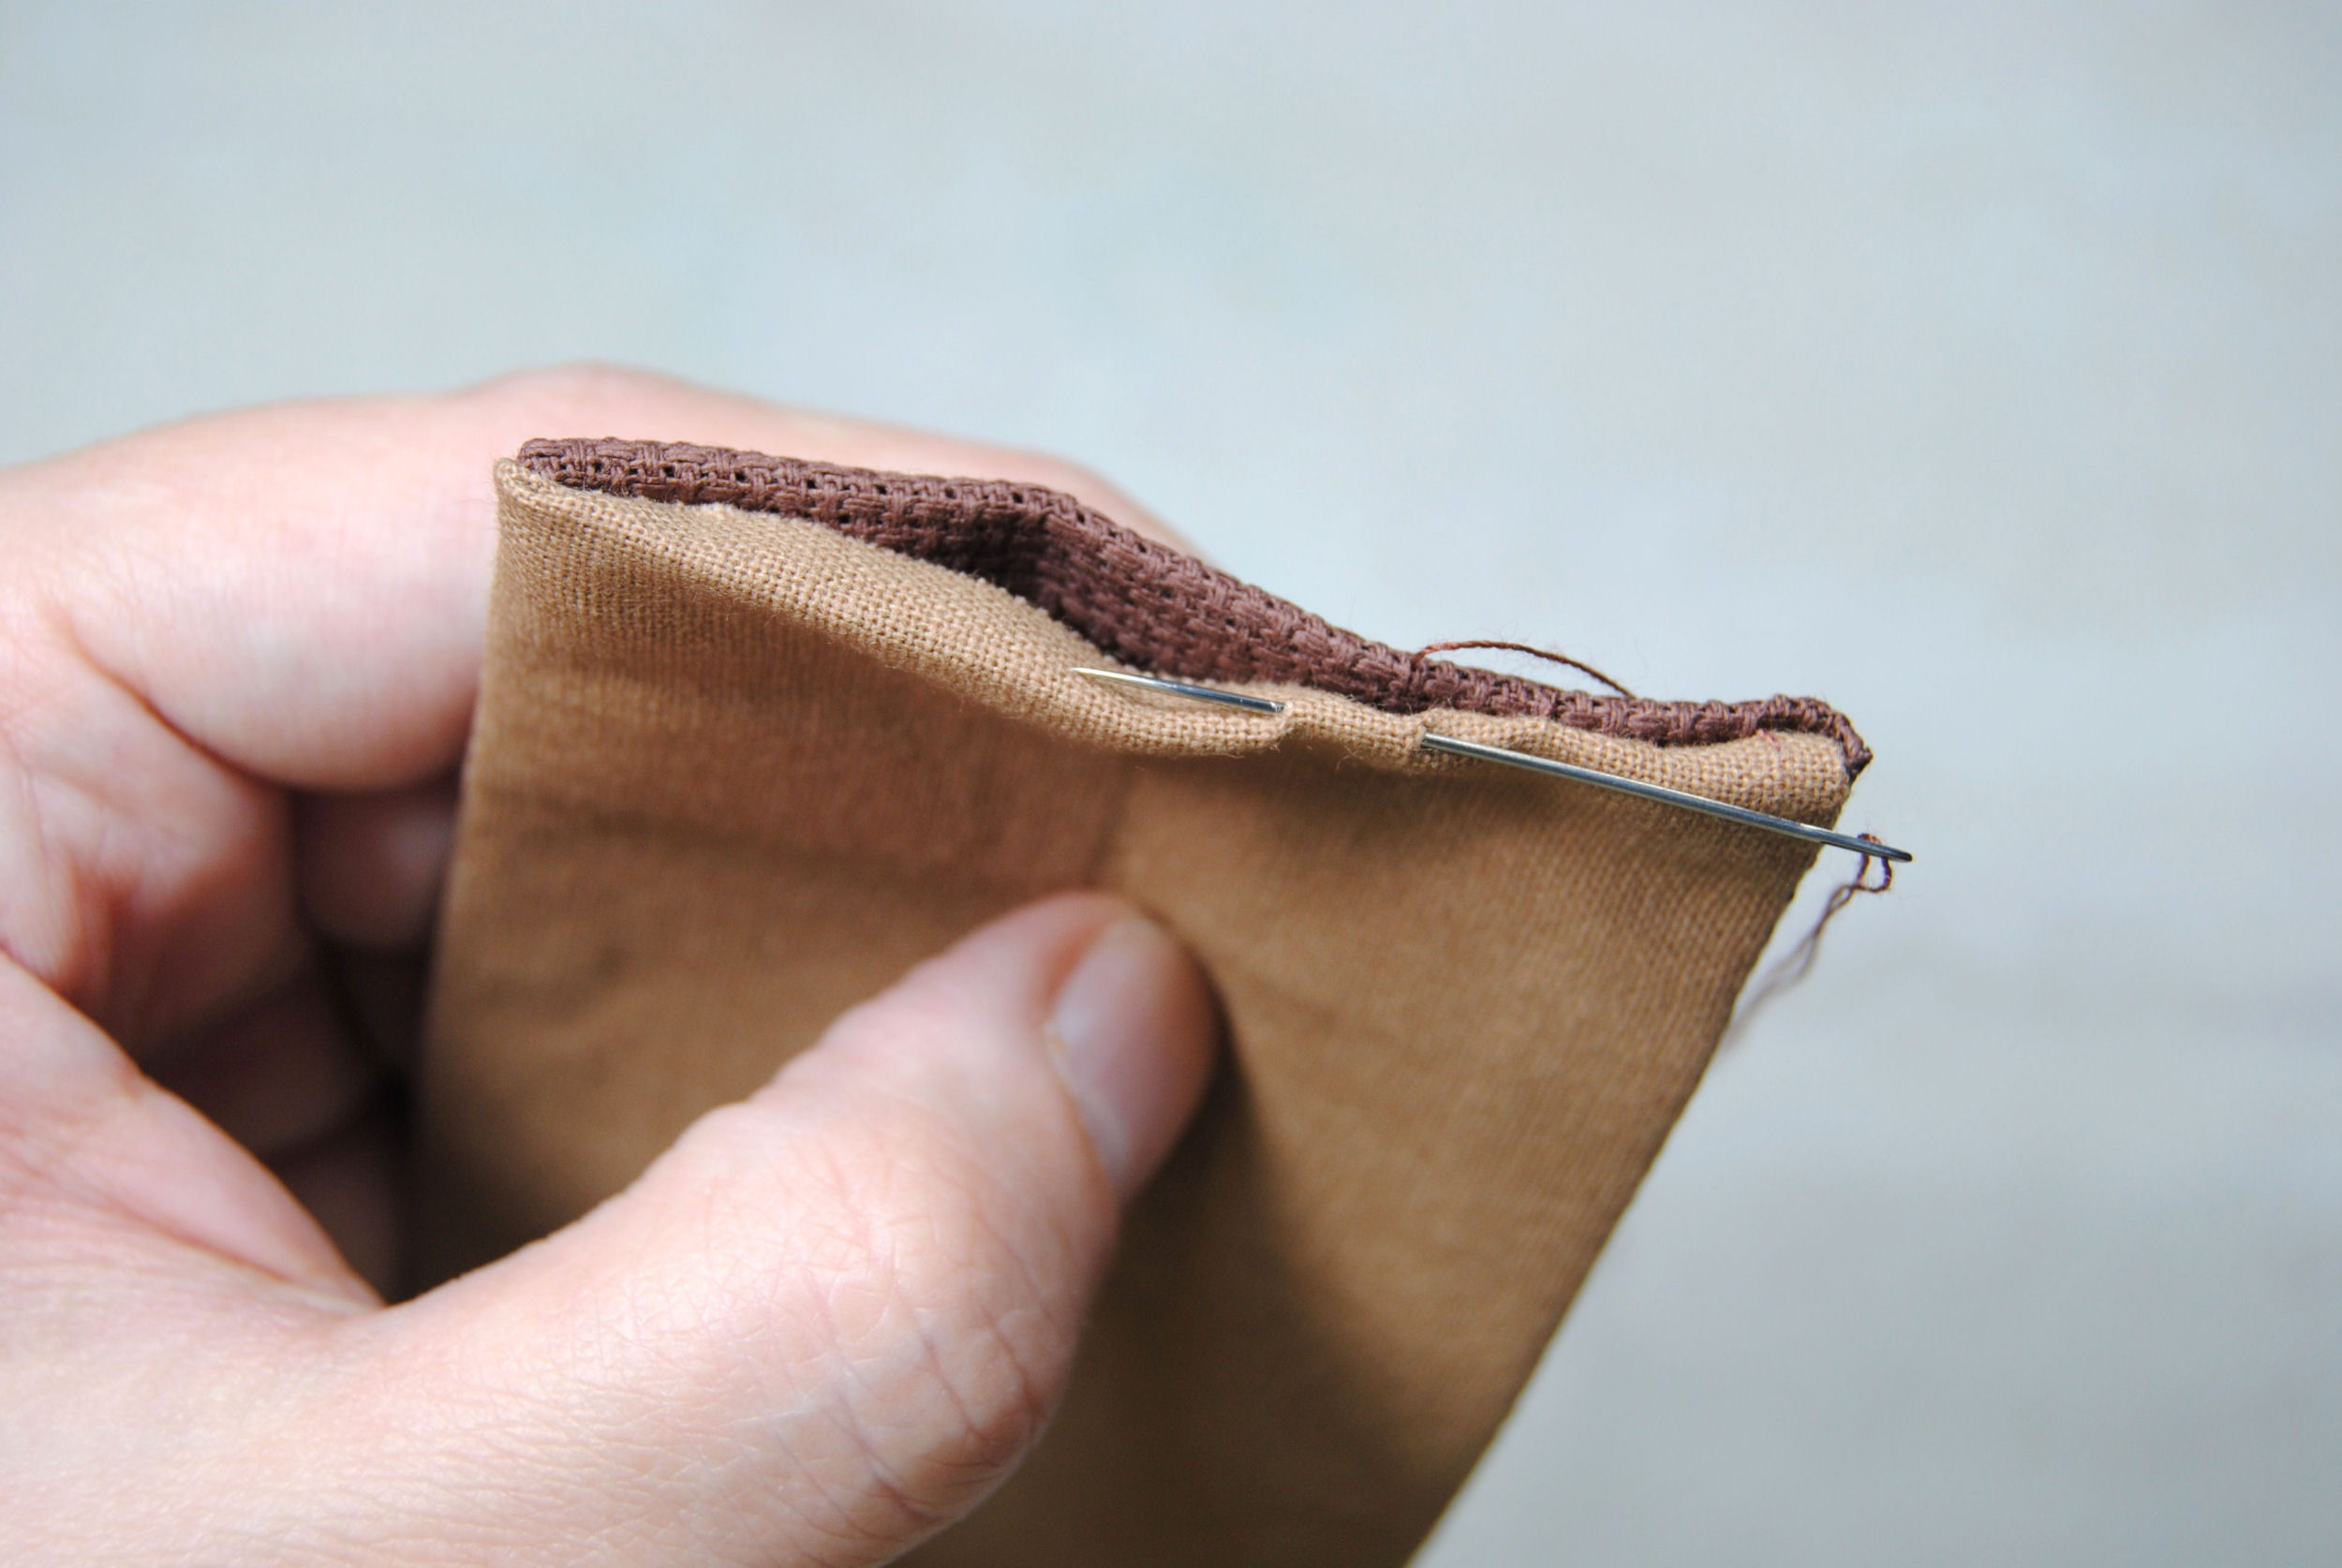
I wasn’t too terribly fussy with keeping it neat, as this would all be on the back in the end, but it still hides the stitching fairly well.
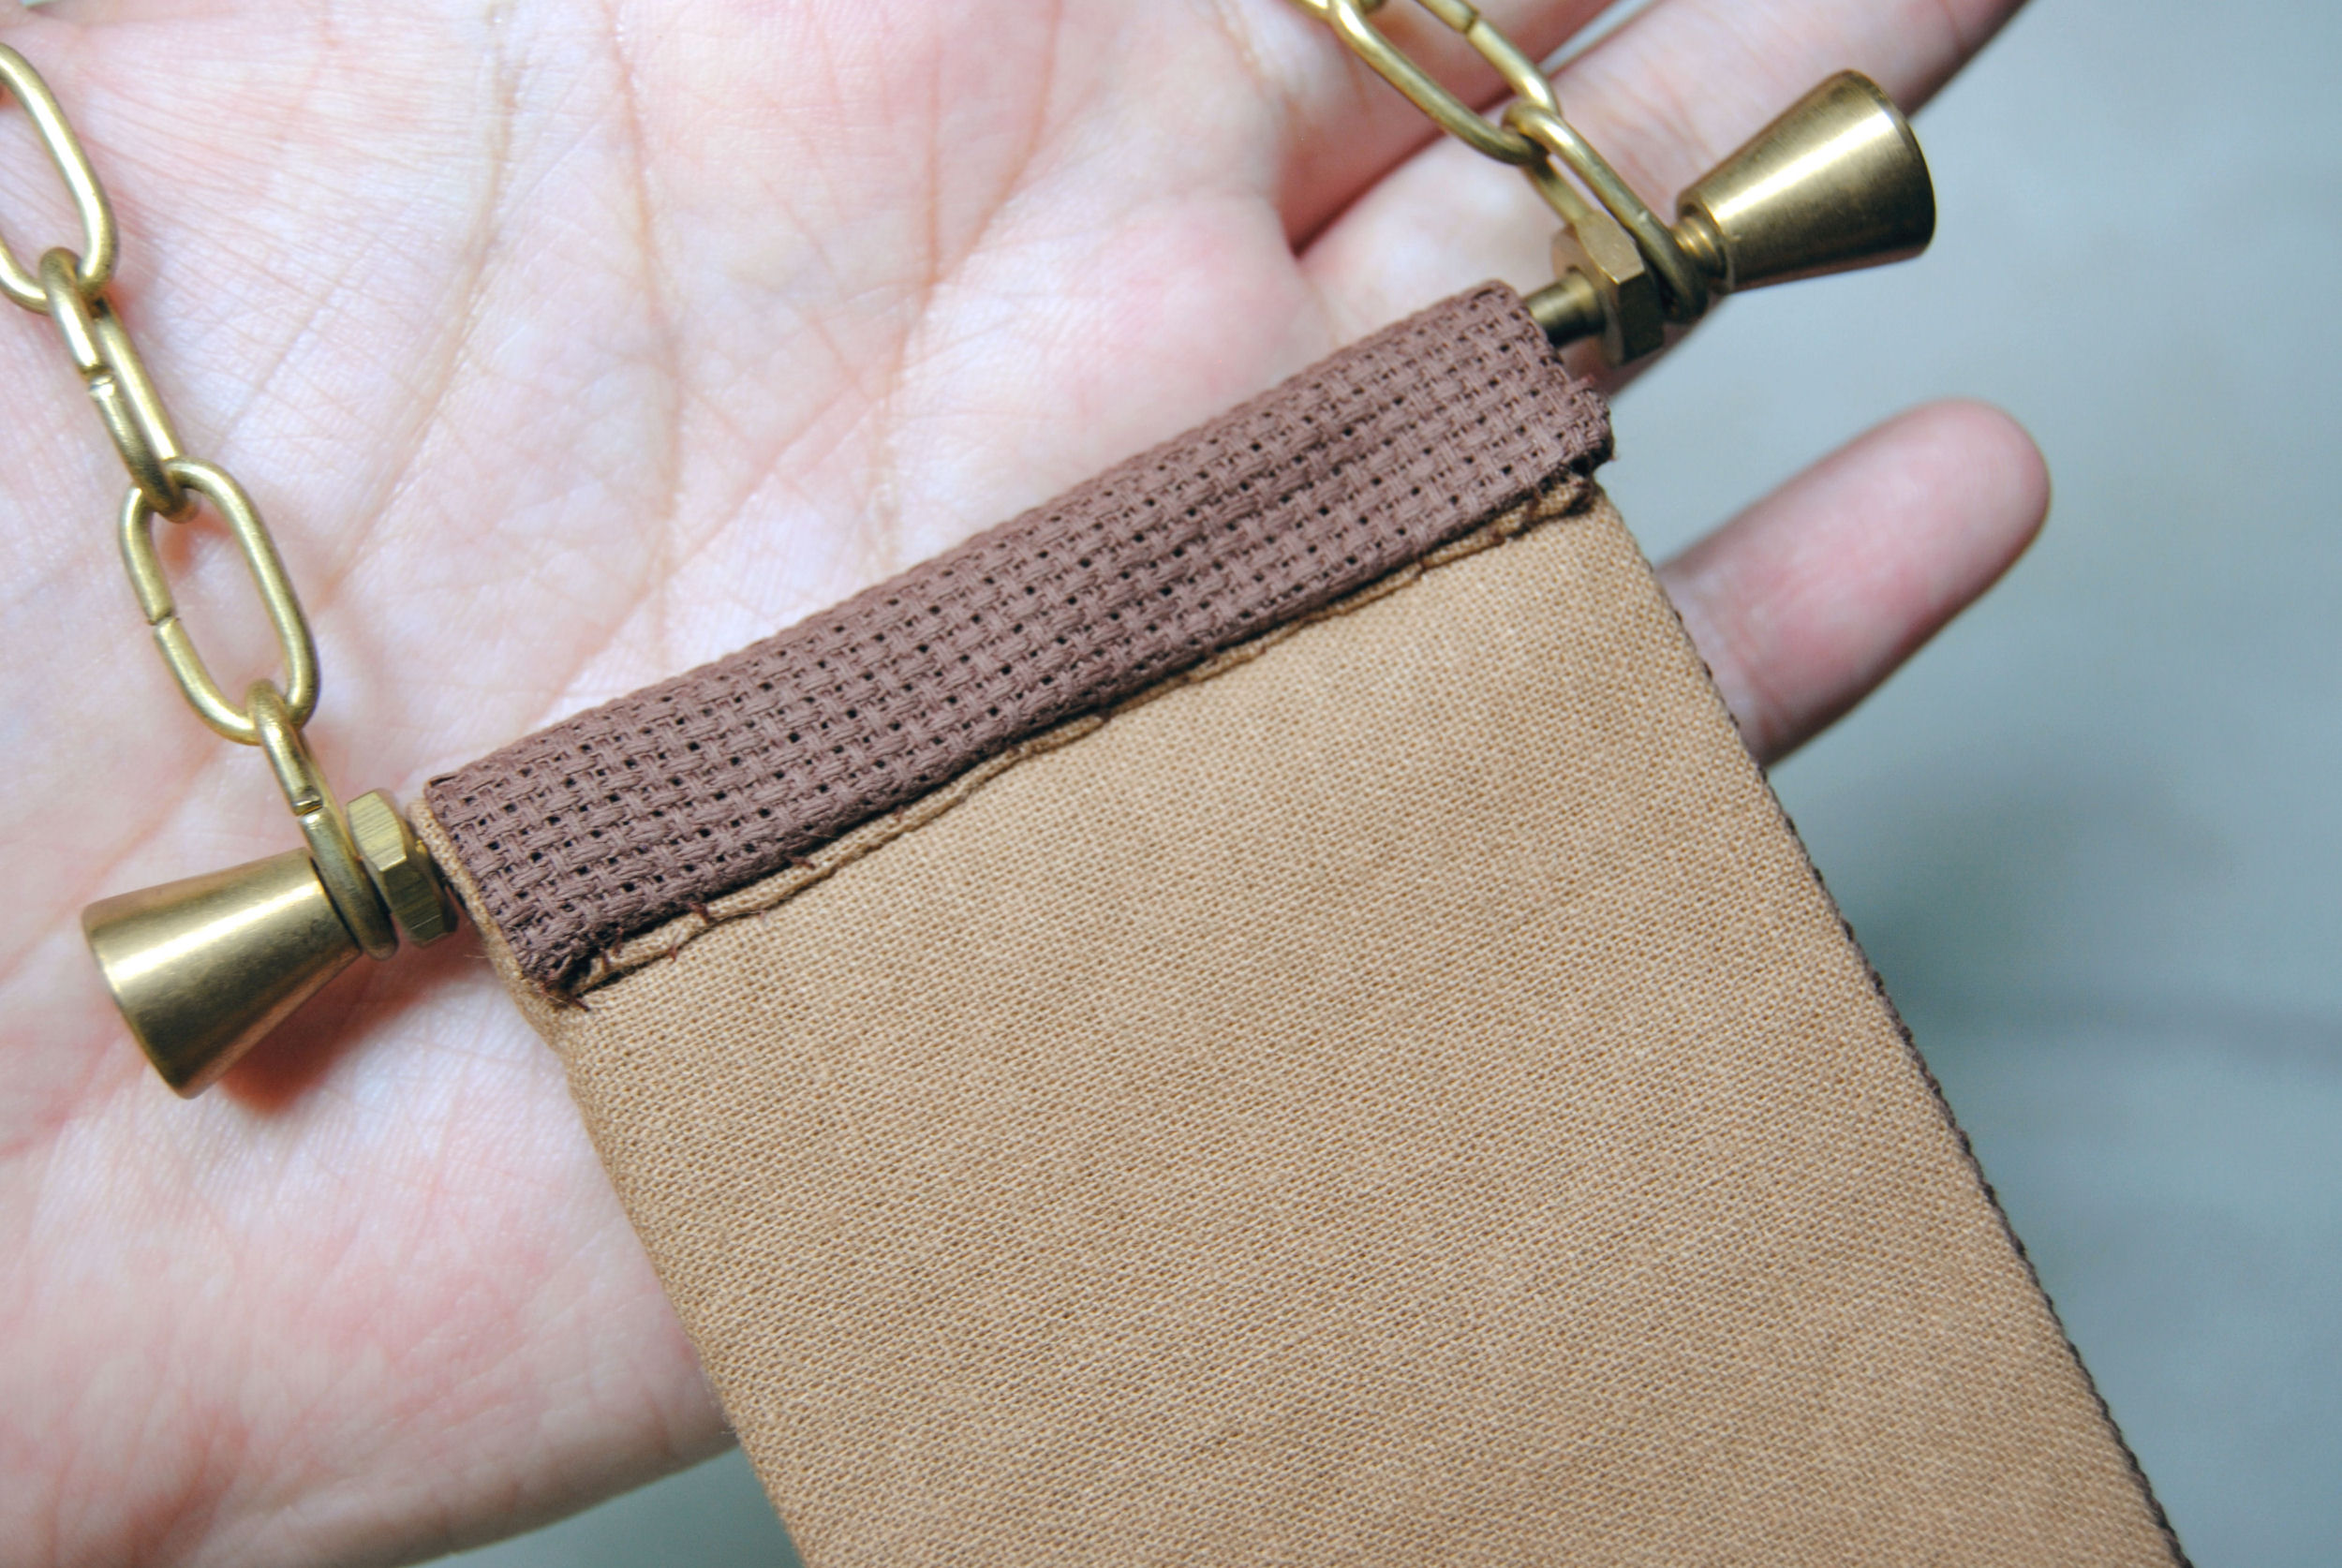
Attaching Decorative Hardware
Once the ends are closed it’s time to attach the hardware. This can be as simple as folding it over said hardware and doing another ladder stitch. This time being careful to only pierce the backing fabric and not go all the way through to the front.
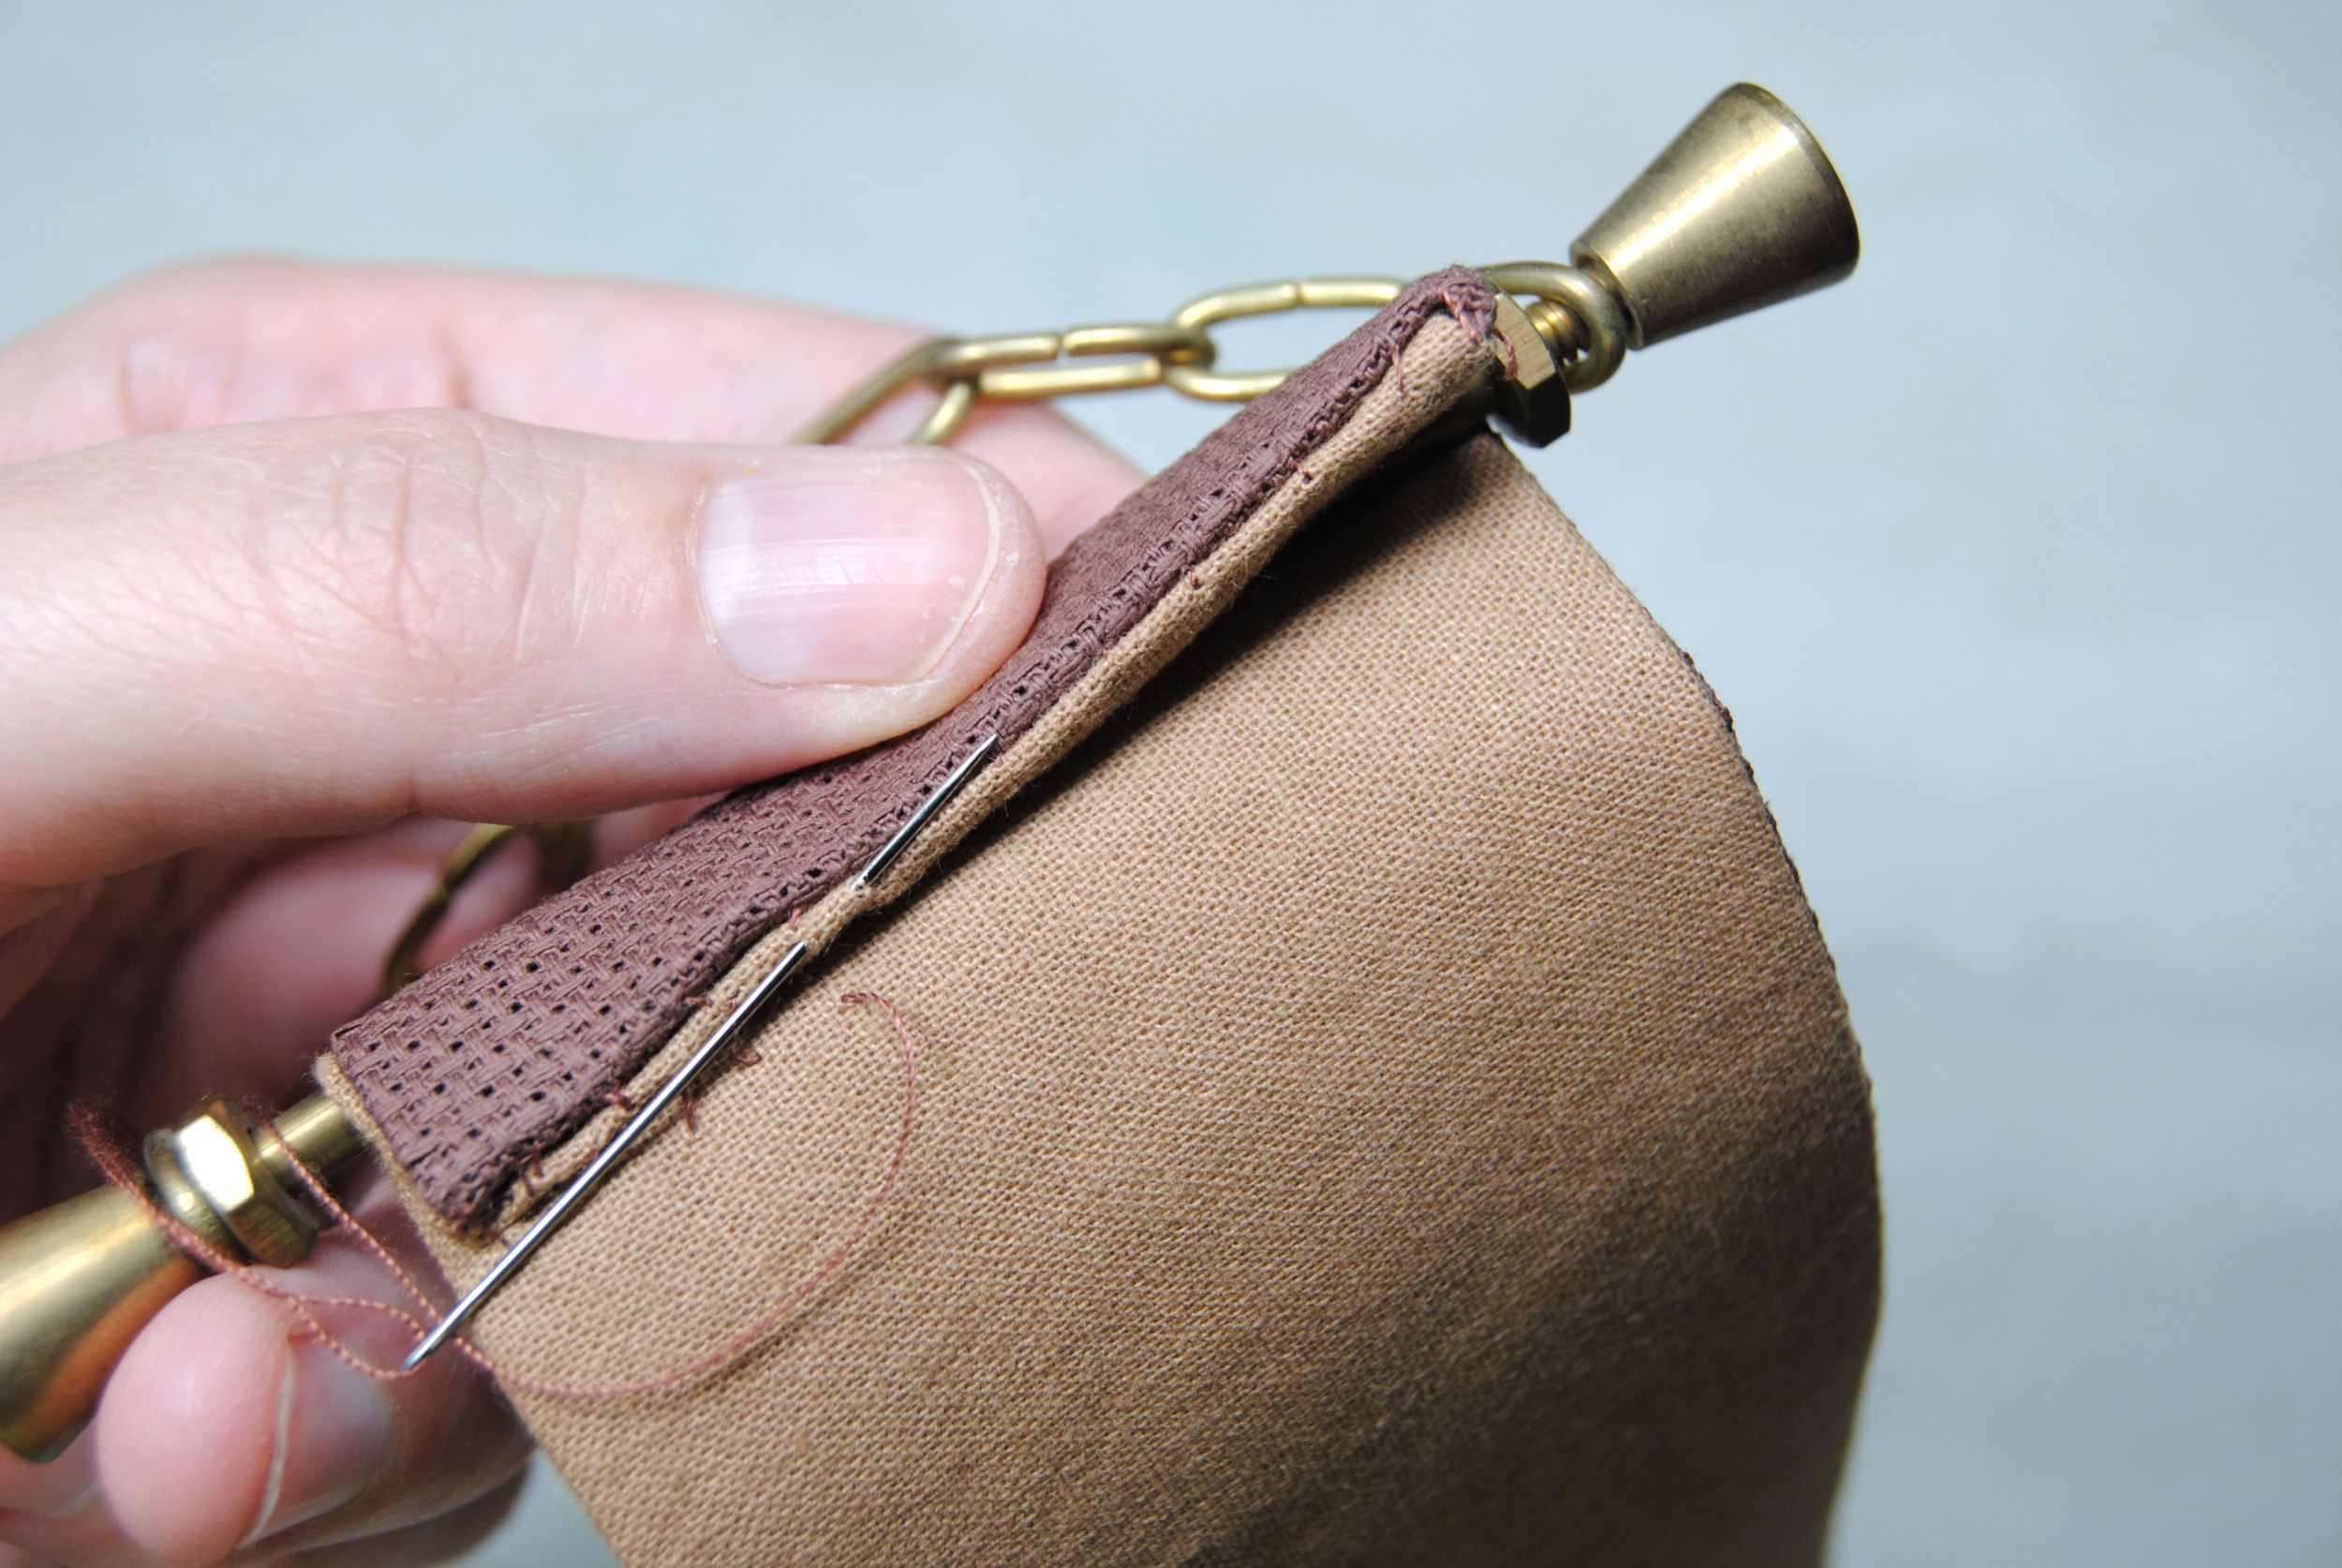
And with this side nice and gently tacked down, it’s time to do the same on the other side.
Optional Flourish
I really liked the plain ‘scroll’ feel of this hardware. However, depending on your project you might also consider doing some extra detailing. I was going to include this in the materials sectional, but it’s so project dependent I wanted you to get a feel for the assembly process first. Regardless, here’s just a few ideas to get you thinking about options for flourish.
Some bell pull hardware has an extra loop at the bottom you could use to attach charms, tassels, or a bell. For example, this one from woolpleasure:
Before I found the scroll-like hardware I used, the plan was to use a wire hanger and attach a lotus flower at the bottom. As that both ties into the Egyptian theme and resembles a bell.
If you’re just doing a wall scroll that only has a hanger for the top, you may want to decorate the bottom in other ways. Like these examples by HomespunElegance which shapes the bottom into a point and uses a tassel or charm at the bottom.

Or you could do a bit of lace or fringe trim at the bottom perhaps? Some pom pom or tassel trim for a boho feel maybe? It really depends on your design what will go well with it, but I urge you to get creative!
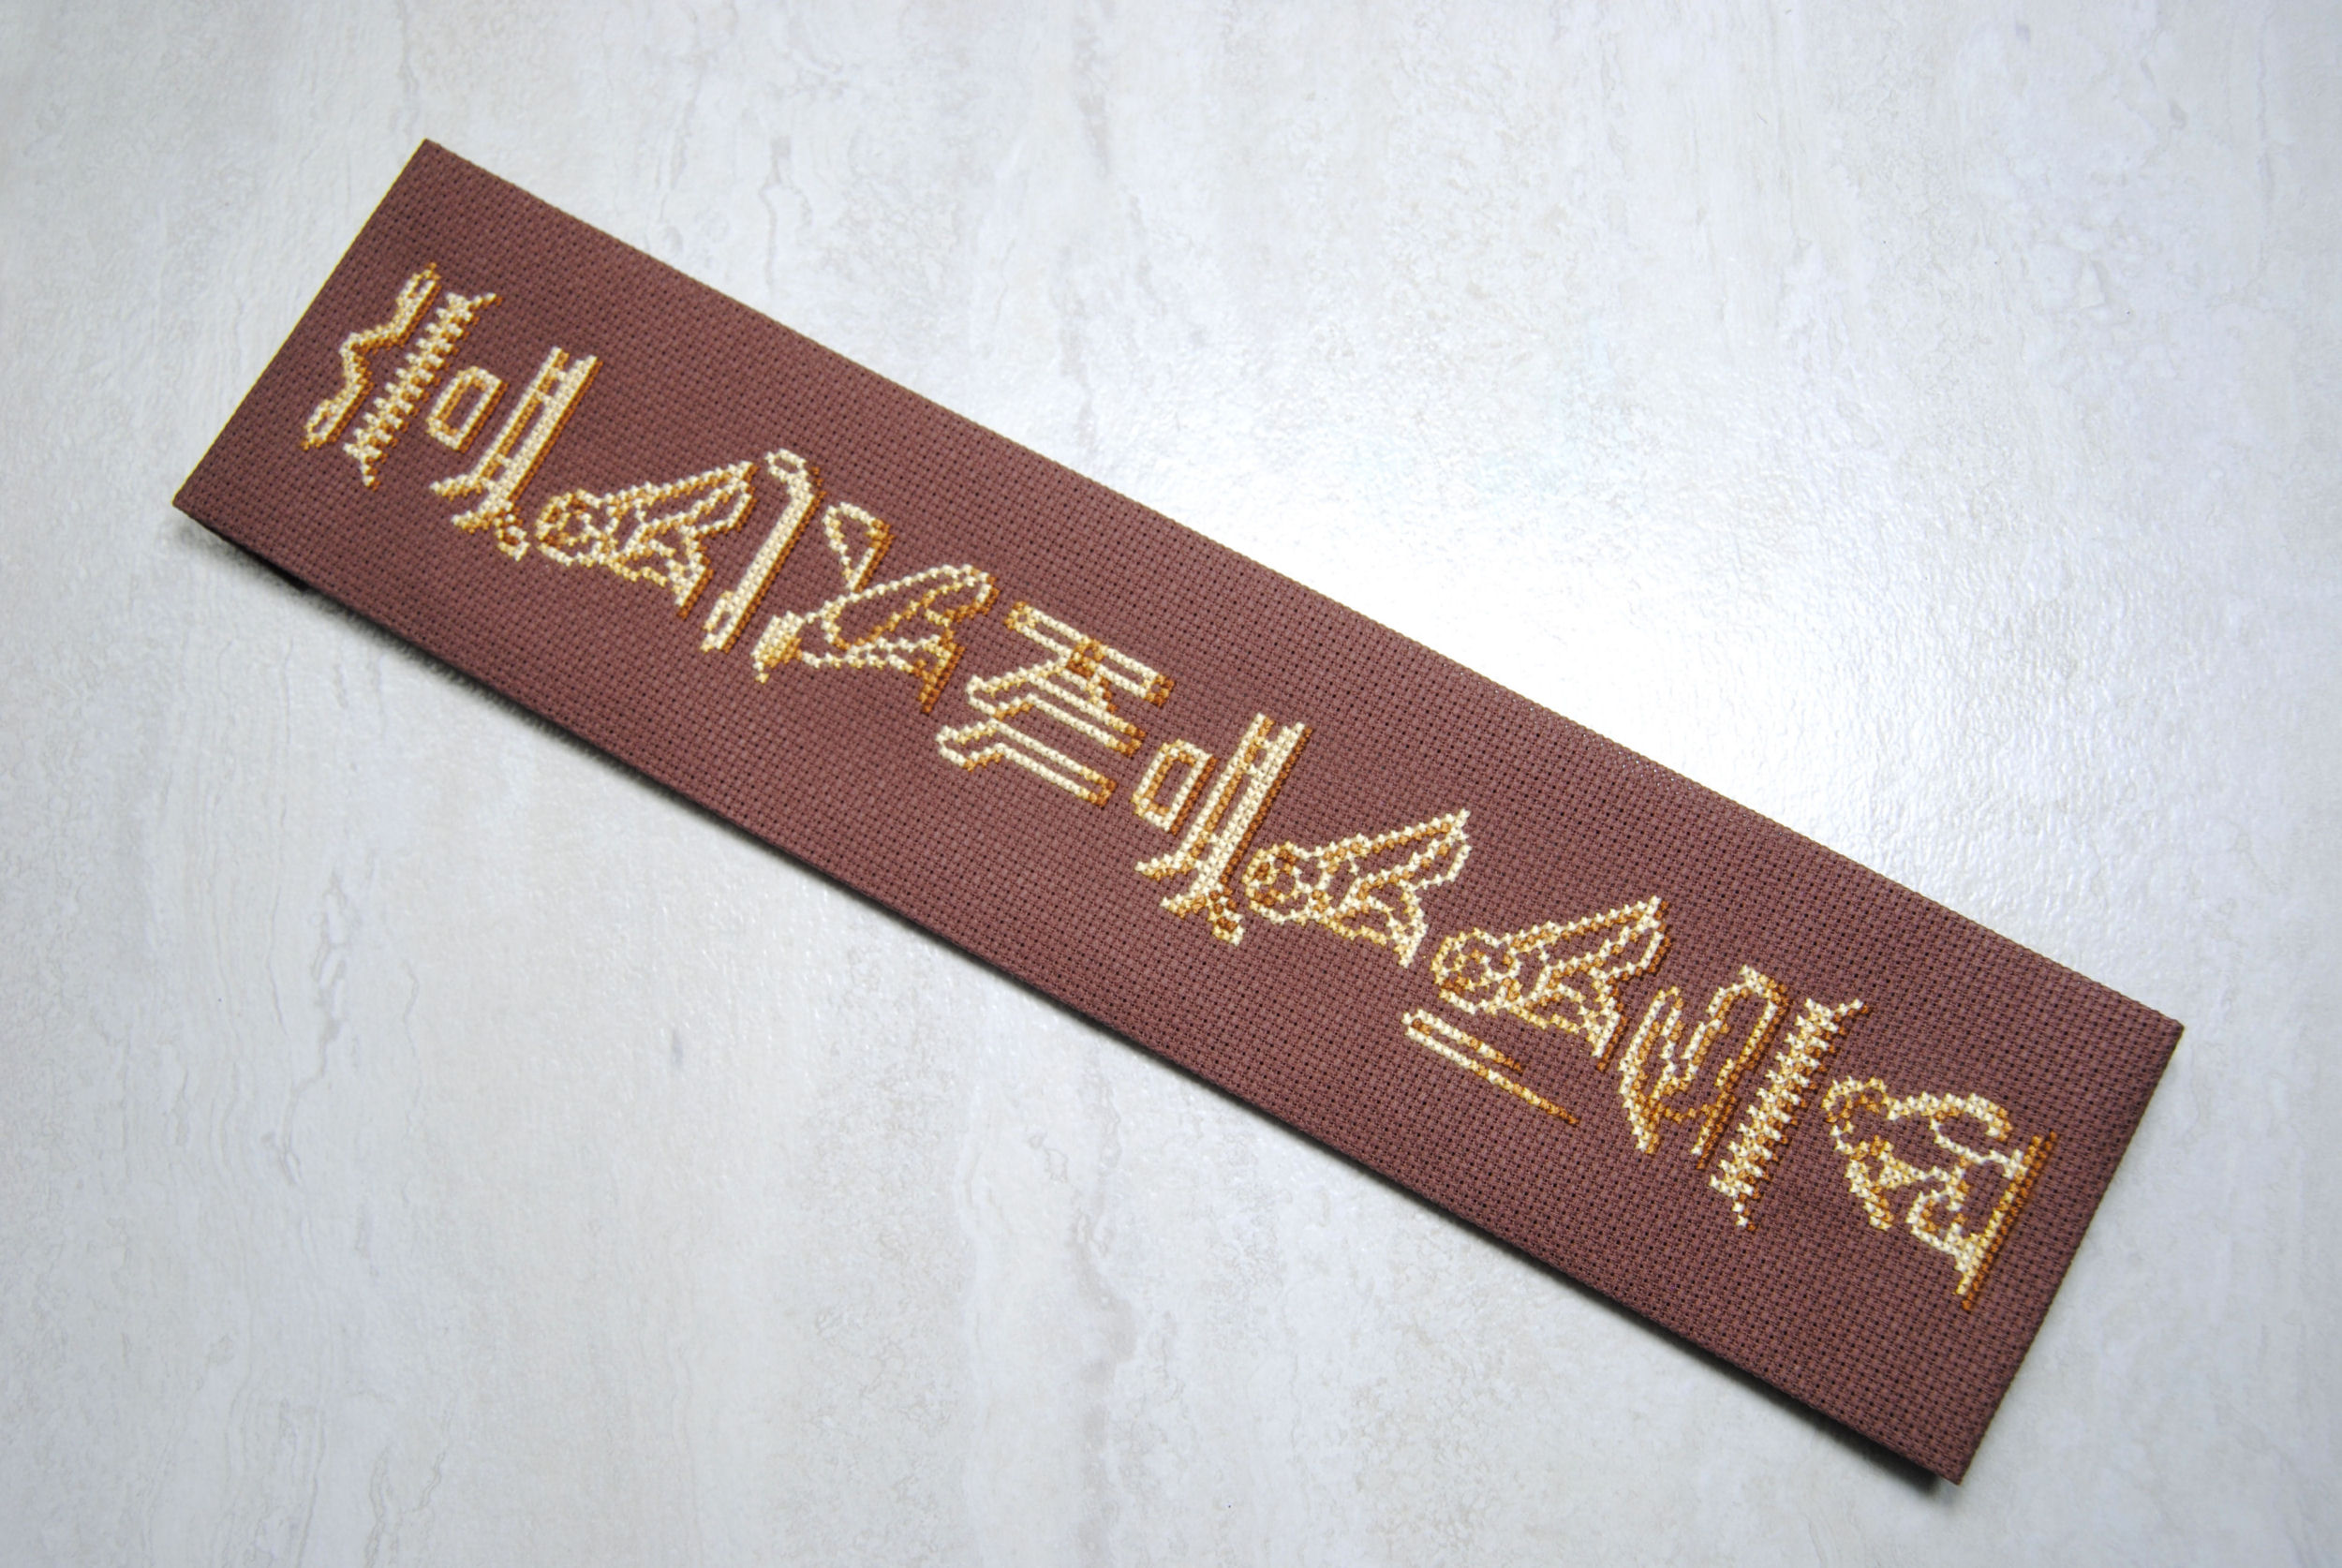
Finished Bell Pull
Overall, I’m pretty happy with how mine turned out. And I hope my swap partner is too!
It is, however, a pain to get good photos of as my photo station is not designed for larger pieces.