Hellooooo all. This is a bit of a different post than usual for me. I tend to focus on tutorials and cross stitch resources. But every time I post a photo that includes a part of my office I get questions. So I wanted a quick reference full post tour of my cross stitch studio. AKA my basement office. Especially since I just completely rearranged it after getting two pieces of furniture for Christmas. But I’ll touch on those later.
This post may contain affiliate links. If you buy something using one of these links, I earn a small commission. However, there is no extra cost to you. Thanks for understanding! Learn more in my Disclosures & Privacy Policy.
I’ll be including links to various things I get frequent questions about (such as what printer I use), as well as all the art on my walls because I love these artists and want you to know them too. Amazon links are affiliate links, but obviously these are items I genuinely use and have incorporated into my office. Feel free to ask if I didn’t tag something or you have specific questions about an item. I am merely guessing at what items you might be interested in.
Table of Contents
I’m not used to having so much space.
Note that until we moved into this home I had spent the last 15+ years living out of single bedrooms and small studio apartments where I tried to keep my belongings down to what I could fit in my car (+ basic furniture) for a single move. I am beyond thrilled to have an actual office turned cross stitch studio. If you are in a situation where you do not have the space to even live, let alone accumulate craft supplies, I definitely understand that feeling. I even waited a year or two after moving here to really feel secure enough to allow myself to spread out and make use of this space.
Do NOT compare my space to your own. We’re all just working with what we have in the moment. This is just meant to give you a peek into my current setup and to give you some ideas for whatever spaces you DO have.
Lighting
I apologize in advance for the inconsistency in lighting. This office is in my basement, and I do all my work at night. I generally have all the lights off except the fairy lights on the back wall, and tend to stitch by the light of my monitors. Product photos are usually taken with a bunch of led lights lighting up my workbench, which just isn’t possible for the full room. Regardless, here we go.
Finished Pieces Peg Board
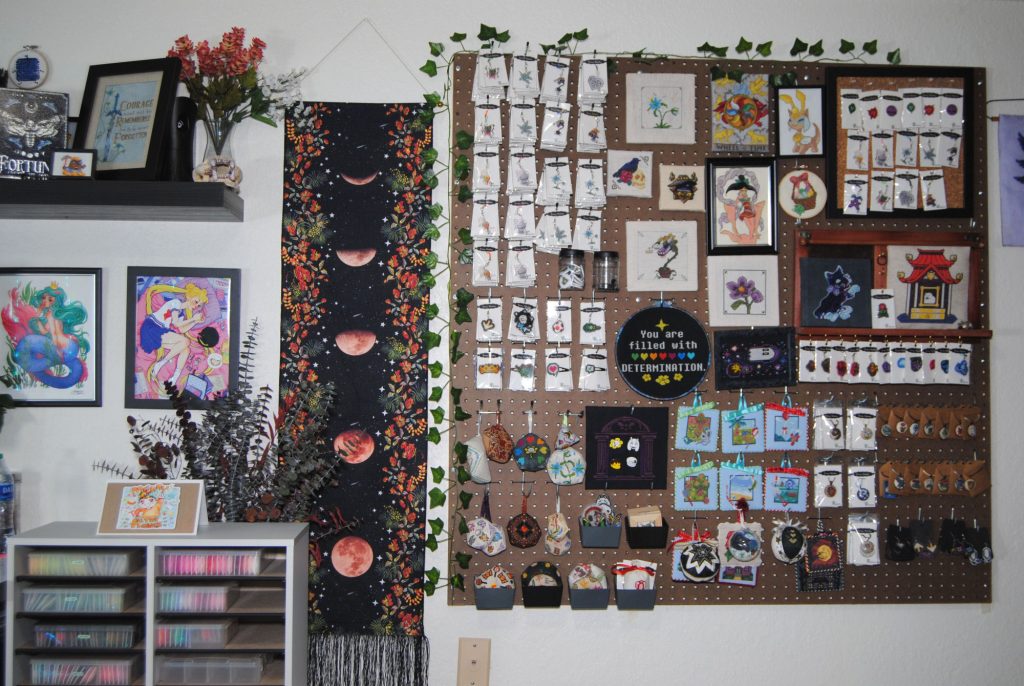
First thing on your right as you walk into the cross stitch studio is this pegboard. Previously I had it mostly covered in fake flowers. But as I’ve moved those flowers over to my photography station, it is now completely covered with just some of my finished pieces. From everything listed on my Etsy like needle minders and acrylic charms, to some of my favorite framed pieces.
That moon phase tapestry just happened to be the perfect size to fit between the pegboard and the shelf above my desk.
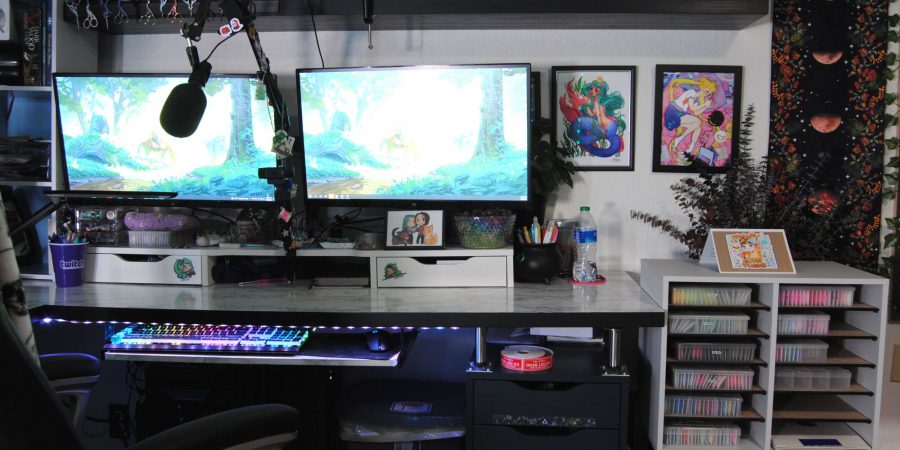
You’ll see I have my thread boxes in a literature organizer in the bottom left. It’s sitting on a side table that you’ll see in another photo. Behind it is a vase I bought at a thrift store that is just filled with dried eucalyptus. The card sitting on top of that organizer was Zinthings‘ christmas card this year
The Sailor Moon Holographic print, and Mermaid Queen print on this section of my wall are both by Jacqueline DeLeon. I also have her “Amethyst” print just to the left of the other two, but it’s mostly obscured by my monitor in the below photo.
Up on the shelf are some more fake flowers, a fake cat skull I got at a thrift store, the ‘Fortune’ sign was from Michael’s Halloween collection in (I think) 2020. And a few more of my favorite finishes.
The adorable Junimo Embroidery Hoop was by ‘craftyfoxkay‘ (but her Etsy seems to no longer exist…)
Computer Desk
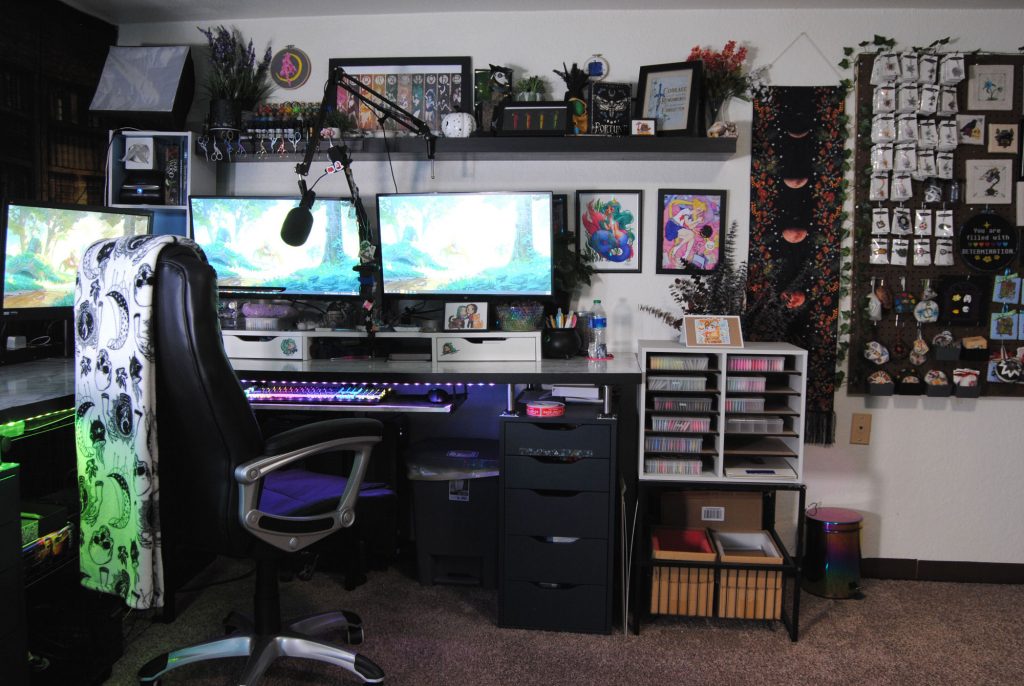
Moving further to the left you get the full view of my computer desk. That little end table my floss box organizer is on houses some of my shipping materials. Mainly envelopes and extra label rolls.
Most of the desk itself is Ikea. I actually still have the original spreadsheet and concept I put together before I moved into this house. You’ll note the orientation had to change to have the shelf/monitors on the right instead. That’s because the other wall is solid concrete and we couldn’t mount anything on there.
The two main monitors are ViewSonic 27″, which fairly often drop to like $150. So be sure to wait for a sale if you’re interested. Right below the right hand monitor is a commissioned Zinthings print of me, my partner, and our two dogs.
The third monitor is one I borrowed from work when we went full WorkFromHome thanks to the panini, which I put on a mount so I can easily swing it out of the way to access the bookshelf behind it. That shelf is mainly there to hold my DYMO label printer, but it also typically holds my current cross stitch projects and some random books and the like. Whatever I just need to get off my desk in the moment.
In the middle of my main monitors is a boom arm holding both my webcams. The bottom one is literally just zip tied to the arm, lol. The rest of the arm is simply covered in needleminders and charms.
I have another boom arm for my AT2005USB microphone mounted from the shelf above so I can easily move it out of my way when not needed. An awfully fancy setup for what is just used for Teams meetings at work nowadays. But made more sense when I was still streaming on Twitch regularly.
My desk chair is this one, and it’s… not terrible I guess. But apparently unavailable at the time of writing this post.
Top Shelf

Up here we have a couple of fake plants from Ross or Target, as well as a starry pumpkin from Target.
There’s a little nail polish organizer of bottles full of color sorted threads from my “What to do with your ORTS” article.
All my embroidery scissors are up there on a magnetic strip. (Thanks to Jess (CraftingGeek) for the tip!)
For art we have: the Sailor Moon Embroidery Pop Hoop by AwkwardSquared, a large Sailor Moon Senshi Poster by AshleyRiot, and the Holographic Senshi Pens are by MadebyAeo.
And randomly the jack in the box from the Assassin’s Creed collectors edition.
Photography Workbench
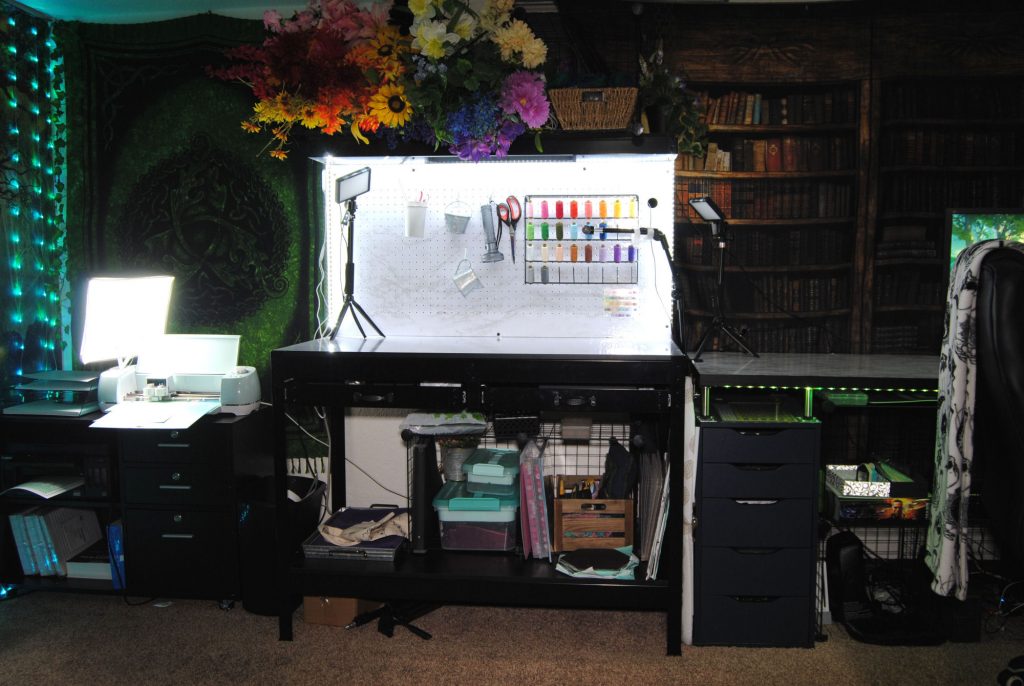
Above the left side of my desk is this Book tapestry that is precariously push pinned into the top layer of that concrete wall I talked about.
To the left of my L-shaped desk is this Olympia workbench my partner got me for Christmas 2022. Whilst I love it now that it’s assembled, I will tell you that the assembly process was the single most convoluted piece of flatpack assembly I have EVER had to assemble. It’s just… horrible. I also recommend the Nut & Bolt version vs the ‘easy assemble’ this was.
Anyway, this whole workbench is dedicated to photography. Something much needed in this cross stitch studio due to my work schedule (overnight) and being in a basement. So I coated it in the same marble contact paper that’s on my desk to help it reflect light onto whatever I’m taking photos of. I also added additional strip of LED lights along the edges of the pegboard. Because seriously, the light in this room is terrible.
I don’t have much on the pegboard yet. Mostly just quick access to my fabric scissors, blacklight, and random props. The thread is mainly there for the pretty rainbow. Though it is nearby when I bring my machine over to the desk to use, so that’s nice. You can also see my ironing board tucked between the workbench and my desk.
There’s a boom arm from the right that normally holds my DSLR camera over the workbench for easy top down photo angles. But as I’m taking this photo with it, it is not IN the photo. You’ll also see two LED lights on tripods to help light up whatever I’m taking photos of.
Under both my desk and the workbench are some grid storage shelves. Under my desk is one of my XBox360’s, and my PS3. Wired up to one of my main monitors on an HDMI switch.
But beneath my photo workbench are some large tiles I got at Home Depot that can be used as photo backdrops, as well as a crate full of cross stitch finishes, an accordion folder also full of stitches that are done but not ‘finished’. And there’s also plenty of other random photo props and backdrops. My extra camera tripods are underneath that shelf.
Above this workbench are some more of those grid storage shelves, this time with the grid facing forward so I can stick in the fake flowers in through the grid. These were all amassed from the Dollar store over the years. There’s also one open cube so I can fit in a basket full of yarn and reach behind the flowers to hide my iron when not in use.
The tapestry on the left side of the workbench is from a renfaire and I haven’t had any luck finding this design online.
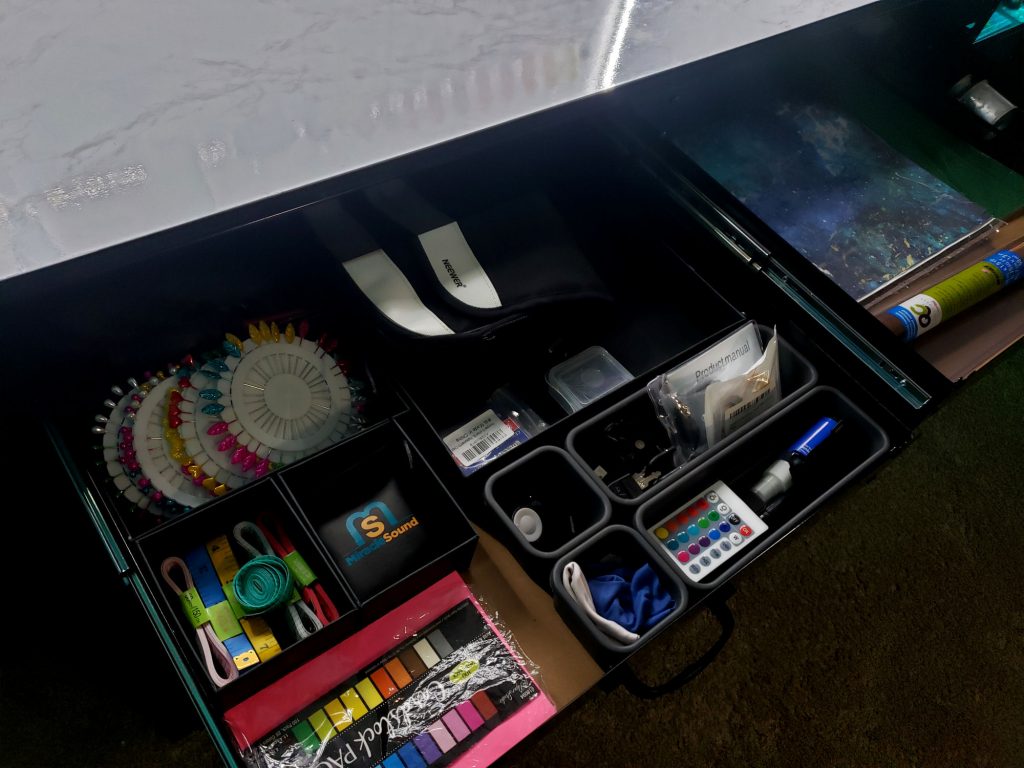
The drawers naturally also contain photo props and paper backgrounds. As well as camera accessories like lens cleaners and shutter remote.
Printer Table
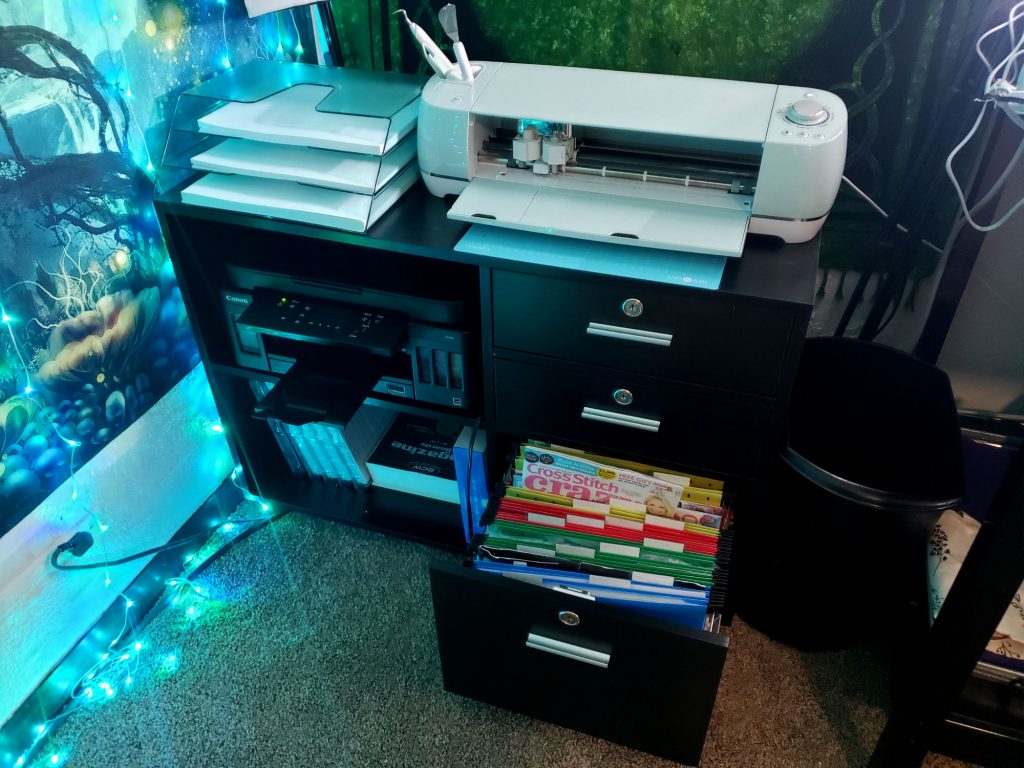
My printer table is basically a Cricut workbench at this point. It feels like I’m constantly printing DMC stickers. The table was also a Christmas gift this year. As you saw in the previous picture, I also have an old photography light over it, as the Cricut struggles to stay aligned sometimes if it’s not well lit.
It fits my printer pretty perfectly in the top open shelf. I CAN still access the scanner pretty easily, though I don’t use it much anyway. The back paper loader of course can’t be used, but as I don’t use it at all I’m not too concerned.
I used a file organizer on top to hold plain paper, sticker paper, and cardstock for easy access. But also the bottom shelf is used to store extra paper.
As you can see, the filing cabinet now houses my cross stitch magazines, kits, and printed patterns. I’ve already written an article on my cross stitch file cabinet organization method, so I won’t go into that here. It’s just in a different cabinet now.
The other two drawers have things like extra ink bottles and more cricut mats/accessories.
Art Wall
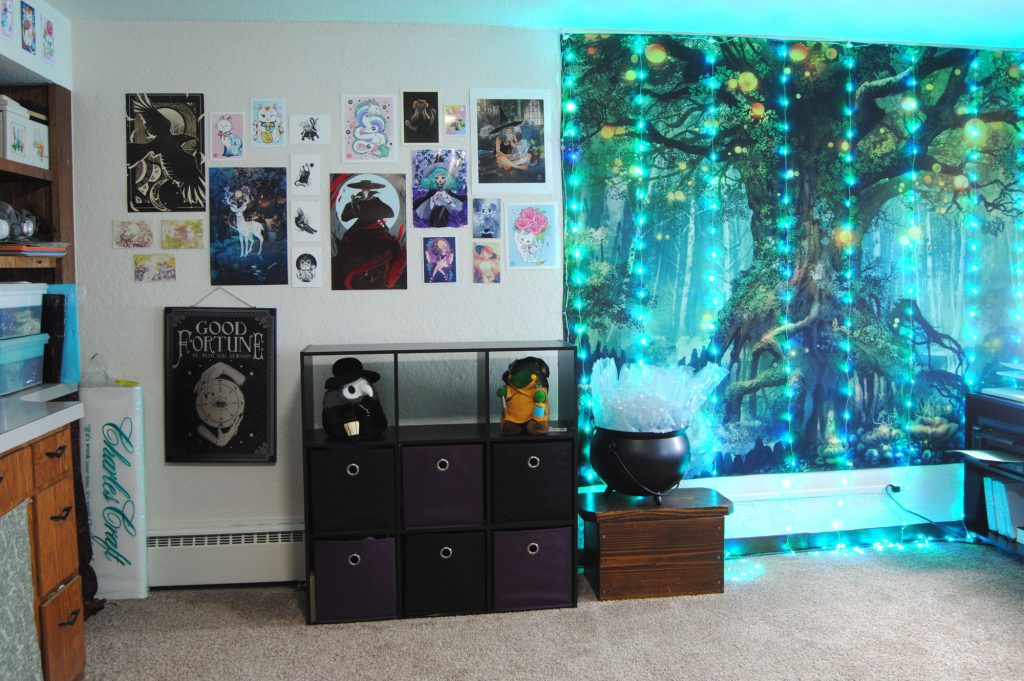
The whole wall back wall is mainly used for art. As this wall is ALSO concrete, I once again have a tapestry hung up with pushpins that don’t even go fully into the wall but somehow manage to hold up both it and this curtain of lights that I can change colors by remote control. Though it’s almost always in green mode.
The cube shelf is from target and USED to be where my workbench is now. So I haven’t technically decided what to do with it. But it has things like extra trash can bags, and all the extra hardware from every ikea or flatpack furniture I’ve ever assembled. One cube is dedicated just to that random jumble of cables that somehow accumulates over time. From monitor cables, power cables, and ribbon cables, to usb chargers of every length and type imaginable.
The Plague Doctor plushie is from Squishable. I’m not sure where the Tonberry is from, as he was a gift many years ago. You can’t see it well in this photo, but he’s wearing a handmade leather headdress with ram horns that I got from ArtsMyths back in 2011 at a ren fair. I doubt that is where they imagined this piece would end up. But here we are.
Yes, that is a cauldron full of bubble wrap. I think I got it at target as well. (The cauldron, not the bubble wrap) And yes, that is a whole bolt of Charles Craft 14 ct aida that I haven’t even opened.
Art Prints
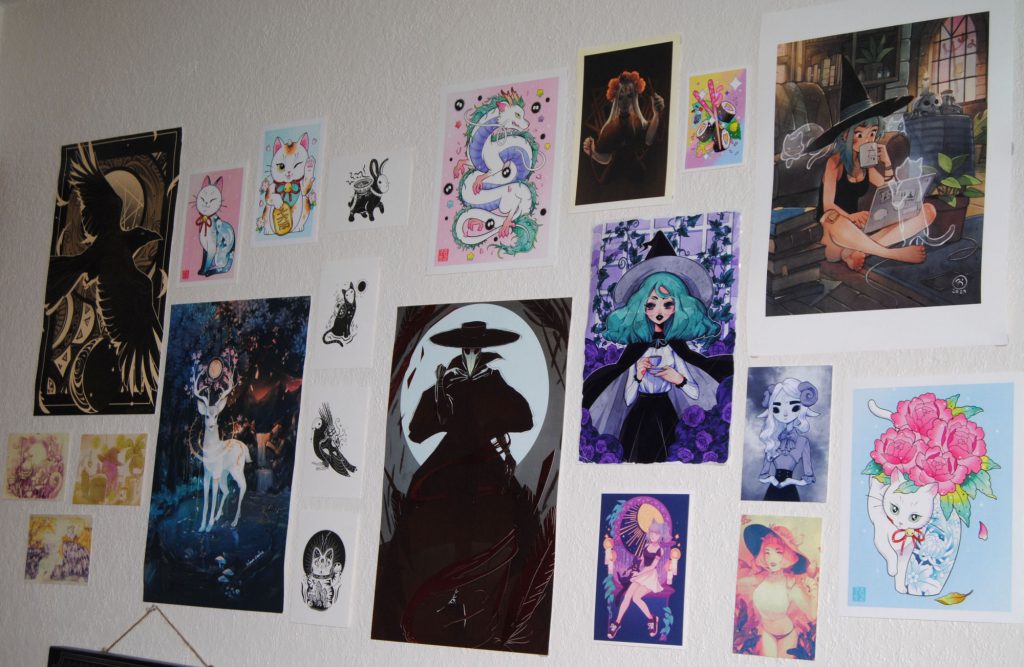
My favorite part of my room. The slowly growing art wall! Mostly held up with putty. Because again, concrete. Listing these off roughly left to right.
- Raven and Deer God by InkJunkArt
- Alchemy bird post cards by Zinthings
- Various prints from Michelle Coffee’s Happy Mail patreon tier (The colorful cats, sushi, and the dragon)
- Spirits Postcards and Moon Maru postcard by SaskiaJuliette
- Plague Doctor by ItsRainingColor
- Woven by viiolaceus
- Tea Witch and Sheep Girl by FanniMezes
- Cat Girl and girl-with-hat by miyaulait
- Coffee Witch by SimzArt
The “good fortune” sign just below these prints was from Michael’s Halloween collection one year
Storage Wall
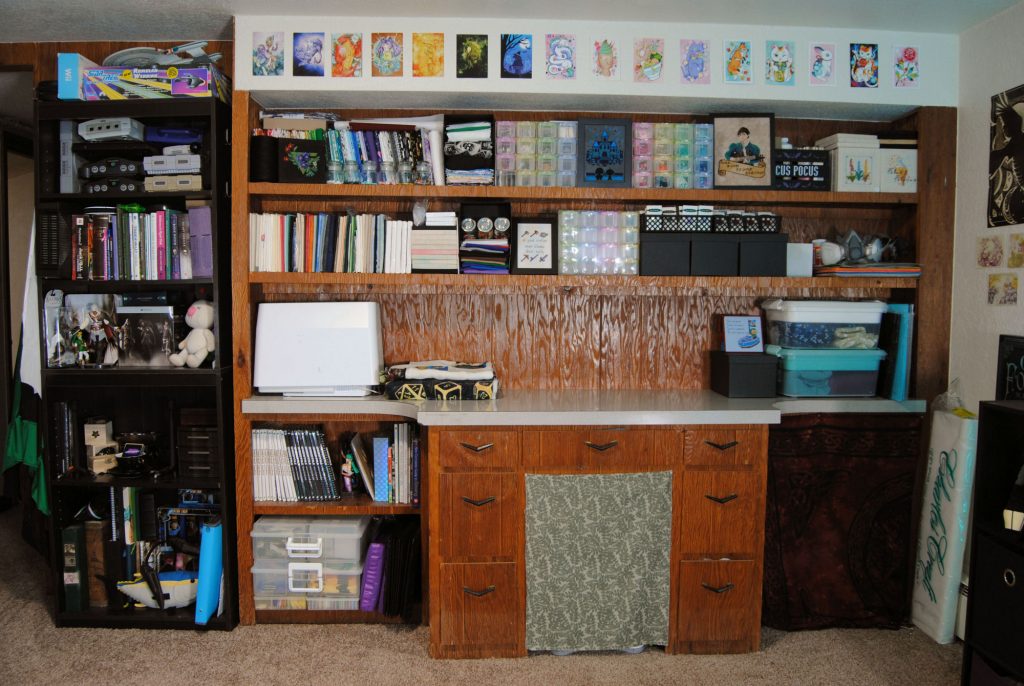
Finally, the last wall off my office. It has this lovely built in desk from the 50s that I mainly use for storage. It used to be a bit fuller, but moving some of the photography stuff over to the workbench and putting more finished pieces up on the entry pegboard has really cleared it up a bit. Time to restock, right? haaa.
Anyway, all the art along the top wall is by either Zinthings (6 on the left) or MichelleCoffee (9 on the right) as I was getting monthly postcards from both of them for quite some time. I still have more of their art in my filing cabinet I need to find homes for, lol. The only exception is the blue crow print by Nikury that came as part of her enamel pin kickstarter. (7th from the left)
All my fat quarters and cross stitch fabrics are up on the upper left shelves. A more detailed look into how I organize them is in an fabric organization article of mine. Though I’ve definitely expanded my collection a bit since then. Those rainbow cubes shelves were from Ross of all places, and they house things like cellphone straps and keyrings and other small bits and bobs.
The top right corner is entirely finished pieces made on those pre-stretched canvas squares I love so much. And you’ll see other finished pieces scattered throughout.
Some bins of fabric, some boxes full of zippers and organza bags and other such bits and bobs. Next to my sewing machine is a Rainbow dice blanket by MaratusFunk, as well as my cross stitch afghan project I haven’t worked on in years.
Drawers mostly have packaging materials like bubble mailers, or crafting materials that aren’t ‘pretty’ enough like bags of polyfil. Same with the curtained areas in the middle and to the right. Mostly boxes and bubble wrap, to be honest.
The bottom left shelf holds my cross stitch books. As well as my cross stitch books. Also the photo box storage bins I use for all my ‘back up’ skeins of thread.
The ikea billy bookshelf to the left is mostly knicknacks and old game consoles, as well as random books and a bright blue accordion folder full of tax paperwork and receipts. Fun.
And randomly a stuffed tuna. Don’t judge me.
Anyway, I hope you find this somewhat interesting and that it has inspired some ideas for your own craft room, office, bedroom, whatever. 🙂
