
Perforated Paper for Cross Stitch – How To Get Started
Perforated paper isn’t talked about enough! A while ago I did a deep dive on plastic canvas and all the different things you can do with it for cross stitch. And it’s about time I did something similar for perforated paper. I don’t have nearly as much experience with it as I did with plastic canvas, but I’ve spent some time this month researching it and now it’s time to share my findings with you!
If you’ve got any additional advice or fun facts of your own, please let me know.
This post may contain affiliate links. If you buy something using one of these links, I earn a small commission. However, there is no extra cost to you. Thanks for understanding! Learn more in my Disclosures & Privacy Policy.
Table of Contents
What is Perforated Paper?
While the name ‘perforated paper’ pretty much sums it up, let’s go into a bit more detail. In the context of cross stitch it’s thin cardstock with holes punch into it to make it easy for you to embroidery onto. This material typically sold in sheets, and most commonly in 14 count, or 14 holes per inch. Though I’ve seen 10count fairly often as well.
According to wikipedia, it first became available in 1820 for creating bookmarks. Neat!
Pros and Cons of Perforated Paper
When it comes to any material, there’s always some benefits and a few downsides. It just depends what you’re looking for in the specific project you’re trying to do!
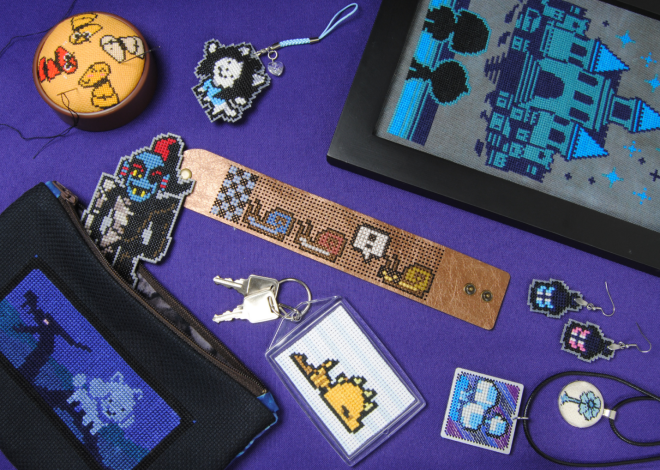
Perforated paper seems to be most often used for ornaments, bookmarks, greeting cards, and gift tags.
Pros
- Holes are easy to see, good for beginners
- Doesn’t fray
- More rigid than fabric, which is good for certain finishes.
- Comes in lots of colors
- Can make your own pretty inexpensively
Cons
- Not as sturdy as plastic or fabric
- Can’t use a hoop or Q-snap as it will bend
- Must be vigilant of tension or it can tear
- Can’t be washed, so make sure your hands are clean.
- Trickier to store as it can be bent and damaged
Where to Buy Perforated Paper
Perforated Paper Kits
A lot of people’s first foray into perforated paper is through kits! The most popular being the Mill Hill beaded kits that offer some gorgeous ornament sized designs and come with perforated paper!
Satsuma Street ornaments are also a great starting point and absolutely beautifully designed.
Take a look around and see what other options are out there!

Stitchable Paper Shapes
Want to design your own patterns instead? How about precut paper shapes that make finishing easy by only having a specific area be stitchable. Similar to working with wooden blanks, there’s a ton of unique shapes and designs out there!
For example, the cute pinked shapes by Waffle Flower Store. Or some gift tags by KoomasKreations.
I got these bookmarks and cards on clearance at the craft store that shall not be named (HobLob) several years ago. But I haven’t been able to find the ‘Cross Stitch Style’ brand anywhere else. So do with that information what you will.

Perforated Paper Sheets
None of the kits you’ve found strike your fancy? Premade shapes too limiting? You can stitch any pattern you want onto perforated paper as it’s available in large sheets just like plastic canvas.
You can find it in fair amount of cross stitch specialty shops in a variety of colors. Check with your local needlework shop if possible!
If you need to order online, 123stitch.com has a decent selection and does ship to a lot of countries.
Mill Hill brand paper seems to be the most popular, and can be ordered directly from Wichelt.

Making Your Own Perforated Paper
Can’t find it locally and don’t want to pay for shipping? Already have cardstock on hand and just wanna make your own? I’m gonna go over how to do it by hand because that’s free, but I’ll mention a couple of machine options at the end.
If you prefer something a bit more hands on, there’s a few options for you to make your own.
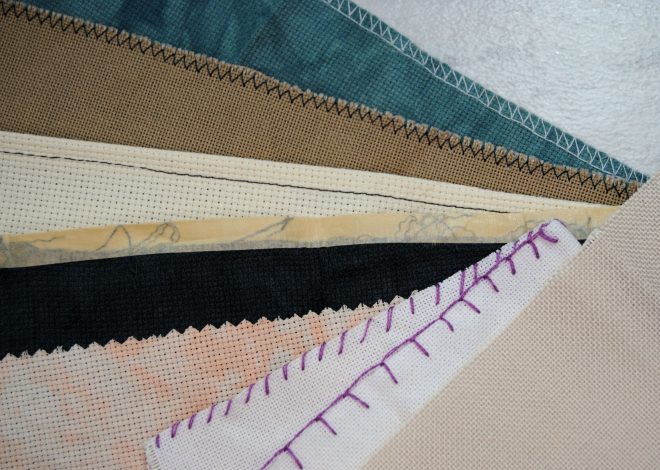
Materials
- Some nice thick cardstock in the color and size of your choosing. The thicker the better, as commercial perforated paper is quite sturdy. But you still need to be able to easily pierce it.
- A cutting mat or something thick you don’t mind getting stabbed a bunch. Perhaps a thick layer of cardboard box from your latest delivery.
- An awl or other stabbing object. A needle might be a bit thin and also hard to hold, so go for something a bit thicker. Mine is actually a seam ripper from RockyMtnPens on Etsy that came with an awl attachment, so I can switch out the tips as needed. Very handy!
- Plastic canvas in your preferred count, graph paper, or a printed out copy of the pattern you’re planning to stitch.

Printed Pattern Perforating
My favorite method is with a printed copy of the pattern, because you have a bit more freedom. First you can print out your pattern at whatever size you need and don’t have to be restricted to the usual counts of fabric. Want a pattern to take up exactly 5″? Would that math out to being 12.5 count? That’s okay! You’re making your own, after all.
But the best part is that it can be a bit more precise and only get the holes you need for the pattern with the rest of the paper being intact. It makes for a nice clean look. And you can use this technique on anything you want to stitch. Anything you’re willing to punch holes in, that is. Even a foam pumpkin, like Jess of CraftingGeek does most years.
Secure Your Pattern
Start by clipping or otherwise securing your pattern or graph paper to the cardstock you want to cross stitch on. You want it secure enough to not slip around while you’re working. I use quilting clips, but they do leave little bumps on the paper sometimes. You could also tape yours down, but carefully peeling up tape trying not to rip the paper is my definition of anxiety.
You’ll note I also folded my pattern paper over the cardstock a little, that also helps it from slipping around. If you’re curious, I’m using this free fairy pattern from the game Kynseed. You can find it on my Ko-fi!

Then take your stabbing device and.. uhh, stab it. More precisely, stab very carefully on the intersecting lines of your grid. If following a pattern, you can do only the ones actually touching a stitch.
For this reason, I find color patterns easier to follow, as I just stab around any box with color in it. Black and white patterns tend to blur together a bit for me and I end up with an extra hole here or there. But do whatever works best for you!

Check Your Work As You Go
Every once in a while, flip your piece over and check that you’re fully piercing through the paper and that you haven’t missed any sections you thought you already went over.
They will look a little ‘puffy’ on the wrong side, that’s normal. You’re not removing any material, you’re just pushing it out of the way to make your hole.

Put on an audiobook or podcast and keep on stabbing. Try not to rush it, as that’s usually when you start to get sloppy and some holes end up not quite aligned with the grid. It doesn’t actually matter in the end once it’s all stitched up, but you’ll still get that awful feeling of feeling like you ‘messed up’.

In the end you’ll have something like this in the shape of your pattern.

You’ll notice my holes aren’t perfectly straight. Especially looking at the little stitches off by themselves. But once it’s all stitched up it looks great! So take your time and don’t rush. But also don’t be too hard on yourself if they’re not perfect. It’s not as noticeable once it’s all stitched up.

Plastic Canvas Grid
Another technique I’ve seen around is very similar, but requires you to have some plastic canvas on hand. You’re doing the same thing of securing the canvas to your paper and stabbing through it until you’re sick of stabbing and your hand kinda hurts.
But! It does make for a bit more even perforations as the plastic of the canvas forces your awl to remain aligned. Especially if you stab from straight above rather than at an angle.
It’s still of course possible to be off center, but it’s not as noticeable when you do.


Die Cuts
Happen to have a die cut machine? You can get dies designed for cross stitching!

Waffle Flower has a few good options for fun shapes, but you can also get full plates such as these A2 ones by Ellen Hutson.
Laser Cutter
If you happen to have a laser cutter, that’s an option as well. I do not and my attempts at using a Circut have not been precise enough for even 10 count perforated paper, so I don’t quite recommend. But laser cutters are much more precise!
Advice for Stitching on Perforated Paper
So you’ve got your paper ready and you’ve picked a pattern. What do you actually need to know about cross stitching on perforated paper?
Which Side To Stitch On?
Not all perforated paper has sides, but some do. In most, the smooth side is the ‘front’. Sometimes the ‘shiny’ side. If you made your own, it’s the ‘clean’ side where you pushed all the paper away from.
Stitching In Hand Or A Magnetic Frame
Unfortunately you can’t use your favorite hoop or Q-snap for this. Well, you can. By making sure the frame is larger than the paper you’re working on and stitching some extra fabric to the paper and then using the frame on that extra fabric.
But sometimes it’s just easier to stitch in hand. Unless you have hand pain and specific needs, in which case it might be worth it to you to go through all that work!
As another option, I have been told many times about these magnetic frames for working with perforated paper and plastic canvas, but I haven’t yet used them! They come highly recommended though, so if hand cramps are a concern for you, definitely give it a go.
Watch Your Tension
Unlike plastic canvas, you don’t want to roll this up or bend it. It is paper, after all. Those creases are not gonna come out. But similarly, you want to watch your tension. If you pull too hard you can tear through the paper.
How hard you can go really depends on the type of paper. Some brands (like Mill Hill) are pretty sturdy and you can tug quite a bit. With thinner paper, you might need to be extra careful.
This also means take it slow.
Use A Thin Enough Needle
How thin you need depends on how big the holes are in your paper. You need it to be thin enough to easily slide through the holes carrying two threads even after you’ve already stitched the surrounding stitches. It can get quite tight. Thinner is better, especially if you’ve made your own perforated paper.
But also preferably a dull needle, as we’ll discuss next.
Do Not Pierce The Paper For Quarter Stitches
I recommend using a blunt needle so you’re not piercing it on accident. But if your pattern happens to contain three-quarter stitches, don’t try and pierce the paper to get that quarter stitch in. While you can do that on fabric, it will likely just end up tearing your paper. Instead, loop that quarter stitch around the long leg of your stitch. You’ll want your tension a bit loose for this, but it’ll basically ‘hang’ on the long leg.

Otherwise than those few things, it’s very similar to stitching on plastic canvas or very stiff fabric. And you can even attach beads!
Repairing Tears
Okay, but what happens if you do tear through stitch. Not gonna lie, I struggled to actually force this Bucilla paper to tear. You can see the bend in the upper right from me gripping the paper too tight for leverage while pulling. But I did manage to tear a bit so I can show you how to fix it.
Method 1: Extra Paper

First, I cut a small piece from my spare paper. I could’ve cut it from the corner of the piece I was working on, but didn’t want to make it any smaller and harder to hold. But this is why you save your scraps when trimming your ornament down at the end. They’re great for repairs!
It doesn’t have to be quite this big, but I needed to be able to photograph it and my camera was already struggling with focus.

Slap that extra piece on the back over where the tear was, then stitch through both layers as normal.

It will add a bit of thickness to that area, but it won’t be visible from the front. Depending on how you’re planning to finish it, you won’t be able to tell in the end.
But if you need your finish to be more flat, there’s one other option.
Method 2: Tape
I once again struggled to rip out a stitch to demonstrate. The things I do for y’all. I managed to get the middle of a stitch this time, nice.

For the second method we’re using plain ol’ tape. I had this matte scotch tape on hand, but really any tape should work. It just needs to hold that one stitch up after all.

You might even need to cut that tape down to half to keep it small enough to not cover too large an area. But basically, slap it on the back and then stitch right over it.

With clear tape it’s pretty hard to see even from the back let alone photograph.

Just keep stitching and it’ll be hidden in plain sight and ready for you to fully finish. We’ll be talking about finishing options here in a moment, and most of those cover up the back anyway. So no one will ever know!

And you can’t really tell from the front!

Cutting Perforated Paper
It’s paper, so bring out your paper cutting scissors. You do not want to use nice fabric scissors for this, as it will dull your blade. But any old scissors will typically do.
The main thing is to make sure you’re cutting one hole out from your stitched area. You don’t want to get too close to your stitches.

Slowly work your way around cutting away what you don’t need. I prefer this more ‘pixelated’ jaggedy edge as I can just follow the holes. But you could actually cut around on a curve as long as you cut far enough away from the stitches that none of the holes with thread in them get cut.
If you’re not sure, draw that curve on the back so you can see where you’re cutting. An exacto/hobby knife on a cutting mat to get a nice curve if you find it hard to get in there with scissors.

And save those larger scraps! They can be used for repairs in the future. I put them in a little plastic baggy which I store clipped to the larger sheets.

Perforated Paper Finishing Suggestions
Backing With Felt
Now you’ve gotten your perforated paper piece stitched up, how do you finish it? I actually finish mine a lot like I do with the plastic canvas backing — Just running stitch a piece of felt to the back and stuff it lightly with polyfil or ORTs. Here’s the two I still have on hand as examples:
I like a little thickness to mine, so I do add stuffing. I find the stuffing helps them feel more sturdy and less likely to get bent on accident. But you could just leave them flat if you prefer!

If you don’t want to stuff it or even stitch your felt on, Jody of Satsuma Street swears by self-adhesive felt. I’ve had decent luck with this Caydo brand, while she uses Kunin brand.
Backing With Decorative Paper
Not a fan of felt? Vonna here recommends backing with decorative paper and adding a corded trim:
Prefer written tutorials? TheCopperFox has a nice simple step by step on backing with paper as well!

Design Ideas – 3D Shapes
I wish I had more time to explore 3D shapes with you all today, but I’ve already spent a ton of time on this article, so I’ll just leave you with some inspiration instead. Perhaps for a future article, eh?
3D Dioramas and Layering
Looking for more modern options of 3D Perforated Paper designs? How about these stunning diorama pieces from WorldCrossStitching?

Or this creative layering technique by beadeddesignsbyidele?

Folded paper cards are an option as well. Like this beautiful floral card by TheNutmegCompany

Vintage Perforated Paper Pattern Books
I could not find a place to purchase these books/kits other than used copies on Ebay. I won’t link to those, as they’re likely to sell and the link will break anyway. But I did want to show that perforated paper has been used for some amazing 3D shapes before.


I’ve no idea how they’re assembled, but it would definitely be something fun to experiment with! If you have any information about these books or ones like it, please feel free to reach out! 🙂
You Might Also Like:
Cross Stitch Handmade Gift Ideas
Fraying Fabric – Various Ways to Deal With It
