
Assisi Embroidery: Learn With Me! Plus Free Pattern
It’s time again to learn a new craft similar to my main craft, cross stitch! Last year (2024) in March I tried out Hardanger for the first time, and now I thought it’d be fun to try something new again. This time around I landed on Assisi Embroidery, something I only learned about while researching for the Choose Your Floss Adventure I started last year. I’ll be doing it again in June, feel free to join me! In the meantime, let’s dive into Assisi together.
Before we start, I must stress here that I do NOT know what I’m doing. This is not a tutorial. I am not a historian. I’m learning right along with you and will be linking to all the different sites I found discussing it. Be sure to check them out as well for more info!
Table of Contents
What is Assisi Embroidery?
Assisi embroidery, also known as voided work is an Italian embroidery style named after the town which revived this technique in modern day. It’s easily identifiable by the style in which you stitch the background of a design while leaving that inner motif blank. Holbein stitch is then used to outline and add details to the design.
Usually this is done in a single color such as red or blue, and then outlined in black. More modern designs added new colors such as green and gold, and even multicolored backgrounds.
A lot of traditional Assisi embroidery designs seem to incorporate flowers, animals, and heraldic or mythical beasts. Many historical designs have that wonderful medieval charm to it that remind me of the illustrated manuscript beasts.
Below pattern examples from Assisi Embroidery published in 1988

Below pillow examples from AnnesItaly.

Differences to Cross Stitch
While it may just look like standard cross stitch at first glance, there are a few differences to note here. Besides the obvious difference of stitching the background rather than the design, of course.
It’s usually done in just one or two colors on a contrasting fabric. Most historical examples being red or blue, with green being added a bit later.
Assisi embroidery is also typically done on fine linens, though we can make do with any evenweave fabric for modern designs.
Stitches Used for Assisi Embroidery
While some examples seem to exist of the plain cross stitch we’ve come to know and love, it seems this is actually rare in Assisi work. Instead, they are more commonly stitched in long-armed cross and italian cross stitches. These stitches are very similar to cross stitch, but with a few extra steps.
Rather than backstitch it also tends to use Holbein stitch, or double running stitch for the outlines.
I’ll go over how to do some of these stitches later when I start stitching, but something to keep in mind.
Learning Assisi Embroidery: Resources
Here’s a list of the sites and videos I referenced in making my own article and learning for myself!
I generally prefer written articles (hence how much work I’ve put into my website), but I did find some videos as well for those who learn better that way, though mostly just how to do the individual stiches. I didn’t find much videos on the embroidery style itself.
Written Articles
- AnnesItaly – Stitched Examples
- Wikipedia – Assisi Embroidery
- Rowdypopulace – Overview & Free Patterns
- Jedscape – Someone else trying it out for their first time
- Stickereywerck – Someone else experimenting
- Pieceworkmagazine – How to Italian Cross Stitch + Free pattern
- Needlework-tips-and-technique – Free Pattern + Long Arm Cross Stitch tutorial
- Needlepointers – Directory of free patterns
- embroidery and embroider – Patterns and instructions courtesy of the wayback machine. RIP 2019.
Videos
- DK Long-Armed Cross Stitch
- Mistress Briony’s Long-Armed Cross Stitch
- Creative Hand Embroidery: Italian Cross Stitch (No talking, just music)
- Left Handed Italian Cross Stitch (No audio)
- Lynne Fairchild: Holbein Stitch
- Crazy Cat Lady: Holbein Stitch
- Assisi Embroidery Academy (In italian, but cool to see some examples.)
Attempting To Design Assisi Embroidery
Alright, time to try and design something in this style that I can stitch as a test. If you’ve never done pixel art, it’s hard to express how difficult it can be to get detail out of small spaces and few colors. I’m still forever awed by old gameboy graphics, let alone how anyone made anything make sense in even older consoles like the Atari or the Magnavox Odyssey.
But there’s nothing like trying it yourself to really drive home why those examples above look so derpy sometimes. That’s just the limitations of the style.
Where to Start?
I knew I wanted something small, rather than a big repeating banner. I needed to get this stitched ‘in time’ to post this article to my Patrons early. And while I know they’d understand if I pushed it back, I do try to keep to a regular posting schedule. So I went for a more medallion type shape like the example given on the Wikipedia page. But an 18×18 circle was feeling a bit too cramped, so I sized it up a bit to 40×40.
Hopefully that would still small enough to not take forever to stitch. (that’s definitely foreshadowing…) Especially if I made the voided space relatively large. Like a dragon maybe? Nice open wings filling that space perhaps. Yeah, that sounds good.
Just Keep Refining
If there’s anything I’ve learned about art in general is that rough drafts are just that. Rough. They’re gonna look terrible and you just have to keep refining the shapes until they look like you want them to. I started by using the circle tool to create that 30×30 circle. Then in a new layer started doodling me a dragon.
I’m using Pyxel Edit to get the pixel art down first, then I’ll add the outlines and decorative bits later in PCStitch. But still. Designing in silhouette is difficult. And my dragon (or technically an amphiptere) was looking awfully bird like. And those wings… were just jagged.

A friend suggested I turn it’s head upwards. But I didn’t want to have to redo the first head if the new one turned out even worse, so it ended up with two for a bit. With the second one looking kind of… bird like. Or like a sock puppet with ears maybe. It definitely needed work.

Eventually I managed to push the head into a more dragon like snout shape, and something that looked more like horns than bunny ears. I then curved the body to line up with the new head and tried separating the tail a bit to help create more dimension. But those wings still need some help.

With the ‘tail’ in the way it’s hard to really give that wing enough room to stretch. And I was liking that tail shape so I didn’t want to mess with it too much. But I did end up shortening the tail a bit to make room for the wings.

Outlines and Decorative
Once I got all my shapes figured out in pixel silhouette, I imported the pixel art to PC Stitch and removed the black stitches entirely. With the backstitch tool I outlined all the shapes, added a bit of details to the wings and added some filigree on the outside taking some inspiration from some of the traditional Assisi embroidery designs. At some point I also decided it should be green instead of red.
And there you have it. I have a pattern. A design that hopefully brings forward some of that medieval charm while still being a bit more ‘modern’. If you’d like to give it a go, you’re welcome to use this pattern as well! Click on it to get a larger image version. Or if you prefer a PDF, click here.

Learning Long Arm Cross Stitch
So after reading about the different types of stitches used in Assisi embroidery I didn’t want to just do normal cross stitch, though that is a valid way to tackle this. Instead, let’s try out some of the other options.
First up, the long arm cross stitch which is very similar to standard cross stitch, but with a bit more coverage.
Here I’ll do some stitching over two squares so you can see it better. Basically reaching across each stitch to complete the last. With the beginning and end of a row being a normal cross.

Here’s a row of long arm cross stitch over two on 14 count so you can see the pattern it makes. And a row stitched over just one square so you can see how the coverage is when stitched at ‘normal’ size.
While it did take some concentration to not revert back to my usual habits, I can definitely see this being an easy stitch to pick up and use on regular cross stitch patterns if you wanted just a bit more coverage but didn’t want to have to go up to 3 strands of thread. I might have to try that in the future and see how it goes.

For the curious, here’s what the back looks like since I’m stitching across a row, then going back. Just a bunch of vertical lines, plus my starting knots and where I tucked my tail.

Learning Italian Cross Stitch
Now let’s try Italian Cross Stitch. Which is cross stitch, but with a box around it. Except you’re really only doing the bottom and left sides since when you put all the rows together and do all the holbein outlines they’ll be surrounded anyway.
Once again I did my sample across two squares so you can see it without a magnifying glass. For this stitch, the order is a bit more important since we want it to be reversible.

So to do an entire row you leave off that last leg and just do a row of the W shaped stitch.

And then you go back and cross them all like shown below. And then I did it again over 1, and wow.. even more coverage! You can barely see the vertical lines. This is good for those of you who prefer big puffy stitches and full ‘pixels’ rather than the traditional X shape. If that’s a look you prefer, maybe try out italian cross stitch for your next small pattern! That said, since you’re adding two stitches you’re doubling both the thread it uses and the amount of time it takes to stitch it. So keep that in mind.

However, it also has the added benefit of being reversible! Mostly. Obviously it depends on your start and how you anchor your tails. But it’s designed to look the same on both sides, which is pretty neat.

I think I’m gonna proceed with this stitch for my final piece so we can see what reversible stitch looks like on a finished design. My version probably won’t be as perfect as some of the historical examples, but it should be a fun challenge for myself.
Learning Holbein Stitch
Before I get to stitching though, let’s discuss holbein stitch. Also known as a double running stitch. It looks an awful lot like backstitch, but rather than looping back every stitch, you stitch an entire row and then stitch back.


And of course it just looks like a solid line on the back as well.

Finally Trying Assisi Embroidery
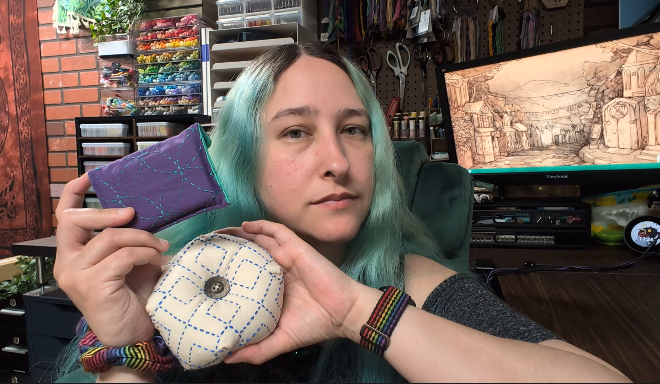
Alright, time to try this. I went through my thrifted thread stash and found a pretty green to use that I felt like I should have enough of based on how much thread used in normal cross stitch. That definitely won’t come back to bite me. Nope.
I started from the top of the circle and focused on just doing full unbroken rows to make sure the stitches look the same on the back. This meant going around just the left side of the design first.

Then going back and filling in some of the middle sections as their own rows. I had to be careful on diagonal stitches to make sure the back was still looking full and that I was not trailing threads across any of the middle white areas, since those are meant to remain white on both sides.
The hardest part was the single stitches of the eye and on the ‘leaves’. I really would’ve benefitted from trying to learn pin stitch for this. But pin stitch still scares me, so I just secured them as best I could and moved on.

If you hadn’t figured by my foreshadowing, I did in fact run out of that thread. Like, a dozen stitches from the end. Because of course.

And that last strand from that thrifted bobbin was a slightly different green. Which you can sort of see here. But oh well. At least it was one of my thrifted threads that actually had a number on it, so I was able to pull from my main stash to finish it off.

The back isn’t as tidy as I’d like, but a heck of a lot better than my ‘usual’ backs, so I’ll take it. It did however take over 8 hours due to the extra stitching time from the Italian cross stitch method. So uh, I definitely did not take that into account when planning this project. Whoops. Maybe I should’ve stuck to the smaller size.

Holbein Stitch in Action
With the green done, it’s time to outline all this.
The circle outline was pretty straightforward, but it got a bit tricky in the center. Here you see me going down the inner line of the wing first. I then double back up to the top and then continue down the outside. of the wing

I did the same thing when I got to the separated bit of tail. When I got to where the pieces touch, I did my dashed line around the lower section and then doubled back to where they met, then continued on.

Unfortunately, the flowers took a bit more concentration. So much so that I forgot to take photos during their stitching. But the same principles applied.

And below I’ll show you the back of my project. Again, my use of knots wasn’t helping matters here. Though I did at least try to anchor my threads by hiding it behind other backstitching that had already been secured. It’s not perfect, but I did managed to keep the center area pretty white, so I’ll call it a win.

I also notice some random white gaps in the green area that I didn’t see before backstitching. Namely on the right side and under the left wing. Not sure what happened there.
All in all, the outlining took me another 2 hours. So, 10 hours total. Plus design time I didn’t really track.
Final Thoughts
Making reversible stitches is harder than it looks. And I really need to get better at confetti stitches and maybe suck it up and learn pin stitch. I DID use the loop method for most of this, since I was working with just one color. But those single stitches were not helping things.
I learned just how slow it can feel when doubling the amount of stitching involved. I did not expect this to take 10 hours. And that’s not even counting the hours I spent designing it!
Overall though I’m pretty happy with how it turned out for a first try. Both the designing and the stitching of it. Will I be doing this again in the future? Idk, maybe! Maybe not in full Italian cross stitch, but I do enjoy the look of it, as derpy as my little dragon might be.
The question is, will YOU try it? If you do, I’d love to see what you make!
You Might Also Like:
Learning Sashiko as a Cross Stitcher
Design Challenge: Colors I’ve Never Used Before
